Get monthly coaching and support to FINALLY gain momentum in your business without burning out in the process. 🦄 Learn more about WAIM Unlimited.
In this article, we hope to help you learn how to grow your online business monthly revenue from $0 to $10,000++. We are NOT about overnight success or viral tactics, which is why we call this process: Grow It Gradually 🦋.
👋 PLEASE READ: Before you scroll to the $10,000++ section, the idea behind this article is NOT to leap from $0 per month to $10,000++ per month overnight. That’s simply not possible. But, what is possible is to make small revenue jumps over time with your business. Remember, taking the slower 🐌🐢 approach to biz is still a successful way to grow!
We’re going to share 3 tips in each revenue “level” of your business so that you can Grow It Gradually 🦋. The five “levels” we’ve identified and experienced are as follows:
We want to make it EXTREMELY CLEAR that regardless of how much money your business makes, you are welcome and celebrated just as you are! There are SO many more important, more interesting measures of success and growth beyond just money.
But alas, in our experience, money can buy FREEDOM and that’s really what we want for you.
We hope, in each section of this article, you walk away with actionable takeaways for whichever level you’re currently at or striving to get to (at the pace is right for YOU!) Now on to the show…
Welcome to our Grow It Gradually 🦋 article where we’ll walk you through how to jump up 5 different revenue levels in online business. And as a final reminder, making more money doesn’t make you better at business or more important than anyone else 🤗.
When we were just getting started with our businesses, one of the biggest issues was trying to figure out what type of business and revenue model to pursue.
Online courses sound great, but if you don’t have an audience, who are you selling them to? The unfortunate answer is: No one 😩😩😩.
Software (aka SaaS) is cool, but if you have zero developer skillz (yes, skillz), it’s going to be a looooooong time before you can start making money.
Service-based businesses come in many shapes and sizes: Graphic design, web design, web development, virtual assistance, copywriting, art therapy, personal styling, social media management, the list goes on and on.
Essentially, you are a person with a specific skill, getting paid for the hours you work for someone else’s business.
This is a GREAT business model to start with because you don’t have to have a big audience or a social media following; all you need is to have cultivated a specific skill that you can monetize. With just a few clients in the door, you’re likely making enough money for a healthy side business (rather than a products-based business which would take significantly more sales and effort to make the same amount of money.)
💡 For the rest of Grow It Gradually 🦋, we’re going to use a fictitious business example so you can put yourself in the shoes of a fledgling biz and watch it grow. Let’s call our business… Oodles of Poodles Web Design 🐩🎨. Here at Oodles of Poodles, we specialize in helping people launch elegant websites on Squarespace. We focus on designing and building websites for small business owners in the health and wellness space. (Are we health and wellness experts? No! But we know there are many new businesses popping up in that niche and we love a good skincare routine as much as the next person, so we’re going to target them.) Our mascot is Prism, a lovable Poodle who has yet to learn how to build websites, unfortunately, but we’re working on training her! 🐩
Great, the (fictitious) business is established and we know who we can help [health and wellness experts] and with what services [Squarespace website design] we can help them with. Now, let’s get into the three tips in this section for Oodles of Poodles 🐩🎨 to get their business foundation right and their first client(s) in the door.
You may have noticed in the short bio for our fictitious business, we offhandedly threw out there our web design company focuses on helping small business owners in the health and wellness space. THIS. IS. IMPORTANT.
One of the biggest mistakes we made early on that we see new business owners make as well is NOT specifically stating who your business is for.
It may seem limiting to pick a specific group of people that can pay you money, but trust us, if you cast too wide of a net and just say you do “web design for small businesses” you aren’t going to ATTRACT 🧲 anyone. We’re going to go into more detail about this in the next section.
The other part of this first tip is to identify what exactly you do.
For Oodles of Poodles 🐩🎨, hopefully you noticed we wrote “build elegant websites on Squarespace.” We want to focus on the skills we have and the software we know how to use.
We don’t want to learn how to use WordPress, Wix, Weebly, Webflow, or any other website platform that starts with a “W” 😂😂. Plus, this is another way to attract a specific type of customer who uses the platforms you know.
Once you can answer these two questions, the logical first step is to create a website.
This is very important though: Don’t overthink this step! Give yourself a specific deadline of when your website needs to be launched for your biz. Constraints are incredibly important and we’ve all had those “under construction” pages up on our sites for longer than we should’ve.
Everyone open your ears… 👂👂… Are they open? Good. You ARE going to have to reach out to people before your business is “perfect.”
You ARE going to have to put yourself out there on a limb that’s a bit uncomfortable. We ALL do this!
To get your first couple of paying clients, you may need to do things like:
📌 *Related content alert: We recorded a podcast 🎙 episode titled, A foolproof way to get more clients, and it’s worth a listen if you’re at this stage of biz.
It’s really really really important to avoid overthinking everything early on in your business. Oodles of Poodles 🐩🎨 is not going to get its first paying client with hopes, prayers, and crossed fingers. It takes doing outreach and being proactive.
Promoting yourself ≠ being a sleazy salesperson. Those are not the same things. We love this quote from Tina Roth Eisenberg:

Head’s up: Be prepared that your friends, family, and acquaintances may criticize you for putting yourself (and Oodles of Poodles 🐩🎨) out there.
We’ve learned that nearly all criticism in business comes from other people’s insecurities and fears. Know this, and put on your invisible suit of armor, ready to ward off any unwanted criticisms of your new biz!
One thing we don’t see enough new biz owners do is leverage the “new-ness” of their business to create buzz early on.
Now, we understand being quiet is more natural to some people, but businesses need to be seen/heard before they can get paid!
Here’s what we’d do for Oodles of Poodles 🐩🎨 if we were just getting started:
Optional: If you’re a much more extroverted person, you could also do some sort of video launch. It could be done on Zoom, YouTube Live, IG Live, etc, and the entire call-to-action of your buzz-worthy event would be to attend that (instead of OR in addition to the email signup).
This type of launch event is not just about getting those first three paying clients. It’s about doing what we talked about in Tip #2: showing people your biz exists!
If you get a paying client, that’s obviously your main goal, but at this stage of the game, just getting people to know you are offering this service is critically important.
If you can work through these three tips, you should absolutely be well on your way to landing your first paying client (or two, or three!)
There’s no specific timetable on how long these things should take, but we’ll remind you of one important thing: You have to get started before you feel 100% ready! No one feels 100% ready at the $0 stage of business.
Next section, we’re on to our next stage and we’ll tell you what to focus on next once you earn hit that first $500/month benchmark. 🦋
⚡️ Tip #1: Be clear about what you do and who you do it for (ps. You need a website!)
⚡️ Tip #2: Start BEFORE you’re ready and courageously practice putting yourself out there.
⚡️ Tip #3: Create a buzz-worthy “launch” event.
Let’s say your business is generating around $500 every month and that’s about 500x better than $0, but you know $500 can’t pay all your bills, so you’re looking to grow. What do you do?
If you missed it in the previous section, we’re going to use our fake business Oodles of Poodles 🐩🎨 Design Studio (a company that does Squarespace website design for health and wellness businesses) as our ongoing example.
One of the most important ways you can grow your business is to get crystal clear on WHO your target customer is.
Even with our Oodles of Poodles 🐩🎨 business, we’ve narrowed in on “health and wellness” clients, but even that niche can be very broad.
Using the tips from the previous section, hopefully, you’ve been able to take on a few clients by this point, but since you’re still in that early stage you may have felt the need to say YES to each and every client inquiry.
That’s totally okay! But if you really want to grow, it’s time to get laser-focused on attracting a specific type of client. Think back to which clients you enjoyed working with the most, and try answering the following questions:
1️⃣ Is there a pattern to what these clients do? (Instead of “wellness companies” are most of your favorites actually yoga instructors?)
2️⃣ Is there a pattern to why they are looking for a [insert your business here] to help them? (Multiple clients have said they “don’t consider themselves creative” and “they are frustrated by trying to design their own website”.)
3️⃣ Is there a pattern to what they’re asking for? (Maybe you started out thinking you’d design 10-15 pages per website, but the best clients are happy with 4-6 pages.)
Just by answering those questions, you can paint a much clearer picture of the IDEAL customer you want to attract and how to speak to exactly what they want.
And where do you apply that lovely business-paint? You spell it out clearly on YOUR website and in all your promotional copy!
At the $500/month level of business, it can be easy to fall in the trap of taking on any client that comes your way because you’re afraid to turn down money. But we found from our own experience and helping many people over the years, saying yes to clients who AREN’T your ideal customers is the quickest way to NOT enjoy your work and to muddle your messaging. The quicker you can create cohesion and clarity in your portfolio and your website copy, the quicker you will see results of more and more ideal clients coming to YOU.
Back when Caroline 👩🏻🦰 started her first online business in 2014, a design studio called Made Vibrant, she marketed herself as a do-it-all-designer (hand-lettering, logos, graphic design, print design, branding, websites, etc.) She could apply her design skills to all these different projects, so why not cast the net as wide as possible, she thought.
After working with the first few clients of Made Vibrant, Caroline went through the questions we just posed in Tip #1 and found there was a more focused approach she wanted to take.
Instead of being a do-it-all-designer designer, she realized her favorite projects were designing brands for first-time creative entrepreneurs. She loved the feeling of confidence she could see in her clients after they had a clear and unique brand identity they were proud of.
This decision to stop being a jack-of-all-trades and instead develop a clear expertise in brand design is the point where clients finally starting seeking out Caroline instead of her always needing to go out and find them. It marked a turning point in the success of her business.
This approach is about being specific in stating exactly what your expertise is, exactly who you can help with your business, and exactly what makes you unique (and even a bit weird!). It’s Caroline’s version of becoming a Brand Designer. For Oodles of Poodles 🐩🎨, it’s about knowing that Squarespace sites for technology-frustrated yoga instructors is the sweet spot.
When you stop being vanilla and “for everyone,” you start to ATTRACT your ideal customers and repel customers who aren’t a good fit for you (sorry spa and gym owners, these poodles aren’t oodling for you!)
This approach is the ole “spray and pray” idea. You’re hoping if you keep things generic enough in your copy and promotion that the right customers will fall into your lap (amidst all the wrong customers).
Yet, what tends to happen is that you don’t get any customers because people don’t know if you’re the right fit. You get stuck in place and you end up taking on bad clients and doing work you don’t want to do.
By creating more clarity in who you want to help and how you can help them, you’ll 🧲 more of the right customers for your growing biz.
Remember, don’t be afraid to “repel” people at this stage of your business. The more you can become known for doing something specific really well, the better your chances are of getting paid to do that thing!
Buckle up, buttercup! It’s time to take control of your business and build an audience of people who care about what you have to offer the world.
⚠️ IMPORTANT: Any existing service-based biz owners might be thinking, “Hey, I’ve made it this far in my business, why would I start an email list and put extra work on my plate??” And the answer is three-fold:
The sooner you build an engaged audience (one that’s NOT at the mercy of social media algorithms), the sooner you’ll be able to start thinking about transitioning away from trading time for money. We’ll talk more about that in the next Grow It Gradually 🦋 levels below.
It’s a way for you to attract people out in the chaotic catacombs of the Internet and stay connected to remind them how you can solve their problems.
By showing up consistently in someone’s email inbox (where algorithms don’t punish you), you build trust and authority with them. You also give them a constant reminder of Tip #1 (who your business is for) and #2 (what your expertise is) in this email! Read more about our concept of “Marketing Bridges” here.
Using our trusty biz Oodles of Poodles 🐩🎨 as an example, we’re not just going to say, “Sign up for cute photos of Prism the poodle 🐩.” Instead, we’re going to have a bi-weekly email newsletter that shares A) a case study of an awesome yoga website and brand we found and B) a hot, new thing we learned in Squarespace. Okay, also C) an adorable photo of Prism doing something suuuuuper cute.
You want to attract 🧲 your ideal customers to your email list and consistently show up in their inbox on a schedule you can keep up with. These subscribers will hopefully become customers as you add in callouts for client availability in your emails!
⚡️ You can NEVER start an email list early enough. Trust us, even if one day in the future you were to pivot your entire business model (which we’ve done many times over the years), the right audience will move along with you. ⚡️
Having a captivated audience you can mostly control your interaction with is extremely important in business and will be absolutely mandatory to grow to the $1,500, $3,000, $5,000, and $10,000+ biz levels.
These three tips aren’t going to immediately help you jump from $500/month to $1,500/month in your business but, spoiler alert, no one has a silver bullet to help you do that.
We’re all about that gradual, sustainable growth 🦋 around here. It helps you keep balance in your life and to avoid burnout at all costs.
Next section, we’ll jump up to the $1,500/month level of business, with new tips to help you at that stage 📈.
⚡️ Tip #1: From your first few customers, can you look for patterns and identify a clear customer profile?
⚡️ Tip #2: Develop a clear skill-based expertise that people are searching for.
⚡️ Tip #3: Start building an email list… TODAY.
Our previous two sections have been about your client service-based business, and this section will be the last one in that arena before we start transitioning into scalable, digital products.
Too often, though, we see online biz owners try to make the leap into digital products too soon, while not building enough client runway to sustain the time that transition takes.
As a reminder, we are all about slow, methodical growth in business 🐌🐢,which often means sticking with client work for a while longer to avoid burnout and dips in business revenue.
When you’re at the $1,500 per month revenue mark with your client business, you’re probably not quite at the stage where you can cover all your bills with your profit (some folks may, and if that’s you, AWESOME 👏👏!) This is why our first tip in this section is to continually be investing time in your client outreach and potential client lead list.
Where do you find leads? Start with who you WANT to work with! Based on the previous 🦋 section’s tips, you now know the importance of getting super-specific about who your ideal client is. Use that info to search your social media channels for businesses and business owners that fit the criteria you established in the previous section.
By clearly knowing exactly who you want to work with it becomes much easier to search those clients out and put them in an outreach spreadsheet.
It seems like suuuuch simple advice, but we’d be willing to bet our merino wool socks most client-based biz owners do not have a client outreach spreadsheet. If that’s you, that’s okay! Now’s the time to fire up Google Sheets, Numbers, Airtable, Notion (aff link), or if you absolutely have to… Excel 😬🙈. Having a spreadsheet/database with a list of potential clients is how you keep your business organized and your leads nurtured.
🗓 Carve out one day per week to nurture your leads and create/send pitches! It is very unlikely that you’re going to grow your client roster at this stage of your business simply through your social media content creation (aka: posting on IG or TikTok) and referrals from the few clients you already have. You can’t sit back and have a, “they’ll come to me” mentality; you have to be thinking, “Let me go find them!”
This is why it’s key to put time on your calendar each week to invest in the future of your business! We actually have three sub-tips to this tip’s sub-tip 😂 #tipception:
New clients aren’t going to fall in your lap which means more money isn’t just going to magically appear in your bank account.
An easy trap to fall into when you’re starting a client business is to have one core service offer (which is great!) but then not give yourself permission to experiment 🧪 with other revenue-generating ideas.
For this second tip, we want to encourage you to think about a smaller, mini offer that isn’t a huge ongoing time commitment but could bring in a splash 💦 of revenue to your biz! A gradual splash, you know? A spritz. You get it.
If you recall, our fictitious business we’ve been talking about these past few sections is Oodles of Poodles 🐩🎨, a Squarespace design company for yoga instructors. The main offer (website design and build) can take weeks of work to complete, so let’s brainstorm 3 other offer ideas that require less time:
OFFER IDEA 1️⃣: Squarespace bug fix day – For $500, you’ll spend a day ironing out any bugs on someone’s site. These could be CSS-related, email form setup, page organization, etc.
OFFER IDEA 2️⃣: Squarespace site setup – For $500, you’ll hop in someone’s brand new Squarespace account and get all their pages set up (Home, About, Blog, Product, and Contact), their blog started, and their settings how they want them.
OFFER IDEA 3️⃣: Homepage redesign blitz – For $500, you’ll redesign someone’s homepage and offer them two layouts as a refresh from what they have now.
As you can see with these offer ideas, they don’t take ongoing work and can create a nice bump in monthly revenue. If Oodles of Poodles 🐩🎨 was able to land 2-3 of these per month, that could quickly help them add $1,500 in monthly revenue without any ongoing work.
⚡️💡 BONUS TIP: If you’re a savvy offer creator, your smaller offer could be a GREAT lead-in to your larger client package. Offer Idea 3️⃣ (homepage blitz) is a great example of this and could lead to someone starting with paying $500 but then wanting help implementing the design for a larger client package!
We like to think about foundation articles on your website like the old Chinese proverb about planting a tree: “The best time to plant a tree was 20 years ago. The second best time is now.”
Similarly, if you’re wondering when you should get some SEO-friendly articles published on the blog of your website, the answer is as soon as possible.
Foundation articles are great for short-term and long-term (gradual) business growth.
🩳 Short-term growth – Once you have your articles written and published, you can share them on your social media channels and try to convert those folks into email subscribers. Your articles become immediate marketing opportunities. They establish trust with your audience as your followers begin to see you as a source of expertise.
👖 Long-term growth – The goal one year from now is that the almighty Google (or Bing – LOL) has seen your article(s) as helpful for certain keyword searches and you’re getting organic traffic to your site which converts into new email subscribers!
If you’ve been putting off writing articles that can build organic traffic (which lead to new email subscribers) it’s time to stop delaying this task!
What are “foundation articles?” Plain and simple, they are helpful articles that can attract your ideal customer based on problems they’re searching for on Google. Shall we take a look at some examples for our friend at Oodles of Poodles 🐩🎨? We should?? Okay, then!
These are not perfect ideas BUT there are no perfect ideas in any part of business! You want to do a bit of search term research (which we did for those 6 article ideas) and adapt what you find to fit what your ideal customer is looking for.
📌 Related: Does SEO completely baffle you!? It used to baffle us to until we learned just enough and put that enough into practice. Learn everything we know about SEO here!
📌📌 Related #2: If you want to learn our full content strategy read our Content Salad Strategy guide (with even more foundation article advice).
Next section we’re going to venture past the client-side of growing your business gradually!
⚡️ Tip #1: Focus one day of your week on client outreach and new client pitches (build that spreadsheet!).
⚡️ Tip #2: Get creative with your client offers and experiment with a mini offer!
⚡️ Tip #3: Write 6-8 foundation articles that can bring you more email subscribers today and a year from now.
We absolutely HAVE to start this section off with a big disclaimer:
🚨 TRUTH ALERT 🚨
The stage of your business where you transition from clients (trading time for money) to digital products (more scalable offers) is a lot harder than most people would want you to believe.*
*Maybe those people are trying to sell you a product that makes it look “easy?” Remember that the next time you get sucked into a “how to grow your digital product biz to $X,000s in just 4 weeks” rabbit hole 😉.
The reality of online business is that it’s much harder, more stressful, and takes a ton more trial and error than you’re led to believe. We know you CAN do it, we just like to be 100% real about what it takes so that when you hit obstacles, you don’t think there’s something inherently wrong with you.
Now that your client business is humming along, you’re probably at max capacity and can’t grow your revenue much further because you don’t have any extra time in your day/weeks to take on any more clients. This is why building a digital product is sooooooo helpful, because it’s a scalable asset that can generate revenue well beyond what you could ever make with clients and the limitations of your time.
In our experience, we’ve found some of our most successful digital product ideas have been born out of our existing client service offerings.
For example, 👩🏻🦰 Caroline’s brand design business could only take on so many branding clients. As she got more and more requests, she realized she might be able to teach all her branding processes in an online course that anyone could take at their own leisure. Thus, Better Branding Course was born, a digital product that eventually replaced Caroline’s brand design business completely!
How do you validate that idea?
How do you make sure it fits within your current biz?
😱 We have an entire (paid) coaching session we’re going to let you watch IN FULL right now…
Our Identifying Your Offer 💡 coaching session replay will help you come up with a digital product idea that can be the foundation of your business revenue.
You came up with a digital product idea, happy dance for you 👏👏. Now, let’s build that sucker and give strangers on the Internet a way to purchase it from you. Whether you’re creating an e-book, online course, or paid membership community, these next tips should apply.
Annnnnnnnnd BOOM GOES THE DYNAMITE! 💥 You have a digital product in your business-arsenal! It’s a thing people can purchase from you that doesn’t require additional time investment the way your client service offers do. Hurrrrray! 🎉
Bringing back our ongoing example company, Oodles of Poodles 🐩🎨, a Squarespace design company for yoga instructors, the digital product they’ve decided on is: Squarespace website creation course for non-designers. This course will be targeted at folks who don’t have thousands of dollars to pay for their site to be done for themselves but they also don’t want to create a Squarespace site entirely on their own.
And here’s where the train goes off the rails for most folks who are trying to make the client-to-product leap. They 1) find their product idea, 2) make their product, and 3) sell it (ONLY) one time. And then… 🦗🦗🦗.
Life gets busy, clients pick back up, maybe the first launch doesn’t quite go very well (we’ve all been there!)
That’s where this tip comes into play and should absolutely help you generate ongoing consistent digital product revenue!
Your (new) digital product NEEDS a monthly promotion schedule. To create that consistent, gradual 🦋 revenue bump you’re looking for, it takes ongoing effort – especially early on.
Here are some digital product promotion ideas to try:
Hosting a free monthly workshop is a fantastic way to generate attention and potential buyers of your digital product. The idea is to solve a problem with the workshop topic, that people can attend for free, and then at the end of the workshop sell the digital product (which further solves the problem of the workshop).
Creating in-depth tutorial videos is akin to writing those foundation articles we talked about last month! You want to identify topics your ideal customer is searching for and create helpful videos that educate them on that topic. Then, in every video, make sure there’s a call to action to get more helpful info via the digital product.
If these two ideas don’t tickle your fancy, we have an in-depth article with 13 marketing blueprints you can steal and implement for your biz.
And just a friendly reminder: We started with client businesses, gradually transitioned into digital products, and now a few years later we only have digital product businesses that afford us the freedom we always dreamed of (both in time and in enough revenue).
It is absolutely possible for you as well it just may take longer than you’re being told by the “experts” out there.
⚡️ Tip #1: Create and validate your first digital product idea.
⚡️ Tip #2: Once you have a validated digital product idea it’s time to build it and make it available for purchase!
⚡️ Tip #3: Create a monthly promotion schedule for your digital product.
At this stage in your business, it may feel like you’re in constant juggling-mode 🤹♀️🤹♂️🤹 (you’re not alone!)
Our hope for this section is to share three tips that absolutely changed the game for us, but it’s important to remember these next tips came AFTER we did all of the things in the previous sections. Notice we’re going from $5k to $10k here, NOT $1k to $10k (that’s important!)
You probably read that tip and were thinking, “um, hey Jason and Caroline, how does honing my messaging help put dollar-dollar-billz in my bank account?” And to that, we would answer, “keep reading, ya silly goose! 😂”
Very quickly, let’s jump into the Wandering Aimfully (WAIM) Time Machine™ and take you back to the summer of 2019. Our WAIM business had been chugging along for almost two years, but we didn’t quite feel like we had our messaging locked in.
Here’s our exact monthly revenue back in 2019, sitting right between the $5k and $10k mark where it seemed to have stalled out:
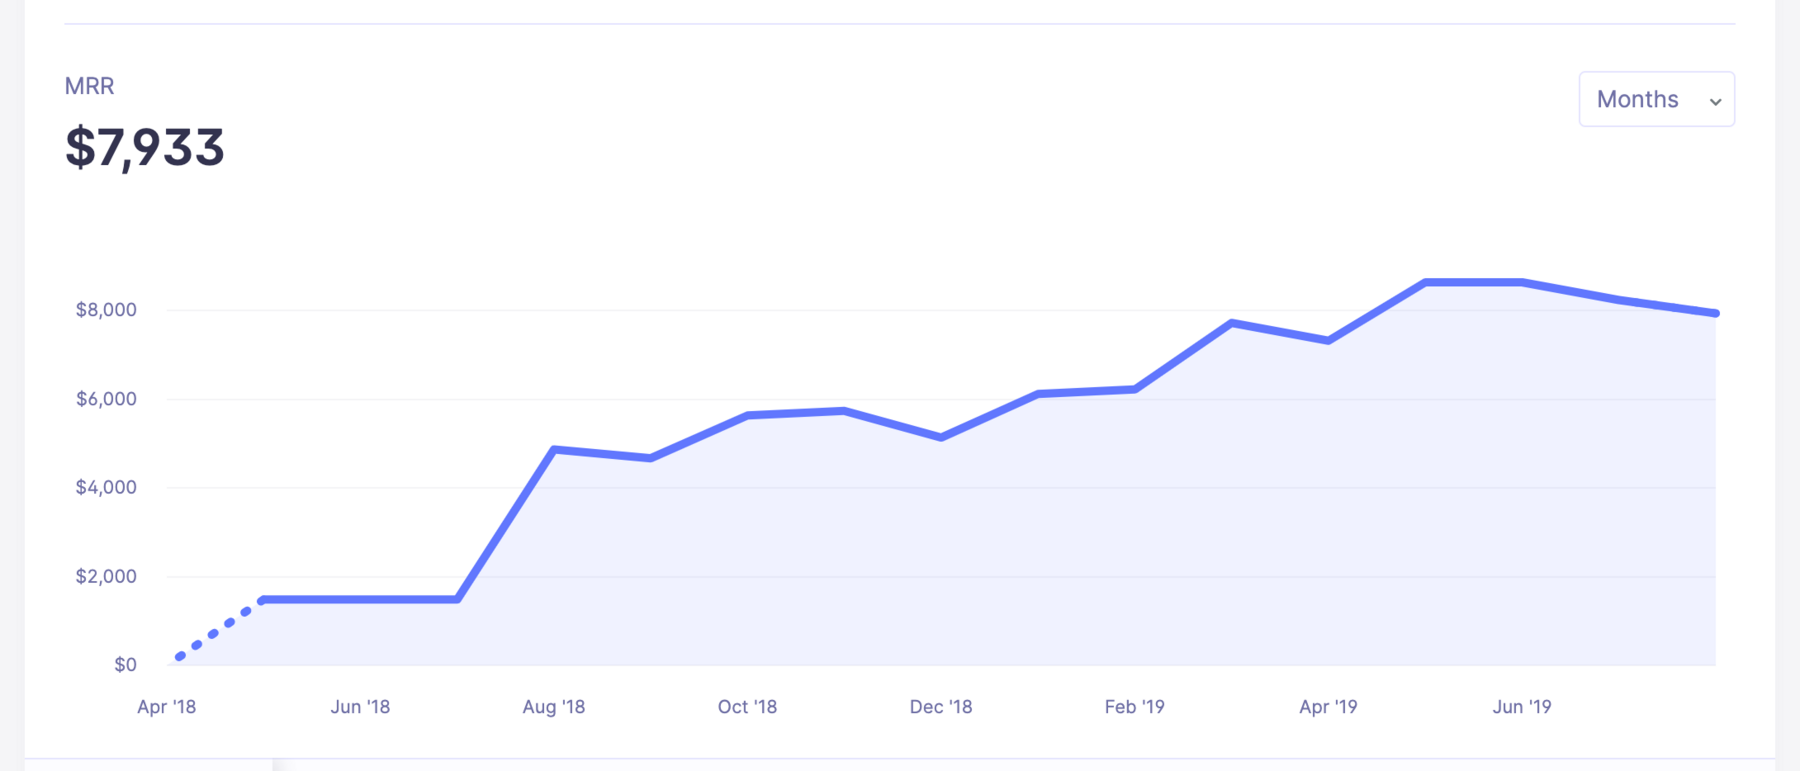
The problem we were solving for our customers was a bit vague and our product itself wasn’t selling like proverbial hotcakes 🥞. We knew we could help transform the businesses of our customers, but that clearly wasn’t coming through in our marketing.
It was at that moment we decided to get laser-focused on what our core product should be, who it should be for, and how someone would know it was absolutely right for them.
Fast forward a few months and we did our first launch (more on this in Tip #2!) of our Un-Boring Group Coaching Program. This was the first launch of WAIM that really exceeded our sales goals, and we finally saw the traction we’d been searching for!

Those three items, together, are what helped us springboard to the next level in our business revenue. It’s soooo easy to continue to use the same messaging and copy you always have, but we believe you should be auditing these things often.
💡 PRO-TIP: If honing your messaging isn’t in your wheelhouse, we highly recommend finding someone who can help you do this. Investing in this part of your business is crucial at this juncture and is worth every penny to learn who you are talking to and what benefits you are providing them!
Open and closed launches are one of our favorite ways to generate our business revenue (especially to create a jump in 💰💰).
If you aren’t familiar with them, an open and closed launch is simply a set period of time when you “open the cart” and allow people to purchase your product. This creates the urgency to purchase but more importantly, puts YOU in control of when you have to be in sales mode.
We shifted our WAIM biz model to bi-annual open and closed launches back in 2019, and we’ve been loving the flexibility, freedom, and predictable injections of revenue ever since!
🤔 Is your messaging from Tip #1 resonating with people during your launch, or are they asking a lot of questions about your product/who it’s for?
🤔🤔 Have you had a bad launch before? That’s okay! Don’t compare a previous launch of a completely different product to what you’re selling now.
🤔🤔🤔 Does selling still feel icky to you? Prove to yourself that selling doesn’t have to be sleazy and that people on your email list/social don’t mind being sold to (when what you are selling can actually benefit their livelihood!)
If you get a launch or two under your belt and your customers aren’t buying at quite the pace you expected, consider offering a lower-priced “entry” version of your product. This is exactly what we did with that 6-Month Group Coaching package we mentioned. We still had our larger ($2,000) offer, but the coaching package was $100 per month for six months ($600 total, obvs). We found the “entry” product became a solid source of immediate revenue but then also led to those happy customers upgrading to our larger product when the six months finished up.
Hey….. Guess what, chicken butt? We also have a FULL coaching session within our WAIM Unlimited program called Sales Launch Start to Finish 🚀. This coaching session teaches everything we know about launching and what we’ve learned that works really well for our bi-annual launch schedule.
✅ You’ve nailed your messaging.
✅ You’ve done your first launch or two.
✅ You feel like you have all your business-ducks 🦆📊 in a row, it’s now time to find more ducks! (We know, we’re mixing metaphors in this section, it’s FINE.)
This is the tactic too many online biz owners jump to way too early in the game. They pour effort and energy into marketing, except the thing they are marketing (their offer) isn’t working that well yet so it’s (somewhat) wasted effort.
Sure, we always want you amazing humans to be doing more marketing than you currently are, but we don’t want you to expend all that effort without having all the foundational stuff in place.
That said, once you DO have your offer locked in, one of the MOST effective marketing tactics to get a bump in revenue is to partner up with someone who has a highly engaged audience in your product arena.
You want to find someone who is willing to share the spotlight with you and promote your product to their audience so they can make a sweet % of revenue without having to create your offer themselves. Your pitch to someone in this position is that you’ll give them as much as 50% of product revenue sold during the partner event and they’ll promote the initial signup of the event to their audience.
Example: Our friends at Oodles of Poodles 🎨🐩 (our example biz that does Squarespace design work for yoga instructors and also teaches a Squarespace design course) are going to partner up with a prominent Squarespace template company: Temptation Templates 💋🖥.
The great news about partnerships? There are MANY ducks in the sea! (We had to bring the ducks back and mix just one more metaphor in here).
If your first partnership doesn’t work out, figure out why. Just like one lackluster product launch doesn’t mean all launches won’t work, a partnership effort that falls flat doesn’t mean all partnerships won’t work!
And remember, especially with Tip #3, you’re NOT trying to do everything at one time. You can space these tactics out and you can tackle them on a schedule that works for your life and biz. We’re all about that slow 🐌 and steady 🐢 pace around here.
As with all of the tips we’ve been sharing these past few sections, these come from our very personal experiences.
These aren’t just theories we’re conjuring up from our business crystal ball 🔮, these are well-worn strategies we’ve implemented to help us make real jumps in our biz revenue.
We know these can work for you, it’s just about carving out the time to make them happen while having an experimenter’s mindset.
⚡️ Tip #1: Hone your product messaging. What problem are you solving for people?
⚡️ Tip #2: Do an open and closed launch of your digital product 🚀.
⚡️ Tip #3: It’s time to utilize effective partnerships.
It wouldn’t be a section in this article if we didn’t give a big, juicy caveat before sharing these last three tips with you:
Growing your business to $10,000++/month and beyond is NOT a requirement for a “successful business.”
It’s not the only way to reach your dreams and goals in life. Most of those can actually probably be done with less money (as many studies have shown). Always remember this, friend, when you catch yourself thinking your worth as a business owner can be measured in dollars. IT CAN’T.
These last tips will show you the exact steps that helped us take a leap to reach our “enough number” in business revenue, where we happily sit and don’t need to grow just for growth’s sake.
At this point in business, you most likely have a few content things going on: An awesome weekly email newsletter; a fun-but-helpful podcast; an info-packed YouTube channel; a pin-worthy Pinterest plan; an interestingly-designed IG grid, etc, etc.
But, what you might not have, is a clear directive and STRATEGY for each of those content buckets. You may also not have a clue if any of them are direct contributors to your revenue (if you do, kudos to you, we did not at this stage of biz 😂🤣).
📬 Your Email Newsletter: This is your real-time, value-packed piece of trust-building content with your audience. You want to have a clearly defined schedule your audience can get used to as well as a specific outcome they can expect with each email they receive. Then (and this is the strategy part) make sure you have a business objective being met in EVERY email as well as a lead-up plan for your product launches.
🎙 Your Podcast: This is one of your strongest connection points to your audience, even though podcasting is a very passive listen. The reason it’s such a strong connection point is because it’s a somewhat intimate relationship. People listen to podcasts while living out their day-to-day lives and you get to be alongside them in those moments! You know, doing the dishes, driving to work, walking the dog, taking a shower, etc. But the trick with making a podcast strategic is to ensure you have reminders of the product you offer in each episode!
We think you get the idea with each content channel, but the key is to make sure you’re not just churning out content without thinking strategically of how it can impact your business.
You might be thinking, “great, I can do all those strategy things, but how do I see the actual ROI of my content efforts??”
⭐️ SUCH A GREAT QUESTION! Thank you for asking…
You create a post-purchase survey!
A post-purchase survey is an embedded form or a linked form your customer sees immediately after buying your product. In that survey, you can ask a series of questions but one of the most important things you can ask is: “How did you hear about this product?” And you list out your content channels!
When we finally implemented a post-purchase survey (a Typeform embedded directly on our “thanks for buying” page), we found some really interesting data points:
That’s AWESOME for us to learn! Mostly because a content strategy can feel a lot like being on a never-ending hamster wheel. But, that hamster wheel gets easier to ride when you can see a certain % of your revenue comes from specific channels!
The post-purchase survey is also a great way to identify any content channels you might not be loving and thinking about cutting out. If your customers aren’t finding you through a certain channel, this can give you the data point you need to stop investing time and energy into that channel 💪💪. For us, this was Instagram and what helped us decide to stop using Instgram for WAIM at the end of 2021. (And our revenue has NOT plummeted since!)
Okay, we could write a 2,000+ word article just on creating an affiliate program, but we’re going to distill it down to the actionable stuff we hope can help you right away.
Adding affiliates to your business when things are on shaky ground is only going to cause headaches in the future (and create possible bad relationships). Our advice is to only move forward with affiliates if things are humming along smoothly!
For us, we use Affiliate WP (aff link) which is a WordPress plugin built by the same company that we use for our Membership Program (Restrict Content Pro – also aff link). There are MANY affiliate programs available so just be sure you pick the one that fits right with your website.
We do the following for our WAIM Affiliates:
The last thing you want to do is leave your affiliates feeling like they have to do everything on their own. You want to make their promotional efforts as SIMPLE as possible so it’s a no-brainer for them to promote and support your program.
As a fun note to finish off this tip, in our previous two WAIM Unlimited launches, affiliates have accounted for 50% of our new members! 👏👏👏 We’ve had a sizable jump in revenue with each launch due to affiliates and love that new customers are joining our program from existing members!
Once you work through the tips of the previous section and Tips #1 and #2 in this section, it’s probably time to pour a little biz-accelerant on your marketing fires.
What content channel is working THE BEST for you?
Is it your podcast? Your YouTube channel? Pinterest? IG? Etc? Whichever one it is, you want to identify it and brainstorm ways to pour biz-fuel on that wonderful, very safe and not hot, marketing fire 🔥!
Our last example for our dog-loving Squarespace compadres: Oodles of Poodles 🎨🐩 has a weekly podcast we told you about in Tip #1 called Grooming Squarespace 🎙✂️. Poods’ has noticed an uptick in podcast listenership and has seen a good amount of people have been visiting the podcast-only page they direct people to on their website for more helpful Squarespace Tips. They’ve also done a recent launch and noticed 15% of their new customers found them via the podcast (rad!)
Oodles of Poodles 🎨🐩 is going to focus on growing their podcast listenership by trying to appear on other podcasts. They take the time to research the top 20-40 Squarespace-related podcasts (or design-related podcast where Squarespace is mentioned) and they build an outreach plan to be a guest on these podcasts – making sure they only reach out to shows who have guests. Their pitch is to appear as a podcast guest and share an actionable set of Squarespace tactics most people don’t know about. This helps the other podcast hosts know value will be given to their audience and it’s not just a random pitch hitting their inbox.
Showing up on these other podcasts gives Oodles of Poodles 🎨🐩 a chance to promote their Grooming Squarespace 🎙✂️ podcast and increase their audience!
It might not be a podcast you’re going to amplify but the key in this final tip is to look for a marketing channel that’s already having some amount of success and growth and 🔥 it up a bit!
We couldn’t finish the final 🦋 section with just three tips, could we??
When we get asked how we run TWO online businesses and create all the content/stuff we create, with virtually NO team at all (we do have two developers for our software app Teachery), the answer is PROCESSES.
Need to write a weekly email newsletter? Here’s our process:
That may sound simple, but it’s a repeatable process. It’s what’s helped us write and send 800+ email newsletters over the past 8 years.
We have similar processes for our podcast, YouTube channel, articles, IG posts (R.I.P. ☠️), monthly live coaching curriculums, customer update emails, new products we build, new features we add to our software app Teachery, etc.
We also have daily, weekly, monthly, quarterly, and annual meetings together. Those meetings have a structure to help us know what to focus on and how to keep the WAIM Train 🚂 moving forward!
Good processes, ones that you hone yourself from experience and learning from people who do the things you want to be doing, are how you can get more stuff done AND not burn yourself out.
*We do want to acknowledge that not having kids (yet) makes our output a lot easier. That’s an intentional choice we’ve made. We also want to acknowledge our inherent privileges (things like our education, upbringing, being neurotypical) that we know contribute to our ability to create processes and execute within them. We know this might not be as simple for everyone, but we hope you’ll lean into what works for your brain, your life, and your circumstances!
⚡️ Tip #1: Dial in your content strategy.
⚡️ Tip #2: Create an affiliate program.
⚡️ Tip #3: Amplify the marketing bridges that are working!
⚡⚡️ BONUS TIP: All the tactics in the world are useless if you can’t get things done.
Hurrrrrraaaayyyyyyy for you making it through this Grow It Gradually 🦋 article (hopefully you didn’t just click through to this section looking for a silly GIF of us 👀😂).
There is NO straight line to success but there is a clear path we’ve followed and we believe you can follow too (with your own tweaks along the way!) Just remember: NO one jumps from $0 per month to making $10,000++ per month overnight or even in a few weeks/months.
What we’ve shared in this article is yours to come back to as often as you like! As un-boring coaches, we’re happy to support your journey as much as we can but YOU have to do the work. We can guide you and teach you from all our personal experiences but we can’t build your business for you.
You can do this.
You’ve got a plan of action.
Carve out the time and space but go at YOUR pace 🐌🐢🦋.
And now, your silly dancing GIF of us to celebrate!
While we love productivity, we’re NOT trying to be the most productive humans ever and we don’t enjoy hustle-culture. However, we are constantly trying to improve our efficiency and use systems that make our lives easier.
When wearing multiple hats in your online business, it becomes all too easy for tasks, projects, and goals to fall through the cracks.
As creative people, we don’t always think about organization first, but organization has actually made us MORE creative.
When you can get all of your to-dos, your tasks, the overwhelm of everything you have to think about out of your brain and into a system, it leaves more room for creativity, for having ideas and for executing those ideas.
When you can get all of your to-dos, your tasks, the overwhelm of everything you have to think about out of your brain and into a system, it leaves more room for creativity, for having ideas and for executing those ideas.
Let us share a big, juicy secret with you: Sustainable habits and being consistent are the most* important things necessary when trying to reach your goals.
*When we say most important, we mean the most important things YOU can control. We don’t want to ignore or minimize that privilege is real and not everyone has the same advantages.
But alas, forming new habits can be a struggle!
We all love to read/watch/listen to other people talk about their holy grail productivity tools and habit-building hacks, but it’s important that you figure out what works best for YOU and your unique situation.
Here’s the truth about our journey with organizing our business and staying on top of things using different productivity tools/tactics over the years…

Every time we discover a new productivity tool or app, our motivation and organization shoot up! We get really excited and we spend hours setting up a new app to ensure maximum productivity but then, a few months (maybe even weeks) later, the adrenaline of the new shiny app wears off and we just stop using it. #wompwomp
It happened with Trello.
It happened with Asana.
It happened with digital planning.
It happened with Airtable.
We craved consistency in our organization systems. We wanted a system that was flexible enough that we could adjust when we got bored (or didn’t feel as productive). We also wanted something versatile enough to manage multiple types of organization so we could focus on actually using just ONE system, not three different apps and systems.
Notion is what finally fit that criteria.

Before we dive into how we use Notion to organize our lives and businesses, let’s go through a little crash course on the basics of how Notion works.
Notion is a system of interconnected pages. You can add content to each page by using different types of content blocks.
There are many different content blocks in Notion such as:
We like to think of Notion as a system of blocks for you to build whatever you want.
You can pick and choose the blocks that would work for every single page in your Notion workspace.
But by far, the feature that stands out the most is the ability to create Databases.
Notion Databases allow you to organize similar pages and assign different properties to them.
While databases seemed complicated and clunky with other productivity apps, Notion has really nailed this feature!
You can visualize the same Database in different ways using Views (Gallery, Calendar, Board, Timeline, etc):
You can also create Templates to load a pre-made set of content blocks for every page.
The best part of Notion is using all these blocks together to build whatever dashboards and pages are most helpful to keep your life and business organized. Truly, the possibilities are endless and that’s what makes Notion powerful!
Note: This section is a very abridged overview of Notion and all its functionalities. Notion has very robust and easy-to-understand help docs so if you want to deep dive into a specific feature, you can go to their help docs to learn more about it.
After many months of using Notion, we took a look at the MOST important databases and pages we use here at Wandering Aimfully and then we organized it into a system we could teach to you!
And that system has an acronym, because DUH.
🦅🦅🦅 (feel free to do your own bird screech sound effects for added flare!)
The remainder of this article will be less about the ins and outs of how to set up the S.O.A.R. Notion system, and more about how we USE the system to run our lives and businesses more efficiently and calmly. Our S.O.A.R. System template is only available to our paying Wandering Aimfully members. Hopefully, you’ll be able to create your own system from what you learn based on our setup!
Before we dive into each component of the system, we’re going to give you an overview of the key pages in our S.O.A.R. Notion system. This will give you a reference point for everything in the system, then we’ll show you how we actually USE it.
The pages in this category are the foundation blocks of setting the vision for what we are aiming for, what areas of growth we want to see, and what projects will help us get there.
We have three main databases for the Setup part of the system:
In this database, we’ve listed out all of the areas in our life that we want to pay attention to. Think of broad categories like Family, Finances, and Knowledge and Learning. Here are the exact Life Area categories we use:
In order to cultivate each Life Area, we’ve created a relation property that is linked to the Goal Tracker database (more on this below) so we can set goals for each area of our life.
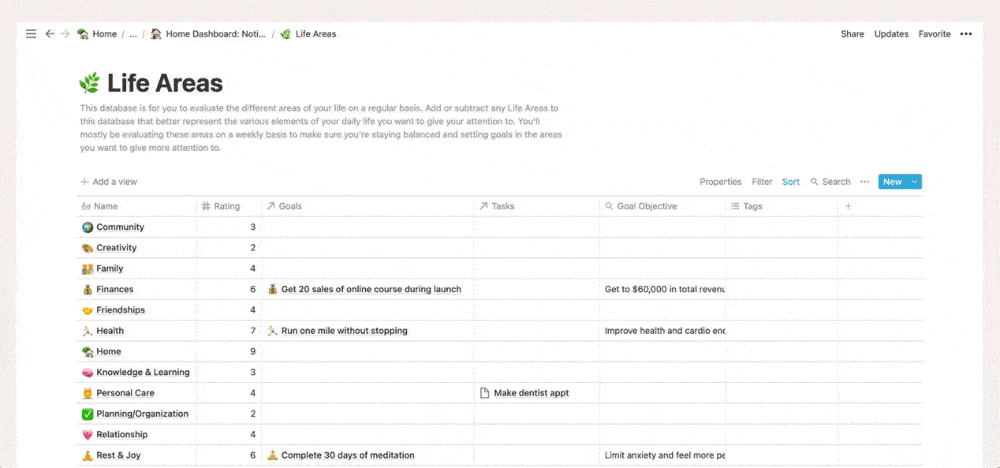
For example, in the Finances life area, we set a goal to get 20 sales of an online course during launch.
💡 Tip: One of the ways we also like to use the Life Areas database is by rating it on a weekly basis (during our Weekly Reviews, more on this in Part 4) using a scale from 1 to 10 based on the attention it got during that week. Afterwards, we sort it from highest to lowest, we can clearly see which Life Areas we could be cultivating more or we can decide what our current priorities are.
In this database, we add each goal as a Key Result (specific, measurable outcome) and identify the Objective (more intangible and broad) that it aligns with.
Each goal is connected to a Life Area and to Projects (if applicable) using relation properties. We also have a date property to take note of when we want the goal to be completed.
![]()
For example, the key result is to write & publish 5 new articles, and the objective it’s trying to serve is to increase organic website traffic. This key result is connected to the Work Productivity life area and the Blog project.
This database consists of any projects that we want to track for our business(es). This could range from launching a new course, tracking an ongoing marketing channel like Podcasts, to managing your Clients, etc.
We find it really helpful to create Projects for content creation as it’s easy to have those recurring “projects” slip through the cracks week by week if you don’t plan them accordingly with everything else.

The PAGE area of each project is where you can manage everything related to just that project. We’ve created a Project Template where we set objectives and key results for the project. We also create the tasks associated with the project and compile the resources and inspiration for it.
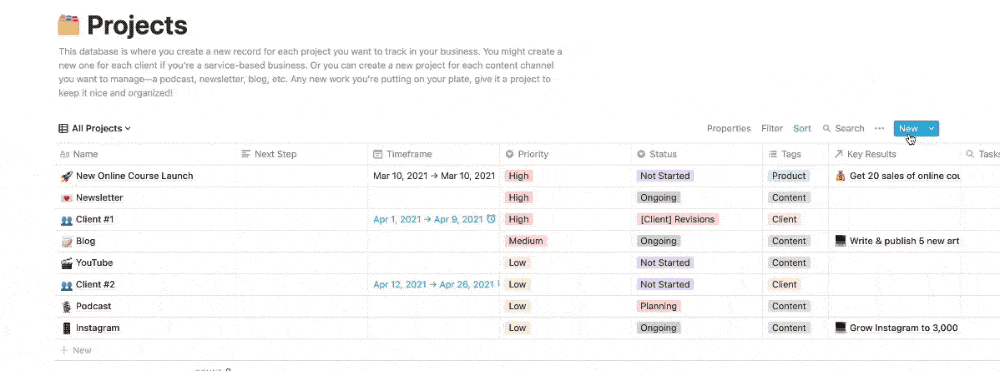
Just to further clarify how these all work together, we like to think of it as:
Here’s a specific example:

You can also apply the same concept to your Projects. For example:

The pages in this category are the smaller bits that projects and initiatives get broken into. These pages help us move the bigger projects forward.
We have three main databases for the Organize part of the system: Tasks, Content Calendar, and Social Posts.
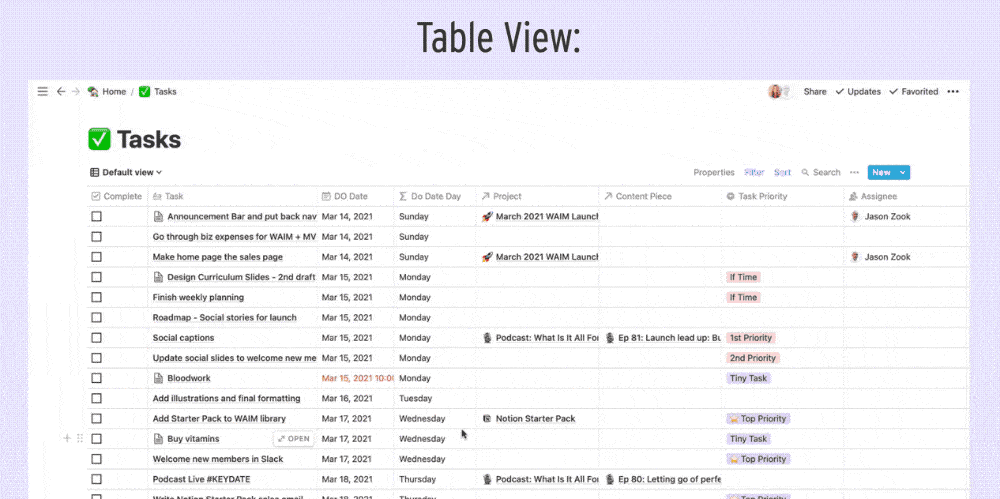
All of our tasks across all of our Life Areas and Projects go into this master Task Manager database.
For each task, we assign a DO Date which is the date we plan to actually work on the task, not the deadline.
Quick shout-out to August Bradley; we believe he came up with the term “DO Date” for his own Notion system.
We also connect each task to the Project or Content Piece (more on this later) the task is related to via relation properties.

For example, the task record podcast falls into the Podcast project and the Episode 01 content piece. That way, we’re able to see all the tasks in the context of the project or specific content it falls under.
💡 Tip: You can also estimate how long your tasks take and then log a Start Time and End Time (using two date properties) to see how long each task actually takes. If you’re diligent about tracking your time for each task, it’ll be easier to estimate times for similar tasks in the future.
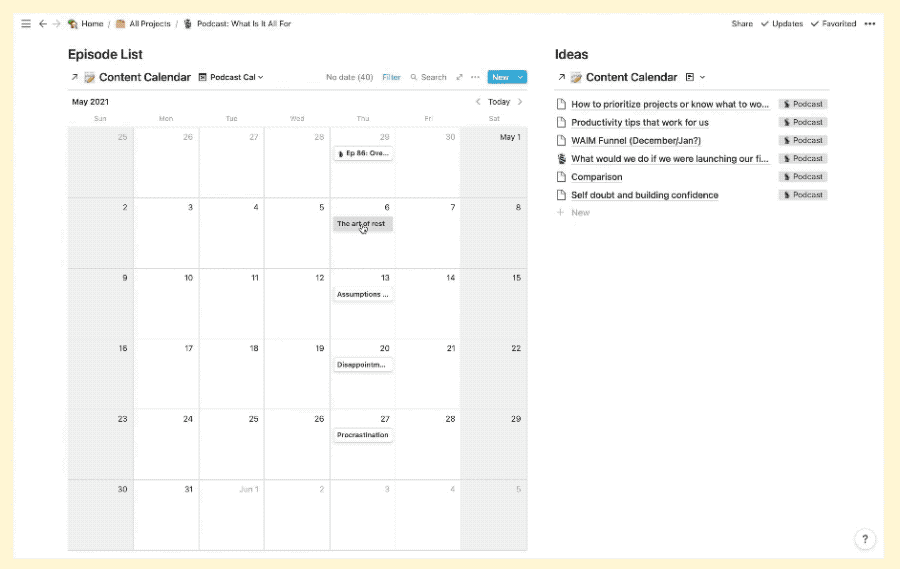
All of our content (articles, podcasts, newsletters, YouTube videos) goes into one master Content Calendar database.

We use the type property to differentiate between the different content channels and to set the status of each content piece. We also add a Publish By date (deadline) and a Create By date (when the majority of the creation will happen) to each content piece.
The Social Posts database functions similarly to the Content Calendar but we prefer to keep it separate because if you’re posting on your socials every day, it can get cluttered very quickly.
We use the type property to differentiate between the different platforms and to set the status of each social post.

The Calendar View for both the Content Calendar and Social Posts databases are especially helpful to see when our content and when the related social posts get published.

The pages in this category are the dashboards and pages designed to actually GET. THINGS. DONE. most efficiently.
We have three main pages for the Act part of the system:
This is really where the system starts to come together because this is where you execute on all of the stuff that you did in the set-up and organize sections.
This page is where we spend most of our time in Notion every single day.

You can customize your own daily dashboard but for our system, we have spaces for:
The most actionable part of the Daily Dashboard (and where the magic really happens) is the Daily Task Manager. This is the same database as your Task Manager but it is filtered to show only the uncompleted tasks whose Do Dates are today and previous days.
This way, tasks don’t fall through the cracks because you are always reminded every day which tasks you assigned to be done today and the tasks you didn’t manage to complete from previous days.
The tasks are always piling up in this section so if there’s a task we haven’t done for a week, that tells us that we’re not prioritizing this task and we either need to do it or set it for a date in the future.
We also have linked databases to our Projects and Goal Trackers so we can quickly jump to a specific project if we need to.

The Biz Dashboard is a page where you can see your business at-a-glance. Think of it as a living and breathing page of where you can implement the things you’re learning for your business.
In this dashboard, we have:
4Qs: These are the core questions you need to answer to know what you’re doing and what your business can offer to people. We talk more about this in the Foundation section of our 5-Step Business Checklist.
Goals: This is where we write our revenue goal for the year as well as list our business-specific goals from the Goal Tracker database.

Marketing Bridge Strategy: This little section is where we can see at-a-glance, “Are we hitting initiatives at every step of the critical marketing bridge puzzle?” We share more about the Marketing Bridge concept in this article.
Project Focus By Week: Each week, we like to set our project focus which is especially useful if you’re juggling multiple projects at a time.
Growth: We also track specific metrics in our business each week such as traffic and newsletter subscribers.

💡 Tip: You can also dedicate a space for business-related files! For example, you can compile all of the worksheets you’ve been filling out for to gain clarity on your business in this dashboard so they get lost in the catacombs of your file folders.
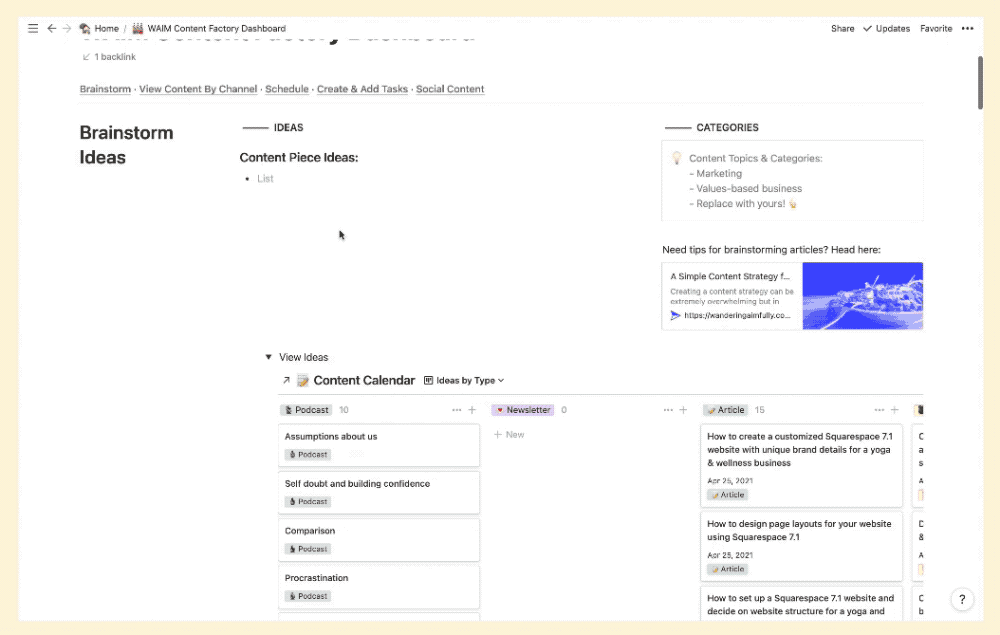
The Content Factory Dashboard helps us stay on track on all of our content channels. We use this dashboard to:
We’ve found that an efficient way for us to generate content ideas is to write all our ideas in a stream-of-consciousness style and then decide afterward the content channel that is best suited for each idea.
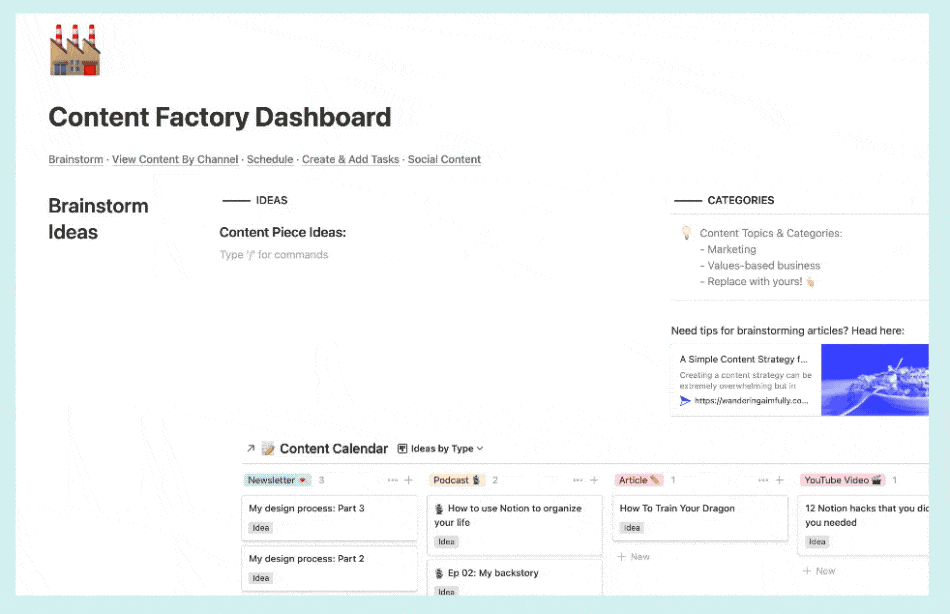
We use the same drag-and-drop concept for batch ideating and scheduling our Social Posts.

In the Scheduling section of our Content Factory Dashboard, we have a list view of our Content Calendar database which is filtered to show only the content pieces that have not been assigned a Publish Date, basically ideas that are floating around but haven’t actually made it in our Content Calendar.
From this list view, we can then drag each content piece idea to a calendar view (using the Publish Date) of our Content Calendar database to easily assign a publish date.
This process makes sure that all of our content ideas are captured and ready to be scheduled.

Once we’ve added our publishing dates, we go to this section to create tasks related to each content piece.

The pages in this category are the time-based pages and databases that help us check in regularly, plan for the future, and review all we accomplish.
The main databases for the Review part of the system: Daily Habit Tracking and Weekly, Monthly & Yearly Planning.
This is crucial because even if you spend all the time setting everything up in Notion, if you don’t come back to it often and don’t give yourself set times to invigorate and maintain the system, it will not work.
Even if you spend all the time setting everything up in Notion, if you don’t come back to it often and don’t give yourself set times to invigorate and maintain the system, it will not work.
In this database, each entry corresponds to a single day. We created properties to correspond to specific habits, metrics, and information we want to track on a daily basis.
Each day is also connected to a specific week in the Weeks database so we can review that information later on during the Weekly Review process (more on this below).
![]()
Moving on to the Weeks database, each entry in here corresponds to a single week.

The properties for the Weeks database are a little bit different because it rolls up or aggregates the data you’ve tracked in your Daily Tracking database.
For example, if you recorded the following data for the Exercise habit (property) in your Daily Tracking database:
In your Weeks database, you’ll see this for the Exercise roll-up property:
You can roll up all kinds of data like habits, daily mood, sleep hours, business metrics (average traffic, total newsletter sign-ups), and even your daily gratitude.
![]()
Inside each of the Weekly pages (remember, each entry in a database is also a page!), we’ve created a Weekly Planning & Review Template.
In this page, we summarize what went well (or didn’t go well) and what we learned from the week. We check in on our Life Areas and Goal Trackers to see which areas we need to give more attention to. Then we hop in on planning for our Projects and Upcoming Tasks to make sure we’re on track or if we need to reschedule tasks. We also look at our Content Calendar and Social Posts to check our upcoming content pieces and make sure that we have enough ideas batched and planned for the next two weeks. And lastly, we have a section for tracking specific growth metrics in our business.

📝 Quick Note: Each section in this Weekly Planning & Review Template is actually hidden under a toggle button (that little triangle ▸ on the left side of each colored box). If we expand each toggle, we have content blocks that pull in data from all of the databases we’ve worked on in the Set-Up, Action, and Organize parts of the S.O.A.R. Notion System.
Think of it this way: Weekly Planning is Boss You and the Daily Dashboard is the Employee You. The Daily Dashboard is for getting stuff done every day and the Weekly Planning is for setting what needs to be done every day.
We also do Monthly and Yearly Reviews, which is set up similarly to the Weekly Reviews, but we review and plan broader aspects of our life and business.

You can also watch us break down our (free!) Yearly Planning Notion Template in this video:
Now that you’ve got the lay of the land, let us show you how we actually USE our Notion System!
There are a lot of components in our Notion System so you’re probably wondering: How do all these blocks work together to help us actually run our business better?
Let’s walk you through it!
First, we set our vision for the year in the Years database…

Then we turn that vision into concrete financial goals and project plans for Q1 in our Quarters database…

👉👉 For example: at the beginning of Q1, we set up projects for our January Flash Sale and Spring Enrollment Launch, and when we finally decided on the Notion Starter Pack as our spring “product,” we turned that into a project as well.
When we make a new project, we load our New Project template, and brainstorm tasks. We pull those into our Tasks database, and we’ll usually also estimate time for each task at this point too and assign a “Do Date”
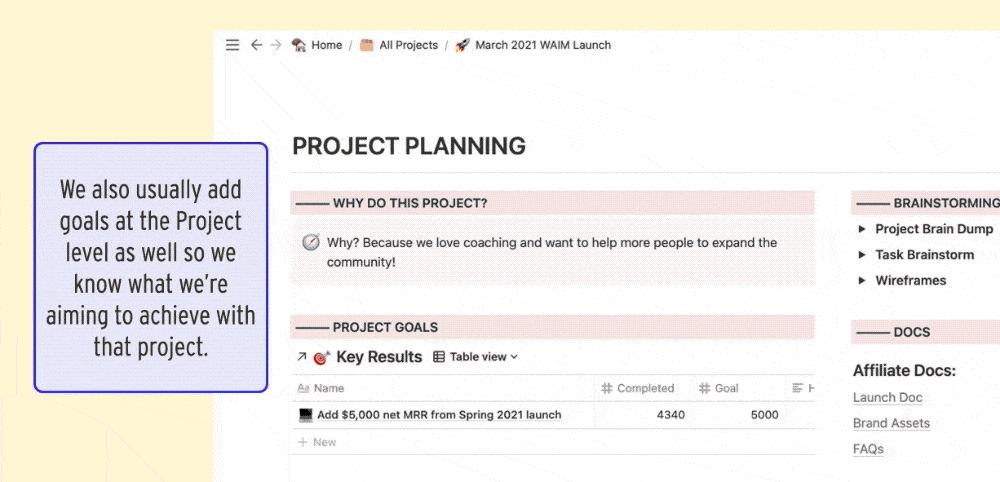
We also usually add goals at the Project level as well so we know what we’re aiming to achieve with that project.
We have a project for each content channel. We plan our publishing schedule a month ahead at a time during our Monthly Planning meeting.
We do our monthly planning in the Months database…

Usually, our Content Calendar is empty or half-empty at this point, which means we need content ideas!
We can use this page to come up with ideas or schedule content that are in the idea stage and needs a Publish Date.
For example, if we have an idea for a new podcast episode, we can add it in the Brainstorm section of our dashboard and drag it into the Podcast column.
Or we can go to the Podcast project page directly and drag our “Ideas” view onto our Calendar View to assign a Publish Date to them.
Once episodes have a Publish Date, that’s when we load in our “Podcast Episode” template and create tasks to actually MAKE that piece of content.
On a monthly basis, we also have our Budget Meeting 🤑💸. We use this dashboard page to input our expenses, our income, see our profit for the month, and see our spending compared to our budget.
We evaluate Life Areas, Projects, Goals, Content, and basically just check in with the whole system to see what needs to be updated or tackled in the upcoming week.

This is where I (👩🏻🦰 Caroline) do my “Intentional Balance Inventory” where I rate my Life Areas 1-10 based on how much attention they got the previous week. If I want to shift my focus to an area that is being neglected, I set that as my weekly intention in our Daily Dashboard so I see it every day.
During that Weekly Review, we’re also logging any stats we want to track for our conversions, etc.

And, also during the Weekly Review, we’re rearranging any tasks for the upcoming week to better even out my schedule and batch tasks if necessary. Don’t be afraid to have a bad week and then need to rearrange your tasks, it happens to us too!

The first thing we do is add a new day to our Daily Tracking and we fill out our gratitude, our habit trackers.
![]()
This section of our Dashboard is where we spend our day though. We assign priorities to our tasks or we designate them for 1 of our 4 “work blocks.”

If it’s a task where we want to track our time, we set the Start Time when we begin and we set the End Time when we’re done.
That’s it! And still, you might be like… WHOA.

This system is complex but you’re really only updating it at specific times. When we do our Weekly Review, it usually only takes about an hour max but that hour is the most powerful hour that we spend on our business because it sets us up for everything else.
If your head is up in the Notion-clouds with all the databases, blocks, properties and dashboards, here’s a quick little zoomed out recap to show you how we use the S.O.A.R. Notion System to run our life and business:
We start by mapping out our year and setting goals for our life and business as a whole.
During the Quarterly Planning, we create our new Project pages, set up goals and create tasks for those projects.
This is when we set up our Content Calendar for the month, update our Content Factory Dashboard, and do our Budget Meeting to check in on our financials.
Every week, we review and update our Life Areas, set our daily intentions in the Daily Dashboard, plan our Social Posts, track our Growth metrics, and make adjustments to the Tasks we’ve already entered in our system.
This is where we do our Daily Tracking, where we take action on our Tasks, track our time and GET. THINGS. DONE 🥳
It seems like a lot but again, you’re only updating the system:
Everything else is working for you behind the scenes and you are just presented with the things that you need at the time you need them.
The final thing to remember: If your life and business have felt disorganized in the past, we’re with you! This system in Notion has really helped us get a stronghold on everything that’s important for us to focus on.
Good luck and happy organizing! 👋
We (hello, we’re Jason and Caroline Zook 👩🏻🦰👨🏻🦲 by the way) know how tough it is to start a business, run a business, or simply create a new product or service.
The number of to-dos and tasks get piled higher than all the stacks of pancakes 🥞 at IHOP on a busy Saturday morning. But it’s not actually the project to-dos themselves that bring us stress; it’s all the mindset hurdles we have to navigate in accomplishing those tasks that bring our projects to a screeching halt.
We have personal experience with this entire cast of lovely characters…
Fear not, though! Over the years we’ve acquired some tools to shift these mindsets and we want to share them with you. We’ll go over a bunch of these “mindset poisons” in this article AND give you the “mindset antidotes” to deal with them!
We want you to know you are NOT ALONE, and dealing with these mindset hurdles as a business owner is completely normal 🙂.

We all have voices and thoughts in our heads that are not helpful. Some voices are louder than others and can keep us from reaching our goals.
🧠 “My work isn’t as good as theirs, so why try?”
🧠 “Who cares what I have to say?”
🧠 “I’m an imposter and totally unqualified to do this!”
These are just a few examples of mindset poisons. They are thoughts and ideas that run rampant in our minds, kind of like a kid getting let loose at a Chuck E. Cheese 🐭🧀🍕 for the first time. (Gosh, remember those simpler times??)
Our goal with the rest of this article is to identify a handful of these mindset poisons and offer you mindset antidotes that have been critically helpful for us and our Wandering Aimfully members over the years.
We’ve created a ⚡️ 5-step process ⚡️ to help cure ANY mindset poison you might encounter! This simple process will be the guiding force moving forward (kind of like a giant mouse was the guiding force at Chuck E. Cheese*).
Extremely random and silly fact: From 1977 to 1992 the Chuck E. Cheese mascot was an anthropomorphic rat, then it was changed to a mouse in 1993. In 2012, the mascot was rebranded into a smaller, “hipper” mouse-version in an attempt to increase sales. (Thank you Wikipedia!)
The first step to changing anything is becoming AWARE of what you wish to change.
What is the poison when we break it down into its most basic fear? What moment from our childhood or a previous time in our lives is this fear grabbing onto?
What thoughts and actions can you intentionally shift in order to offset the effect of the “poison”? What is an opposite action (antidote) you can take?
Imagine your mindset shifting from negative to positive. How would a specific situation be different using a different outlook?
Identify 3 tangible habits, practices, or processes to ACTIVATE that antidote and see it play out in your work and life.
Don’t worry, we’ll go over specific examples throughout this article, but now that you have a clear process for working through your own toxic mindsets, you will be able to identify your own antidotes any time you encounter an unhelpful mindset in the future.
Okay, let’s get into a few specifics, shall we!


When Perfectionism holds you back:
🙅 Projects or tasks drag on because you always see how they can be 1% better.
🙅 You abandon an idea or project before sharing it because you don’t want people to see what you consider an imperfect product.
🙅 You won’t try a new endeavor because you already know you won’t be able to execute to your perfect standards.
🙅 You don’t allow yourself to be vulnerable or authentic because the real parts of you feel imperfect.
The question to ask yourself: “What fear does my perfectionism really stem from?”
Potential answer: “I’m afraid of feeling not good enough.”
Ways this root fear can impact you…
👉 “I’m afraid people will judge me if I put out something less than perfect.”
👉 “I learned as a kid that I wasn’t worthy of love unless I was perfect so feeling not good enough feels like I’m worthless.” (This one goes out to all our fellow over-achievers!)
Let’s go with: “I’m afraid of feeling not good enough.”
🤔 What are some thoughts you can repeat to yourself that can assuage that fear?
💡 “I am already ‘good enough’ as a person because my worth is inherent.”
💡 “I have the power to decide what ‘good enough’ means in my work, which is separate from my worth.”
💡 “My skillset may not be perfect, but I’ll never improve if I don’t continue making and sharing things.”
Basically…learn to be your own best friend and lean into some self-love (you deserve it)!

🙅 Perfectionism (poison) says: “I’m afraid of feeling not good enough.”
💪 Completion (antidote) says: “I’m the one who gets to define ahead of time what is good enough in my work and that will help me keep creating.”
Constraints help you pre-define “good enough” and completion helps you focus on finishing (not perfecting) so you can make more awesome stuff.
The goal is no longer to make something perfect; it’s to COMPLETE something in the time allotted to the standards you already set.
There is a snowball effect—the more you complete, the more you will see that things don’t have to be perfect for them to get you results.
You practice overcoming the fear of feeling not good enough by reframing good enough as something YOU determine, not anyone else.
Previous you: Posting 1 or 2 “perfect” things on social media and continuing to feel stuck.
Antidote you: Posting consistently according to your constraints, knowing you’re planting seeds of audience growth every time you publish!

📝 Try a daily challenge: Here’s an idea. For the next 2 weeks, publishing something daily that’s imperfect but still helps move the needle forward for your business. There’s nothing like a daily challenge to desensitize you to imperfection.
⏳ Constrain your time: You only get ONE hour to do X task. Once the time is up, you are done and you move on. No extra time. No perfecting for hours.
📋 Write a “good enough” list: Before you start a project or share your work, try making a checklist for yourself for what Good Enough means in your eyes.
Constraints help you fight perfectionism by pre-defining “good enough” and completion helps you make more awesome stuff with less pressure.

When Self-Doubt holds you back:
😩 You say no to opportunities because you doubt your abilities or don’t think you’re qualified.
😩 You feel paralyzed before you get started on a new idea because you don’t believe you’re capable of figuring it out.
😩 You’re afraid to raise your prices or charge more for your product because you doubt people will pay it.
😩 You feel a general sense of Imposter Syndrome which affects the confidence you bring to situations.
The question to ask yourself: “What fear does my self-doubt really stem from?”
Potential answer: “I’m afraid of being exposed as a ‘fraud’.”
🤔 What are some thoughts that can assuage that fear?
💡 “I know that I’m conscientious and I will give my best to every opportunity.”
💡 “I have taken on opportunities before when I felt fearful and it turned out okay.”
💡 “I’m not ‘defrauding’ anyone! If I’m clear about my strengths and honest about my skills, I can set the expectations of those I fear letting down.”
😩 Self-Doubt (poison) says: “I’m afraid of being exposed as a fraud.”
🤗 Self-Trust (antidote) says: “Giving myself the opportunity to grow does not make me a fraud. I trust myself that I can handle the discomfort of growth and I will bring my best to any opportunity.”
You think you need confidence first in order to trust in yourself, but you actually need to trust yourself before you can build confidence.
Self-doubt counts you out before you even begin; self-trust deals you in so you can continue to grow.
Self-trust is a muscle. The more you can trust yourself and practice sitting with the discomfort of feeling “out of your depth” the more you will grow and the less uncertain you’ll feel.
Previous you: You say NO to speaking or podcast opportunities because you doubt in your ability to deliver.
Antidote you: You say YES to opportunities, even if they scare you, and you grow your brand awareness and improve your speaking skillset.

📝 Create a “trustworthy” list: Sit down and make a running list of all the things you’re good at and the things you know how to do—all the reasons big and small that make you trustworthy. Go back to this list when you doubt yourself.
💪 Intentionally practice a skill: Building self-trust takes EXPERIENCE. But you don’t have to wait for an opportunity to grow. If you want to get better at something, set time aside to practice which will improve your confidence.
💯 Set a “rep goal”: 50 speaking engagements. 20 podcast interviews. 50 art pieces. Focus on a clear goal to get the experience and this will help you establish building self-trust as the goal, not the outcome.
Overcome self-doubt with self-trust. You think you need confidence first in order to trust in yourself, but you actually need to trust yourself before you can build confidence.

When Need For Validation holds you back:
😬 You let the thoughts and opinions of your audience steer your content in a direction that doesn’t feel authentic.
😬 A negative comment or email sends you into a self-doubt spiral.
😬 You try to be everything to everyone so you don’t turn anyone off your brand, but for this you end up being vanilla.
The question to ask yourself: “What fear does my need for validation really stem from?”
Potential answer: “I’m afraid of not being liked.”
🤔 What are some thoughts that can assuage that fear?
💡 “Not being liked might feel crappy in the short-term but stifling my own wants or needs in the long-term will have much more severe consequences.”
💡 “I can’t make everyone happy anyway, so I might as well be true to myself.”
💡 “Relying on other people for my source of happiness or validation puts way too much power in the hands of other people.”
😬 Need For Validation (poison) says: “I’m afraid of not being liked.”
😇 Intrinsic Motivation (antidote) says: “Being liked is not my primary objective—being MYSELF is. I’m not chasing acceptance, I’m fueled by my own deeper purpose.”
Intrinsic motivation is about finding a WHY and a purpose that has nothing to do with the opinions of other people.
It requires that you prioritize your opinion of yourself above the opinion of others.
You have to be willing to be misunderstood, not liked, or ignored in order to try something new.
You can be motivated by the desire to develop a skill; the desire to be creative; the desire to impact other people positively…anything but “I am motivated by the desire to be liked.”
You have to learn to prefer the free feeling of being true to yourself above the fleeting feeling of being patted on the back or liked
Previous you: You water down your content to please everyone and feed the algorithm, but start to feel uninspired.
Antidote you: You allow yourself to experiment, you feel free, you stumble upon a new area you want to explore.

📝 Write down your why: When you embark on a project or endeavor, be sure to take time to write down your deeper why. This will help you stay connected to your motivation even if people don’t “get it.”
🙈 Don’t wait for the response: If you’re putting your work out there or hitting publish on something, don’t just wait with bated breath to see the reaction. Once you release it, let that be enough.
🎉 Celebrate yourself: Become your biggest fan. When you push the envelope or try something new, celebrate it. Congratulate yourself. Learn to value your opinion of yourself in the highest regard.
Avoid the constant need for validation by focusing solely on intrinsic motivation. Intrinsic motivation is about finding a WHY that has nothing to do with the opinions of other people.

When Comparison holds you back:
🙈 You use the talent or success of others to put yourself down or feel negative about where you are.
🙈 You follow others so closely that you lose your unique voice and start to copy their blueprint instead.
🙈 You compare your beginning to someone else’s middle so you think something isn’t worth doing because you don’t have the skills of someone who’s further along.
🙈 You see how someone else does things and it makes you question your instincts.
The question to ask yourself: “What fear does my comparison really stem from?”
Potential answer: “I’m afraid of being judged as inadequate.”
🤔 What are some thoughts that can assuage that fear?
💡 “Inadequate according to whom?! I can’t let the opinions of other people stop me from making progress toward my goals.”
💡 “Comparison is relative, so why do I only use comparison as a means to discourage myself, rather than comparing myself to where I was a year ago?”
💡 “I can’t compare my journey to anyone else’s because they aren’t me. They don’t have the same strengths, values, skills, etc. that I do so I have to make decisions that are right for no one else but me.”
🙈 Comparison (poison) says: “I’m afraid of being judged as inadequate.”
💬 Owning Your Story (antidote) says: “My story is mine alone. I can’t look to the path of others to set my standard of adequacy; only I can do that for myself.”
Owning your story will help you focus on the strengths within your own experience/self instead of chasing the story of others.
Comparison is about looking outward at others for cues on how you’re doing; owning your story is about looking inward instead.
Once you realize that everyone’s path is 100% unique to them, you realize that comparison is futile.
Previous you: I want to start a travel vlog but compare my video editing skills to the popular channels and feel discouraged and paralyzed.
Antidote you: I know I have a unique creative voice to bring to the table so I start anyway and one year from now my travel vlogs feel polished and unique to me.

🙅 Limit your consumption: One easy way to stop comparing yourself is to limit your exposure to what other people are up to. If you find yourself comparing, unfollow. Spend more time creating than consuming.
🧭 Make a core values list: Remember, those you are comparing yourself to are not operating with your same core values. Write down what YOU care about, what your guiding list of values is, and this will help you own your unique path/story.
🗺 Write down your journey: Write down a timeline of all the pivotal moments that led you to where you are now. This will help you focus in on YOUR journey, no one else’s, and remind you how far you’ve come.
Steer clear of comparison traps by leaning heavily into your story. Owning your story will help you focus on the strengths within your own experience/self instead of chasing the story of others.

When Procrastination holds you back:
⏱ You put off getting started on projects because you don’t know where to begin.
⏱ You don’t get back to clients or other business connections in a timely manner.
The question to ask yourself: “What fear does my procrastination really stem from?”
Potential answer: “I’m afraid of feeling overwhelmed and like I’m not capable.”
🤔 What are some thoughts that can assuage that fear?
💡 “The most overwhelmed I’ll be during a project is likely at the beginning, so the sooner I get started, the sooner I can get through that feeling.”
💡 “Overwhelm is something I feel if I focus on the WHOLE project instead of just the first step.”
💡 “Not knowing how to get started or what to do is a natural part of figuring anything out.”
⏱ Procrastination (poison) says: “I’m afraid of feeling overwhelmed.”
✍️ Permission to Start Ugly (antidote) says: “I embrace feeling overwhelmed or inept at the beginning of every project because I know it’s a part of the process.”
Giving yourself “permission to start ugly” will help lower the stakes for getting started.
By focusing on “starting” rather than the whole project, you can reduce that overwhelm just a tad and find the discipline just to tackle step 1 instead of steps 1-100.
Keep your expectations super low to get started and with that first action, you’ll notice you build momentum, requiring less effort to continue moving the ball forward.
You’ll make yourself feel like whatever crappy version you start with was done on purpose!
Previous you: Waiting until the week of a deadline to start a project, getting stressed out and working long hours all week.
Antidote you: Starting the moment you got the project, and working in increments to slowly complete/improve the project.

🦢 Make “ugly” part of your process: Not everything starts out as a swan! Whatever your process is for your work, make step 1 something that is VERY low barrier and easy to accomplish. Ex) coaching slides
⏳ Set a “Getting Started” timer: Constraints for the win again! If you have trouble feeling overwhelmed when you start, try setting a timer for just 15 minutes to “start ugly.” You can do anything for 15 minutes!
🐜 Do the 5-minute task first: Title the Google Doc, even if you don’t start it yet. Import your footage. Write bullets for the blog post. Choose one maddeningly simple place to start.
If you’re constantly procrastinating, giving yourself “permission to start ugly” will help lower the stakes for getting started.

When People-Pleasing holds you back:
👥 You say yes to too many opportunities because you don’t want to say no or let people down.
👥 You let clients take advantage of you and project scopes creep because you have trouble putting your foot down.
👥 You don’t speak up for yourself when a situation feels out of integrity or inauthentic because you don’t want to seem “difficult.”
The question to ask yourself: “What fear does my people-pleasing really stem from?”
Potential answer: “I’m afraid of letting other people down.”
🤔 What are some thoughts that can assuage that fear?
💡 “My responsibility is to myself first. I have to put on my own oxygen mask first.”
💡 If people are not okay with me standing up for my own needs, they are not people I want to let into my circle anyway.”
💡 As long as I’m clear and up front about what my feelings/needs are, most people will respect that.”
👥 People-Pleasing (poison): “I’m afraid of letting people down.”
✋ Boundaries (antidote): “When I take on too much or don’t speak up for myself, I let myself down. I have a right to protect my energy and be honest about what I can and can’t take on.”
Boundaries are how you articulate—to yourself and others—what does and doesn’t feel authentic to you.
When you are clear about your boundaries, you limit your resentment toward other people or the feeling that they’re taking advantage of you.
Every time you enforce a boundary, you’re choosing to “love yourself, even if you risk disappointing others” (credit: Brené Brown).
Previous you: You say yes to every request a client makes because you don’t want to disappoint them but you end up spending twice as long on a project for half the money.
Antidote you: You establish clear boundaries and scope with your clients upfront, and because you’re sticking to timelines you can take on more clients while being happier.

🛑 Know your limits: Hard to enforce boundaries if you don’t know what they are. Decide where your limits are. How much are you willing to work? How many opportunities are you willing to take on?
📝 Write down your “no scripts”: Saying “no” sometimes feels awkward because we’re so trained to say yes. If you need to practice, write out thoughtful responses to some requests that have crossed your boundaries before.
📋 Create a “not okay” list: Boundaries aren’t just about what you’re willing to take on, they’re about what behavior you’re willing to accept. Make a list of things that are not okay with you so that if they come up, you can speak up.
If you’re constantly procrastinating, giving yourself “permission to start ugly” will help lower the stakes for getting started.

In this section, we wanted to give some quicker antidotes to additional poisons that can affect our mental fortitude as entrepreneurs.
Over-Thinking (poison): “I’m afraid of making the wrong decision.”
Embracing Experimentation (antidote): “It’s impossible to know the ‘right’ or ‘wrong’ decision. I can’t think my way to an answer; I have to ACT my way to an answer and learn by doing.”
Need For Control (poison): “I’m afraid of putting my fate in someone else’s hands.”
Collaboration (antidote): “I recognize that there are also positive things gained from combining forces with someone else.”
Disappointment (poison): “I’m afraid I’m not cut out for this.”
An Attitude of Service (antidote): “One setback doesn’t define me. Instead of focusing on one lackluster launch or project, I choose to focus on helping/serving others and how good that makes me feel.”
Over-Committing(poison): “I’m afraid of losing out on an opportunity.”
Prioritization (antidote): “My next opportunity is not my last opportunity. I can only be effective if I choose where to place my focus carefully.”
Giving Up Easily(poison): “I’m afraid of trying and failing so I give up before I can feel disappointed.”
Patience, Persistence, and Practice (antidote): “I know anything worth pursuing will have setbacks and I need to offer myself time to work through those setbacks to get to where I want to be.”
Unworthiness (poison): “I’m afraid I’m not worthy of good things.”
Self-Love (antidote): “Every single human is worthy of good things, including me. I will practice loving myself out loud until I believe that in my bones.”
Much like learning how to sell, market, grow an audience, or even creating a great product or service, mending your mindset is a business skill.
Without the tools (antidotes) to deal with mindset hurdles (poisons) we all face, none of the practical business skills are enough. You know, just like going to Chuck E. Cheese isn’t fun if you only eat pizza and never play whack-a-mole!
Our hope is we’ve given you a process to work through whatever mindset poisons might be affecting you or that you might run into in the future. Just remember, your fears and your mental roadblocks are normal and we all go through them!
Now, grab your antidote and kick those poisons to the curb.
In this article, we’re going to go in-depth on these five important aspects of online business. There are certainly many more we could cover, but these five are the critical foundation pieces you need to have in place:
Great! Those are the five things we’re going to cover. However, before we move forward, this article comes with a B.F.C. (Big Fat Caveat)…
👋 Creating a successful online business doesn’t happen overnight after reading one article. You have to be willing to experiment, go through trial and error, and know that it takes time for your efforts to pay off.
(Anyone who is telling you they can help you “make 6-figs in your business in the next 14 days” is simply trying to sell you a load of hot-trash. Probably pricey hot-trash. Don’t buy expensive hot-trash, okay?)
Our goal with this article is to help you feel empowered with your business. We want you to feel less confusion and more clarity around exactly what you do, who you do it for, how you make money, and how you continue to grow a thriving business you enjoy.
Just to give you a bit more context, we’re a husband and wife team 👩🏻🦰👨🏻🦲 who have created multiple types of online businesses:
We share that information with you so you know we aren’t regurgitating someone else’s knowledge in this article. The information you’ll read below is from our own learned experiences, hard work, mistakes, and successes along the way.

We’ve all been guilty of starting a business and diving straight into the deep end. We have a good idea, we see a need in the market, or we just want to dabble in a side project. Before we know it, we have a domain, a website, a logo, a product or service, a paying customer or two, and then we feel overwhelmed by our daily to-dos.
Most online business owners (us, included) rarely take the time to create a SOLID business foundation. We’re going to help you do that here in Step #1 with an exercise we like to call:
“If you’re trying to make something for everyone, you end up making something for no one.”
“If you’re trying to make something for everyone, you end up making something for no one.”
Variations of that quote get passed around a ton in the online biz world because it’s true. The more generic and broad your audience is, the harder it is to attract your ideal customer and prove to them you and your business are the right fit for them.
Let’s look at a BAD and GOOD example of answering the WHO question with a business “tagline”:
BAD TAGLINE – I design websites for businesses.
BETTER TAGLINE – I design websites for wellness businesses.
GREAT TAGLINE – I help yoga instructors by building beautiful websites that get them more paying customers.
The difference between the bad and good should be clear. Many online business owners don’t want to limit themselves to a smaller group of people (customers). But limitations when it comes to WHO you help are critically important.
Put yourself in the shoes (or yoga pants) of a yoga instructor who needs a new website for his/her business. Which “tagline” speaks more directly to you and your needs? Which of those taglines will make you go “oh man, that person is talking to me!”
⚡️ACTION STEP ⚡️ Answer the WHO question by writing your own business “tagline” using the formula of: I help <specific customer type> <your product or service> that get them <benefit of your product or service>.
This is your mission statement. It’s an often glossed-over part of running an online business because you can get going so quickly that you pass right by it.
This is the deeper reason why you do what you do and why your business exists in the first place.
Let’s look at a BAD and GOOD example of answering the WHY question:
BAD MISSION STATEMENT – I’m a web designer who likes designing Squarespace websites.
GOOD MISSION STATEMENT – I have experienced the healing power of yoga first-hand, which is why it’s my mission to help yoga instructors create thriving wellness businesses so more people can benefit from this transformative practice.
I don’t know about you, but I’m pumped to start my own design business that helps yoga instructors just after reading that GOOD mission statement. Pro-tip: A mission statement at the top of your business’s About Page is a great way to let your prospective customers know you’re the right fit for them.
⚡️ACTION STEP ⚡️ Answer the WHY question by writing your own mission statement: My mission is to help <specific customer type> <outcome you want for them> because <reason this personally motivates you>.
We’ve touched on this slightly already with the WHO and the WHY, but let’s make sure you’re crystal clear with your WHAT. It’s not enough to simply say, “I create beautiful websites” (for our ongoing example). You need to speak to the outcomes your customer wants for their own life and business. How will your business make their life better?
Let’s look at a BAD and GOOD example of answering the WHAT question with a benefit statement:
BAD BENEFIT STATEMENT – I’m a web designer who creates Squarespace sites for yoga instructors.
GOOD BENEFIT STATEMENT – By creating a beautiful and easy to navigate website, I help yoga instructors get more paying customers and create a stronger connection with their audience of students.
The key difference here is looking at your business from the perspective of your customer. Which person do you think a yoga instructor more wants to hire and give money to? The first example (BAD) or the second (GOOD) which speaks clearly to the outcome a yoga instructor wants?
⚡️ACTION STEP ⚡️ Answer the WHAT question by writing your benefit statement: By <specific thing you do>, I help <specific customer type> get <outcome(s) your business helps them achieve>.
Now, we’re going to go way deeper on your specific product or service later on in Step #2, but for gaining more clarity and strengthening your business’s foundation, let’s make sure you can concisely explain your offering(s).
Let’s look at a BAD and GOOD example of answering the HOW question:
BAD OFFERING DESCRIPTION – Website design.
GOOD OFFERING DESCRIPTION – I build beautiful and simple Squarespace websites through 3 design package tiers: A simple 1-page website starting at $500; a 5-page website starting at $1,500; and a 10+-page website starting at $2,500.
The important thing to note here is just to get clear and specific on what someone can buy from you or how they can hire you AND make the options well-defined to do so. Note: If you have a hard time being concise here, maybe that’s an indication that your customers are having a hard time understanding the complexity of what your business offers!
⚡️ACTION STEP ⚡️ Answer the HOW question by describing your offerings. There isn’t a specific formula to share here but try to be concise if you offer more than one package or option.
Alrighty, that’ll wrap up Step #1! Once you finish answering the 4Qs you can put them together in a nice recap image or PDF (if you’re feeling fancy, obviously).


Next, we’re going to talk about your product or service offering. We like to refer to that thing you’re trying to sell as your “castle.” Think of your castle existing on an island floating out in the middle of the ocean. Your job is to get people over on the “mainland” to know your castle exists and show them how to find your castle (and pay you!)

You already defined what your offering is in the final Q of Step #1, so that should be clear as day. These next questions are really important to answer before you pour more effort into marketing and promoting what you sell:
Too often business owners create a services page or a sales page and because they’ve spent so much time working on it they don’t see the glaring issues with it. Once YOU feel your castle is in tip-top shape, it’s time to get a second opinion.
Put on your mental armor and lather up your thick skin (ew?), because the feedback you receive might sting a bit. That’s okay! You want people to point out any obvious issues with your services or sales page. You especially want this information before you invest valuable time and effort trying to get potential customers to buy from you.
🔥 HOT TIP 🔥 On average, 50% of your website traffic is going to come from a mobile device. Take a look at your services/sales page on a mobile device and ensure it’s in tip-top shape there too! It is easy to read? Is it formatted well? Is the mobile buying experience easy to use?

Think of the journey between the mainland and your castle like a broken bridge. If it’s not easy for someone to understand your services/sales page and to buy from you, you’re likely sending potential customers down a broken bridge to your castle!
Our vote, 99% of the time:
Why? You don’t want your potential customers to get fatigued as they click page after page around your site trying to find the service or product that fits their needs. You want to start by giving them a clear, concise overview of what you offer. THEN, if you need individual description pages to explain more about each option, you can do that, but at least you made the journey as easy as possible on your potential customer.
If you offer multiple packages or pricing options keep them together. We’ve all seen pricing boxes on websites and there’s a reason these are so common, they work!
*Additional note for the Purchase section: Whether you’re using multiple package boxes or not, don’t forget to remind someone why they are buying from you right next to the buy button. Reiterate the problem you are solving and the outcome you’ll deliver to your customer.
Here’s a video lesson taken from a program we include in our Un-Boring Group Coaching Program where we go further in-depth about creating a great sales/services page:
We would highly recommend building your services or sales page using the P.O.P.S.E.P. formula. As a reminder, we’ve sold many products and services over the years and made good money doing it. We have the experience and the data to back us up.
⚡️ACTION STEP ⚡️ Go through your current services/sales page and apply the P.O.P.S.E.P. formula to it. Make sure your packages or buying options are easy to understand. Then, share this page with colleagues for feedback (and test everything on mobile!)

The foundation is set and your offering castle is now strong and just waiting for customers. But, how do they get to your castle? How does someone find out about your offering?
When it comes to promoting your online business, the strategy we often refer to is called “marketing bridges.”
What the heck is a “marketing bridge?” Simply put, a “marketing bridge” is what takes someone from a stranger to your business to a paying customer. It’s the journey they go on from discovering you exist to then paying you money. You have to build that bridge brick by brick to lead someone down the path to your castle.
Think of a marketing bridge as a journey to help guide your potential customer from the mainland to your castle. As much as we’d like to tell you that slapping a B.F.B.B. (Big Fat Buy Button) on your website’s homepage is enough, 99.9999% of the time it’s not.

A solid marketing bridge takes someone down a path:
🕵🏻♀️ FURTHER READING 🕵🏻♂️ For the sake of keeping this article from becoming as long as a Harry Potter book, we’re not going to go into great detail on all 13 of our marketing bridge examples here because we do that in this article right here!
We’ve compiled a list of 13 marketing bridges we’ve used over the years. There are likely many more to choose from but we’re sharing our specific marketing experiences. Feel free to click any of them to read more about each:
We DO want to touch on two different marketing bridges in this article, so let’s look at an example for a service-based/freelancer business (like a web designer) and digital product business (like an online course creator).

The concept: The “Consultation” marketing bridge is almost a must-have if you are a freelancer and are trying to get more clients. It can also work for digital product businesses that sell high-valued offerings too. Either way, the concept is that you hop on a 1-on-1 call with a prospective customer and discuss how your services (or products) can solve their problems.
Why this marketing bridge works: When you’re directly creating something custom for someone (ex: a Squarespace site for a yoga instructor) they want to know you are the right fit. This is where having the 4Qs answers (from Step #1) becomes incredibly helpful! This marketing bridge also works because it shows more effort than most people want to expend these days.
How to take this marketing bridge one step further: Want to add more pizzazz to this marketing bridge and potentially increase its effectiveness? Before having someone fill out a contact form or calendar scheduler, have them download a helpful PDF or have them opt-in to a short series of emails (two other types of marketing bridges). THEN offer the ability to do a consultation call with you, as this creates a more engaged and interested customer.
Our experience with this bridge: We haven’t worked as freelancers for many years but we have used consultation calls to sell digital products in the $1,000 – $2,000 range. When we used to offer client services, consultation calls were a critical part of the marketing process. The key with this marketing bridge is to have the consultation call sign-up process as efficient and straightforward as possible. And while the call itself is important, the follow-up pitch emails are where the final move across the marketing bridge and into your offering castle will happen!

The concept: The “Email Course” marketing bridge is simple in concept. You send a series of emails around your offering topic and you soft sell in those emails, along with emails at the end of the sequence that are a sales pitch. Free email courses can take a good amount of experimentation (read: trial and a good amount of error) to get it converting people to paying customers.
Why this marketing bridge works: You probably aren’t a stranger to online courses but what most people don’t tell you is they can be hard to sell in the beginning (heck, even later on too!) The free email course marketing bridge works because it specifically shows HOW you teach and WHY you are the right person to learn from. If your potential customer gets a lot of value from the free email course, they’re extremely likely to buy your paid online course.
Our experience with this bridge: We absolutely love free email courses and think they are a solid way to build a lot of trust with your potential customers (from the mainland!) Over a few days you can help your potential customer solve problems around your email course topic and then show them how your offering speeds that process up or does some/all of the work for them. Email courses work well because they tend to be a great way to generate passive income (once you’ve tested out different emails, pitches, sales pages, etc).
👩🏻🦰 TRY US OUT 👨🏻🦲 If you want to sign up for one of our free email courses, check out Discover Your Differentiator, a free 7 lesson course designed to help you create more authentic branding by defining your Brand DNA, your ideal audience and your Brand Mission.
We’ve just given you a list of 13 different marketing ideas you can implement in your own business. There’s no guaranteed success with any of them but we have a sinking suspicion you haven’t tried 13 different marketing ideas in the past year.
Invest time each month in a new marketing tactic and see what bears the most fruit for you business!

Slow, steady, and imperfect wins the audience growth race.
Since 2014 we’ve used an incredibly simple content marketing plan that’s helped us build highly engaged audiences that purchase from us. That plan involves:
We 100% believe in the methodology of slow, steady, and imperfect wins the audience growth race.
You might be shocked to learn that our email list has hovered around the 10,000 subscriber mark for years and our website traffic barely tips 50,000 visitors per month. But that amount of email subscribers and website traffic is enough to have us bring in (the coveted) multiple 6-figures* per year.
*Editor’s 👨🏻🦲note: Including this mention of our business income is not meant to brag or gloat. Unpopular opinion perhaps, but we don’t think you have to hit that coveted “6-fig” mark for your business to be deemed valuable or impressive. A successful business is one that makes enough money for you to do work you enjoy while living a satisfying life. We only share our results to reinforce that we’ve had financial success with very relatable and achievable audience numbers. We’re not JUST about money around here, but we acknowledge cash is oxygen for a business.
If you’re looking for a fast-track plan to skyrocket your audience growth overnight, you won’t find it here, friend. And honestly, unless you’re shelling out 💰💰💰on paid advertising (i.e. Facebook Ads), there is no overnight growth strategy other than sheer dumb luck.
Because we love metaphors, we’re going to share our content marketing and audience growth strategy by talking about salads. Did we say, salads?? Yes, salads 🥗.

Foundation articles are the base of your content strategy, the lettuce of your salad. These are 8-10 searchable and helpful articles on your website that are related to your product/service topic. These articles help you build organic (search) traffic, attracting your ideal customer based on the problems they’re trying to solve.

About 70% of our website traffic here at Wandering Aimfully comes from organic search. In 2019, that 70% number equated to over 340,000 people! Those people are searching for an answer to a problem (mostly in Google) and clicking on an article we’ve written to find the answer.
It’s important to note that we aren’t SEO experts, but we do consider ourselves good at writing imperfect articles that help people based on our experiences and knowledge. We employ a few basic SEO practices, but those can literally be summed up in a few bullet points:
That’s it. That’s our SEO strategy and it’s one we’ve used for over 400+ articles since 2014. We even used it on this article.
🕵🏻♀️ FURTHER READING 🕵🏻♂️ If you want to read everything we know and have learned about SEO, we have just the article for you. We’ve never paid an SEO specialist. We’ve never taken an SEO course. We’ve simply learned the SEO basics and implemented them over the years which has led to organic traffic growth. You can do the same thing!
Now, let’s address a couple of common questions as it relates to writing foundation articles…
🤔 How long should my foundation articles be? As long as it takes to help the reader have their problem solved. Word count doesn’t matter as long as you write from your own experience and are helpful (plus, you can always update/optimize later!)
🤔 What if I hate sitting down to write articles? If you’re not good at “sitting in the chair” then pull up a Google Doc and use the dictation 🎙feature. Pretend you are speaking directly to a friend and trying to help them. Then, go through the dictation transcript and turn your recorded words into an article that can read by your target customer.
🤔 Should I just hire a writer to write for me? Maybe… If a writer you can hire has the experience related to your product topic, sure. But, you shouldn’t hire a random VA to compile an article based on other articles they find. You need to share your unique experience and lessons to truly stand out. You SHOULD hire a VA to help with copyediting and article structure if you feel lacking in those areas.
🤔 What if I already have a bunch of articles on my site, what should I do? Most likely, you need to do a content audit. Our latest content audit was in 2018 and we went from 400+ articles whittled down to ~120 articles. We wrote about our entire content audit experience here if you want to read more.
🤔 What platform will give me the BEST chance at ranking Google? WordPress? Squarespace? The platform DOES. NOT. MATTER. Let us repeat: The platform does not matter. What matters is writing helpful articles that solve a problem for your customer and following a simple SEO strategy like we’ve outlined above.
⚡️ACTION STEP ⚡️ Create a list of 8-10 foundational article topics and publish them! Don’t know what the heck to write about? Here are two tips for you: 1) Use the Google Search autofill technique. Whatever keyword or phrase encompasses what you sell/do, start typing that into Google Search and see what searches autofill – this is a great way to identify what things people are already searching for that you can write. 2) Fill in the sentence “I want to help you…” As it relates to what you do, write that sentence out 8-10 times based on how your product or service can help someone.
We call Part 2 the “fixins.” These are all the black olives, croutons, carrots, cucumbers, tomatoes, did we mention croutons yet?? Fixins are the ongoing serialized content you create to build trust and connection. They’re the pieces of content you publish consistently to build trust with your audience (or to attract new people!)

Over 90% of our revenue is directly tied to our email newsletter.
This is priority #1 for us and has been for nearly a decade. Sending out consistent and helpful email newsletters may seem like a thing of the past but boy-oh-boy do we disagree. We generate over 90% of our revenue directly from our weekly email newsletter.
We strongly believe in consistent email newsletters because:
Sending out a weekly email newsletter is almost non-negotiable for us and has been for many years. Sure, we’ve missed a week here or there, but with only a few exceptions, we’ve been sending out Monday weekly emails for the better part of 7 years. Especially in the beginning, we tried to hit send on an email newsletter every week no matter what (plus, getting 3-4 weeks ahead of your writing schedule helps!)
Our email strategy is very simple: Be consistent. Be helpful. Be entertaining and fun where possible. Don’t be afraid to sell but don’t ONLY sell to people.
It’s no secret that podcasts are continuing to grow in popularity. Where Serial paved the way for the masses to embrace podcasts, online business owners have been doing some form of podcasting for a long time.

Nowadays, it’s never been easier to spin up a podcast. The problem is, most people don’t follow a couple of simple rules when starting a podcast:
🕵🏻♀️ FURTHER READING 🕵🏻♂️ We put together a Starting A Podcast guide that walks through all the details of podcasting. It includes how to structure a good show, why or why not to interview guests, what gear to use, and a strategy for getting early traction in the New & Noteworthy section of Apple Podcasts.
Spoiler Alert: For most people, creating videos may simply be too overwhelming. The tech involved is tough. The awkwardness on camera is hard to get past. But, if you do want to dabble in creating videos we have some thoughts for you (I’ve personally created over 2,000 videos in my time, and no, that’s not a typo).
🎬 Be yourself. This may sound like extremely simple advice, but people can tell when watching videos if you’re trying to be the next Casey Neistat (or whoever is popular on YouTube these days). Sure, take a nod from the pros, but find your own voice and your own unique video style.
🎥Good lighting and good audio go a LONG way. Sure, having a compelling story arc and visually interesting footage in your video is helpful but if your lighting and your audio are crap, people are going to X out of your video faster than you can spell video. This doesn’t mean you need to buy the fanciest gear, it simply means you need to find a good source of natural light to sit in front of if you film yourself or your subject matter and you need a quality microphone (we recommend and use this ~$75 lav mic from RODE).
😬Embrace imperfection. My early videos are awwwwwful. Just terrible and hard to watch. Yours will be too! Everyone starts out crappy when it comes to video. Know this. Accept it. Hit record, edit, and publish. Then move on.
This fixin is probably the one that most people won’t dabble in and that’s okay. You need to pick the fixins that are right for you and ones you can consistently stick with!

⚡️ACTION STEP ⚡️ Decide what fixins are right for you and your situation. Is it a weekly email newsletter and a bi-weekly podcast? Is it a weekly newsletter and a monthly video on YouTube? Or is it a combination of the three? We believe a consistent email newsletter is critical, but the other fixins are optional.
A content strategy that starts with social media is like a building a salad by pouring dressing on the plate. You’d never put lettuce and fixins on TOP of dressing and try to eat it that way. You need the foundation of your salad first, THEN your fixins, THEN your dressing (social media) goes on top.
If you’re running an online business, where you sell a product or service, you’ve probably already created social media accounts. Heck, it was probably one of the first things you did and our assumption is that you probably spend time on social media each week without having a consistent email newsletter and foundation articles. That’s OKAY, but we want to remind you that you are trying to run a business, not just grow a social media following.
You can’t pay your rent/mortgage with a bunch of social media followers.
We believe a few things about using social media:
Social media is the dressing on your content marketing and audience growth salad. It’s definitely something that can make a salad taste WAYYY better but you have to get the other parts of the salad right first.
A couple of questions you may be thinking as it relates to using social media to grow your online business…
🤔 What social media sites should I be using? Facebook, Twitter, Instagram, Pinterest Snapchat, TikTok, the list goes on and on. The key answer here is: Where does your ideal audience spend their time AND where do you want to spend yours? Even if your audience is on Twitter, maybe you don’t like Twitter, then you shouldn’t use it. That’s like forcing yourself to eat a caesar salad when you hate… caesar salads. Pick the platform you can most enjoy and that your audience exists on.
🤔 How often should I post on social media? We’d vote for creating a posting schedule that you can stick with and that matches the platform’s natural ebb and flow. For Instagram, you don’t need to post every single day. For Twitter, posting every day makes more sense. We don’t use Facebook, so we’re no help there. Ideally, you’ll have some understanding of the platform and you can build a schedule for posting content that works for you.
🤔 What the heck content should I even be posting? Ahhh, this is a GREAT question but it’s also a tough one. We like to think of social media channels as a great way to disseminate micro-content from our weekly email newsletter, our foundation articles, and our marketing bridges. What tips, sentences, phrases, takeaways, key learnings, lessons, and stories stand out from the content you’re already creating? Use those as fodder for social media content and you should never run out of ideas!
⚡️ACTION STEP ⚡️ Give yourself permission to not be on ALL the social media channels. For us, we essentially only focus on Instagram. We like the experience, our ideal audience hangs out on IG, and that works for us. Pick the social channel that’s right for you and focus on being consistent and helpful.
Remember who you are creating content for. While it may be fun for you to sit down and write a blog post about the gluten-free bread recipe you discovered last week, does that serve your ideal customer and their needs?
We’re not saying don’t have hobbies and don’t create content around your life. But as it relates to your business, follow the plan we’ve laid out here FIRST and then layer in additional content.
This is a fact. We’ve watched it happen for our businesses and our friends’ businesses around us. Sure, it may take a bit longer than you want to get consistent traffic and audience growth but this strategy works.

You may be utterly shocked that we haven’t talked about your website (with exception to your services/sales page) up until Step #5. There’s a reason for that. Most people START by creating their website but don’t have a solid foundation of the previous steps we’ve outlined to make their website actually work on their behalf.
Your online business’ website exists to help you hit your business goals. If it’s not helping you hit your goals, what’s the point in having it at all?
The big question you should be asking yourself is: How effective is my current home page at serving my business goals?
To answer this question, we’re going to bring our friend “4Qs” back around but adjust the questions slightly as it relates to evaluating the effectiveness of your current website’s homepage.
When a new visitor lands on your home page, they should be able to quickly answer these 4 key questions:

At a quick glance at your home page, is it easy for someone to understand what the heck you do? A potential customer browsing your website’s home page should be able to put you in a mental bucket relatively easily.
One key mistake we see with people’s home pages is they use confusing phrases to describe what they do. We like to call describing what you do your two-word tango 💃. Let’s look at an example:
BAD TWO-WORD TANGO – Website Whisperer
GOOD TWO-WORD TANGO – Squarespace Designer
YOU may think saying something “Website Whisperer” is cute and adds personality, but your ideal customer may have no clue what that means. Can you use cute ways to describe what you do? YES… but only after it’s made very clear. Put yourself in the shoes of your customer who doesn’t know your world inside and out.
⚡️ACTION STEP ⚡️ Make sure you’re answering the question, what do you do? clearly on your home page using a two-word tango (pro-tip: it can be 2-4 words). Make your two-word tango extremely obvious to understand.
When a potential customer lands on the home page of your website, the very top portion of your website should IMMEDIATELY answer the question they’re thinking: Are you for me?
Your potential customer should be able to recognize they are in the right place and that you can help solve their problems.
This question relates back to the WHO question from Step #1. We can reuse it here and this tagline should be at the top of your home page:
BAD TAGLINE – I design websites for businesses.
GOOD TAGLINE – I help yoga instructors build beautiful websites that get them more paying customers.
We’ve already explained why the GOOD example is better, but can you see how placing this at the top of your website will also help your customers know that you are the right fit for them?
⚡️ACTION STEP ⚡️ Are you currently answering the question, are you for me? at the very top of your website’s home page? Make sure your audience is clear and obvious!
The outcome you can deliver to your potential client/customer should also be front and center on your home page. In an ideal world, you are answering this question in the same sentence as the are you for me? question.
Avoid using vague phrases that don’t mean anything. Things like:
Instead, write the extremely specific outcomes you can help them achieve:
⚡️ACTION STEP ⚡️ Avoid vague outcome statements and be as clear and specific as you can so that your potential client/customer knows you are going to help them!
It should be painfully obvious what you want your potential customer to do on the home page of your website. Think of this as highlighting your marketing bridge (from Step #3!)
The call-to-action you want someone to take shouldn’t be hidden or stuffed down at the bottom of your home page, and it might even need to be repeated on the home page depending on the length of it.
You may have seen on our home page there’s only ONE button you click on the entire page:

We did some testing in 2019 with a longer home page and a shorter home page. We found the shorter home page led to a drastically higher conversion to getting people into our marketing bridge (a free quiz). Don’t be afraid to test your assumptions about shorter or longer home page designs and let the data tell you what works best!
⚡️ACTION STEP ⚡️ What is the ONE ACTION (marketing bridge) someone should be taking on your home page? Do not overwhelm people with multiple actions if at all possible.

Online business websites should follow a straightforward 3-objectives approach that involves primary, secondary, and tertiary objectives.
Important note about your primary business objective: You must CHOOSE HARD. Pick a primary audience. Focus on one product or service. (You’re likely already doing this because you’ve done everything in Steps #1 and #2, right??)
As shown in the image above, we believe your objectives should be as follows:
We’re going to reverse the order of listing out our 3 objectives so you can see how they lead into one another…
Tertiary Objective (TRUST/AUTHORTY): We share helpful content (articles/podcast) to build authority. We embrace our personality/uniqueness to build trust.
When people find our home page, if we’ve done our job with our Tertiary Objective, it ushers them into…
Secondary Objective (LEADS): Enter your email for our Free Business Blindspot Quiz marketing bridge.
If our website 4Qs have spoken to our ideal person, they get into our marketing bridge, and then…
Primary Objective (SALES): Buy our Un-Boring Group Coaching Program!
BOOM! Our website goal has been met if all goes to plan!

⚡️ACTION STEP ⚡️ Write out your 3 site objectives as we’ve shown for our own biz. By putting them in order of tertiary → secondary → primary, are you able to see how your website’s home page can more effectively help you reach your goals?
If you are utterly confused about exactly what you should put on your website’s home page, we have a framework for you! We call this the APSOSA Framework and it’s led by our wizarding friend, Webineezer!

You want to be able to identify who you’re talking to and they need to immediately recognize themselves in your copy of your home page.
Speak to the problem that your audience currently has. Remind them what they’re struggling with.
This is where you tell them the solution to their problem, but you position YOUR offering as that solution.
This is where you describe how their life will be better on the other side of buying from you/working with you. Paint a picture of the future they could have.
This is how you stand out from the sea of other websites they’ll check out that same day. How can you be memorable? How can you add your authenticity?
Make it clear what the MOST important action you want them to take is. Be clear about what’s waiting for them on the other side and make it compelling.
If your website’s home page only does those six things, you will hit your website objectives. In fact, we’d say your home page shouldn’t do much more than those six things because anything else probably belongs on other pages of your site (About Page, etc).
🕵🏻♀️ FURTHER READING 🕵🏻♂️ It probably won’t surprise you at this point to know we have an entire additional article that dives deeper into applying our APSOSA Framework to your website’s home page. That article includes a walkthrough video where we redesign one of our coaching member’s home page using APSOSA.
⚡️ACTION STEP ⚡️ Apply the APSOSA Framework to your current home page. Does it meet the six requirements? If you’re not sure, send your home page to a colleague or ideal customer and ask them if it meets the six criteria.
You made it through all five critical steps of fortifying your online business! We know this has given you a LOT to think about. But we also hope that by putting all of these crucial components together in one epic post, you have a central location that acts as a roadmap for how to improve every single aspect of your business.
We know it’s not the “silver bullet” that other entrepreneurs might promise you, but remember…you don’t want to buy expensive hot-trash. 😉
Focus on the foundation, take it one step at a time, and watch your business grow. Now, before you click away, remember not to commit a business FOPAW 😜(get it?? it’s the phrase “faux pas” but in the acronym of the 5 steps?? you get it.):

If you run an online business, sure, you know marketing is important, but how can you improve your marketing efforts unless you break down that big word into more actionable pieces?
In this article, we want to share with your how we break down the broad idea of marketing into more digestible parts, plus we want to give you our proven marketing strategies that you can experiment with to boost revenue for your business.
Before we go any further, we want to make sure this article can actually benefit you. These are three critical pieces of the puzzle you need to have in place right now:
Did you say HELL YES! 💪🏼 to all three of those things? Awesome, then let’s keep going.
Before we dive into what marketing is and how we’re going to help you feel less overwhelmed by it, let’s start with what you WANT:
We don’t think there’s anything wrong with that, especially if you’re intentional about defining how much money is enough for you and why you want it in the first place. More money = more freedom. It means more breathing room, more time for the things you value, less stress, and hopefully whatever makes you money is also helping the person who is buying from you.
In order for your business to make more money, you need more clients or customers—it’s as simple as that. And you’re likely in one of these two categories:
#1: You have a service offering that has been validated (meaning someone has paid for it) but you DON’T have a steady stream of clients knocking on your door to hire you.
#2: You have a product that some people like, but sales aren’t as great as you expected and you’re not sure why.
This is where the all-powerful marketing comes in. We need to figure out the gaps in your marketing strategy to understand why you aren’t getting the number of clients or customers you want. And maybe you’re like hmmm, “I don’t think I have a market strategy,” in which case GOOD because this article will help you come up with one (or two, or three, etc!)
Okay, so let’s take our big term Marketing and break it down a bit…
Marketing is the blanket term to describe anything that connects your audience with your offering (product/service).
Let’s paint the scene for you. Cozy up for some storytime and metaphors!

On one side of this scene we’re painting, we have an island. This island is your business, your beautiful little slice of paradise that is all yours. Your island is on the internet and it lives at your website address.
What you sell is a glorious and beautiful castle sitting on your island. It’s your web design services. It’s your online course that helps people clarify their messaging and branding. It’s your 1-on-1 coaching to help people unlearn the bad habits they’ve picked up in their lives. Whatever you sell, that’s your castle.

Now imagine there’s another bigger piece of land wayyyyy across a body of metaphorical water (a river, an ocean, a sea, whatever body you like). This is the MAINLAND Internet. This is where ALL the people are (your potential customers). They’re hanging out in all kinds of hip neighborhoods like Instagram Alley and Podcast Peninsula and Facebook Group Gulf and Popular Blog Bluff.
Not only do these people have to be willing to leave the mainland and venture over to your island, but they also need to build enough trust with you that they’re willing to hand over their hard-earned mainland dollars to enter your castle.
How does someone move from the mainland to your island?
You need a GUIDED PATH for interested people to get from where they are in all those mainland neighborhoods, over to where your product lives (your island). Now, is it as easy as just dropping your website link everywhere you can think you’re ideal peeps are hanging out? Is that a marketing bridge? No ma’am. Because if it was that easy, you wouldn’t be reading this article right now.
A great marketing bridge that gets people from the mainland to your island requires a step-by-step path, one that constantly invites your audience to deepen the connection with you aka go farther and farther across your bridge until they’re ready to enter your castle. We call these invitations throughout your marketing efforts “guideposts.”
But, just because the marketing bridge exists, doesn’t mean people KNOW it’s there. You need to point them in the right direction and guide them down a well-lit path from the mainland, across your bridge, and to your island and eventually into your wondrous castle. These guideposts represent things like your content marketing, maybe some paid marketing, or anything that can get in front of someone and say, Hey! This thing exists!
Let’s recap the marketing metaphors we’ve laid out for you:
Now that we’ve broken this big vague idea of “Marketing” into its parts, we can more clearly see where people often fall short. In our experience, there are three mistakes people often make related to their marketing bridge.
This is the equivalent of putting up billboards over on the mainland saying “Pay $100 to come to my castle!” when people are just hearing about you for the first time. There’s no bridge there, no journey for them to go on to understand what your business is, how it can help them, and why they should pay you money.
Let’s say you’ve spent time and energy building out a robust, helpful free email course on branding as a lead in to sell your branding course (ps. this is one of our Bridge Blueprints below!) You know it works because a few people have converted to sales. The problem is that no one is finding it! Unless you’re creating helpful content in the form of things like social posts, videos, podcasts or articles, then people who could be your potential customers have no way to stumble across you. Your bridge might as well not exist because it’s not connecting with the wealth of people already hanging out over on mainland/the internet!
It’s not enough to simply build the bridge; as we mentioned, you need guideposts throughout your bridge so that people can gradually get to know your business and build trust.
Imagine this: Someone stumbles across your podcast that’s all about how to plan and run big business events. They WERE listening to the latest true crime podcast, but they decided it’s time to up-level their business knowledge and they’re thinking of running an event in the future so they find you in their favorite podcast app. Woohoo! That’s like someone wandering around the mainland and seeing your billboard that says “Hello! I’m a business and I exist!” Great.
Now imagine if you encourage listeners at the end of your podcast to sign up for your email newsletter. Plus 12 points for you! That’s a guidepost—-and invitation for them to step foot on your marketing bridge. Things are looking good for you. But NOW imagine this ideal customer of yours hops on your newsletter and immediately gets pitched your $1,000 course on how to plan your own large-scale event. She’s like WHOA, I just started listening to your podcast. I’m not ready for this level of commitment!
People *most* often need multiple touchpoints to build trust with you before they buy. Instead of pitching up front, maybe you deliver info-packed, valuable newsletters every week to your customers. Maybe you invite the most engaged subscribers to live workshops or a targeted free video series so they can learn more from you first and really get to know you before they buy.
The same goes for a service-based business, instead of closing the deal on the first consultation call, maybe you want to send a proposal first with ideas about how you plan to help them. With each interaction, you want those peeps coming from the mainland to fall deeper and deeper in love with your brand and to move farther and farther down the bridge.
We want to share with you 13 different ways to build a marketing bridge between your audience and your offering. One quick thing we should note though:
As we talked about at the very beginning of this section, we’re assuming you already have a traffic source or two for your business. Traffic sources can be, but are not limited to:
Okay, now that you understand how we think about marketing, we want to share 13 different marketing bridges and their blueprints that you can experiment with in your business. We’ve ordered the 13 blueprints from easiest to implement to more in-depth.
Important note: Just because a marketing bridge is harder to implement does not mean it will land more sales. In fact, we’ve found some of the simplest marketing bridges are the most effective! Remember to use an experimenter’s mindset as you plan your marketing calendar and try these marketing bridges on for size in your business.
Hello, friend! 👋 This is a great moment to hit pause and let you know that we have a monthly coaching program that teaches you a concept and gives you actionable takeaways. We have an upcoming session dedicated to the topic of Building Your Marketing Bridges.
Why this matters to you is that in our group coaching program not only will we go over our marketing bridges more in-depth (and on a live call where you can work with us 1-on-1 👩🏻🦰👨🏻🦲) BUT we’ve also created checklists for EVERY marketing bridge/blueprint listed below. Along with the checklists, which will give you step-by-step tasks to implement a marketing bridge, our coaching program includes a 12-Month Marketing Calendar to help you keep track of your marketing bridge efforts. If that sounds awesome to you click here to learn more about our 6-Month Un-Boring Group Coaching!

Our 👩🏻🦰👨🏻🦲 Favorite
The concept: The “Newsletter” Blueprint is the most basic marketing bridge for an online business owner but is also one of the most powerful. As amazing as social media platforms can be, they are always changing. However, people’s use of email has stayed steady and the experience of reading email is a lot more focused than quickly scrolling/swiping through posts in a social feed.
Our experience with this bridge: We’ve successfully used the “Newsletter” blueprint to generate over $2,000,000 in business revenue over the past decade. Over 90% of our business revenue continues to come from our email newsletter and that’s why we are listing it as the first, and what we think should be, a foundational marketing bridge you have in place.
The concept: The “Consultation” Blueprint is the most direct and 1-on-1 marketing bridge we’ll talk about. This blueprint is almost a must-have if you are a freelancer and are trying to get more clients but we’ve even used this blueprint to sell higher-priced digital products. Speaking of which, it’s not a good idea to use this blueprint for lower-cost offerings (the time isn’t worth the money).
Our experience with this bridge: As we just mentioned, we’ve actually used consultation calls to sell digital products in the $1,000 – $2,000 range. When we used to offer client services, consultation calls were a critical part of the marketing process. The key with this blueprint is to have the consultation call sign-up process as efficient and straightforward as possible. And while the call itself is important, the follow-up pitch emails are where the final move across the marketing bridge and into your offering castle will happen!

The concept: The “Lead Magnet” Blueprint is like an upgrade to the Newsletter Blueprint. You offer a freebie or downloadable item (PDF, checklist, etc) that someone has to give their email address to receive. Lead magnets are a marketing win-win if the freebie/downloadable thing delivers extra value based on what your potential customer was already interested in.
Our experience with this bridge: Over the years we’ve found that some of our most interested and qualified potential customers come from some sort of lead magnet. Because they are willing to enter their email to learn more about something and invest time doing so, they are usually more ready to purchase from (especially if the lead magnet delivers on its promise!)
The concept: The “Email Course” Blueprint is simple in concept but can take a good amount of experimentation (read: trial and a good amount of error) to get it converting people to paying customers. You send a series of emails around your offering topic and you soft sell in those emails, along with emails at the end of the sequence that are a sales pitch.
Our experience with this bridge: We absolutely love free email courses and think they are a solid way to build a lot of trust with your potential customers (from the mainland!) Over a few days you can help your potential customer solve problems around your email course topic and then show them how your offering speeds that process up or does some/all of the work for them. Email courses are great because they tend to be a great way to generate passive income (once you’ve tested out different emails, pitches, sales pages, etc).

The concept: The “Epic Post to E-Book” Blueprint is not for everyone but it can be the BEST way to create consistent organic traffic and email signups. This article you’re reading right now could be considered an “epic post” with exception to the e-book part (which we’ll talk about in the experience section below). The goal is to create a piece of content that really nails a topic and then offer the reader an e-book version to download, which puts them in your “newsletter blueprint” (or “lead magnet/email course” blueprints).
Our experience with this bridge: We thoroughly enjoy writing in-depth “epic posts” based on what we’ve learned and what we’ve experienced. We find that our “epic posts” are the ones that rank most often and end up on the first page of Google which brings us organic traffic over time. While writing these marketing bridges we realized we had YET to do the e-book portion of this bridge and we’d really only pitched our email newsletter as the guidepost to get someone to our castle.
In our Un-Boring Group Coaching program we’re including step-by-step checklists for all of these marketing bridges. This “epic post” bridge takes a bit of work to put together, but our checklist included in our coaching program will make it muuuuuch easier for you.
If investing $100 per month for the next 6 months feels like the right move for your business’s marketing efforts, we’d love to invite you to join us and our amazing community of online business owners. You’ll get all our marketing bridge blueprints, our marketing calendar, join us for a 2-hour live coaching call around marketing, and we’ll have a 2-week action plan to help you get your marketing ducks in a row! Click here to learn more about our 6-Month Un-Boring Group Coaching!

Our 👩🏻🦰👨🏻🦲 Favorite
The concept: The “Fly On The Wall” Blueprint let’s your potential customer watch you work on a project or experimenting with something. You could be building via blog post updates, video updates, or simply via emails. The idea is to share the behind the scenes of how the sausage gets made and let someone join you on the journey.
Our experience with this bridge: This is one of our FAVORITE marketing bridges. Not only is it a great way to showcase how you work and your personality while you work, people simply love to watch how things get made. When we built this site (Wandering Aimfully) we used this exact marketing bridge tactic and it helped us get a bunch of new email subscribers which turned into customers when we were ready to sell our offering. We continue to use this marketing bridge over and over as we thoroughly enjoy sharing our processes and ALL the behind the scenes goodness.

The concept: The “Quiz” Blueprint is a way to figure out what your potential customer needs and identify ways to help them based on their answers. Quizzes are great at segmenting people and then sending them down paths to further solve their problems.
Our experience with this bridge: This is actually the next marketing bridge we’re going to be exploring! We’ve never tried a quiz before but we finally feel like we have a good idea for one that will lead people through our helpful content and possibly become customers. We love this email provider quiz from the Growth Tools team.

The concept: The “Partnership” Blueprint is all about teamwork making the dream work! Ideally, you’re partnering with another person so you can attract some of their audience to you (and vice versa for the partner). Partnerships can include co-hosted video workshops, guest blog posts, limited edition product bundles, or simple co-branded experiences.
Our experience with this bridge: Partnerships are such a great way to tap into audiences that have already been vetted and are hungry to learn and improve. We’ve done partner video workshops, partner “fly on the wall” project builds (whoa, marketing bridge crossover!), partner podcasts, partner guest posts, and they all are a great way to grow your email list, but more importantly, put up a new bridge and guideposts from someone else’s island/castle to your island/castle.

The concept: The “Group Challenge” Blueprint is a great way to harness the power of word of mouth marketing. The idea is to get a group of people excited about doing a challenge together and working closely with one another. Challenges are perfect for social media as people can quickly connect, stay in touch, and there’s built-in discoverability using hashtags (and leveraging the individual group member’s audience).
Our experience with this bridge: We’ve had great success with group challenges on Instagram, especially with Caroline’s Hand-Lettering Course which used to run monthly hand-lettering challenges. Giving people a list of to-do items and a common goal gets them excited to share and attract other people to the group. We’ve also enjoyed issuing small group challenges to our email list where they can share the challenge with their friends!

Our 👩🏻🦰👨🏻🦲 Favorite
The concept: The “Workshop” Blueprint is something you’ve probably seen time and time again. There’s no denying that a live atmosphere is a great way to engage with an audience, help teach them something, and then sell your offering to them. The great thing about workshops (hosted live or recorded on-demand) is that not only do you have the opportunity to sell during the workshop, but the follow-up sales email series is also a natural fit.
Our experience with this bridge: The idea of hosting a live workshop (or even recording one to be watched on-demand) can be daunting for some but it’s truly one of our favorite marketing bridges. Not only do we love to share knowledge and teach on a topic but it’s also a great way to genuinely connect with people. It’s never been easier to host a workshop (or webinar) and we run all of ours using Crowdcast (aff link) these days as they make much of this blueprint easy for you!

The concept: The “Video Series” Blueprint is extremely similar to the “Email Course” blueprint in that the videos are delivered via… well… email! The main difference with this blueprint is that video is a much more engaging media and you can share your personality and build a rapport with a potential customer faster. Plus, video can be a much better medium for teaching with all the extra bells and whistles you can add in the editing process.
Our experience with this bridge: We’ve used video to our advantage quite a bit over the years but only on a few occasions have we followed this blueprint. Mostly that’s because we’ve been spending time using other marketing bridges and we simply forget about the video series as a marketing bridge (yep, even we miss out on our own marketing opportunities!) If you have the chops to record and edit videos, a video series blueprint could work wonders for ya.

The concept: The “Free Trial” Blueprint is definitely one of the most complex marketing bridges to create but if you’re selling a recurring product (like a membership, coaching, or software) a free trial can be one of the highest converting marketing efforts. The idea with a free trial is to give your customers enough access to show them how your product or service can be useful enough for them to want to purchase from you.
Our experience with this bridge: Free trials are simply a no-brainer if you’re selling a software product. Our other business (an online course software called Teachery) has been built entirely on the free trial marketing bridge. Zero other bridges have been constructed and Teachery has generated over $500,000 in revenue as a side project. But, it’s not just software, Wandering Aimfully used to be sold as a membership community and we tested a 1-month and 7-day free trial with some success. Truthfully, we didn’t put a lot of effort into the free trial marketing bridge with Wandering Aimfully but it still worked!

The concept: The “Cool Microsite” Blueprint is last on our marketing bridge list because it typically takes the most effort to create. Putting together a cool microsite takes planning, technical know-how, great copywriting, and more often than not needs to leave the microsite visitor saying, “wow, I’ve never seen anything like that before!” The cool microsite marketing bridge is a great one if you can spin up unique share-worthy experiences that people will pass around and help generic buzz for your offering.
The “Cool Microsite” Blueprint – Traffic → Microsite experience → Email signup to get notified → email pitch
Our experience with this bridge: This marketing bridge has eluded us because of our technical limitations but one we absolutely love is from Growth.Design (this one on Tesla is awesome). A microsite doesn’t have to be a huge technical undertaking but more often than not to make a big impact you do need to do more than just slap a page together with a standard website page builder.
Our hope is that the 13 marketing bridges we’ve shared with you in this article have given you a TON of ideas for your online business. We realize you may have tried a few of the marketing bridges already but we’re fairly certain you haven’t tried them all because we haven’t tried them all (and we do a lot of stuff!)
It may sound like a very simple step for your business but are you actually planning out your marketing? Are you taking the time to set up a marketing bridge, gather the data from it, and review the entire experiment to see how things went?
Shameless plug: We’ve created a done-for-you marketing calendar that we’re giving to all our 6-Month Un-Boring Group Coaching customers. Not only will our calendar help you plan and prioritize your marketing for the next 12 months but we’re also including Marketing Bridge Review Sheets. These review sheets will help take the guesswork out of analyzing and reviewing each marketing bridge! You can sign up for our Un-Boring Group Coaching right here if your interest is piqued and you want us to help you streamline your marketing.
As consumer behavior evolves, your marketing efforts need to evolve as well.
Anytime you feel like you’re not getting the number of sales or clients you want, it’s important to reevaluate the other parts of your sales picture.

Remember, as consumer behavior and business trends evolve, your marketing bridges and guideposts need to evolve as well. We reevaluate all our plans every 6 months or so, but it’s usually every 2-3 months where shaking up our marketing focus.
We’ve been guilty of focusing too much on a marketing strategy before and not enough on the core offering (the product or service). You definitely want to make sure your castle and your island are in tip-top shape before you start trying to get customers from the mainland to find you.
As a reminder, we’ve created step-by-step checklists for each one of the 13 marketing blueprints we’ve shared here. You could absolutely figure these out on your own but if you’re the type of person who wants to save time and learn from folks who’ve done the hard work for you, our 6-Month Un-Boring Group Coaching will be perfect for you! We’ll help you with your marketing AND continue to teach a topic and give you actionable transformations in your business each month.
Oh hello there 👋! The blind auction to purchase our first brand and website has completed! But GUESS WHAT? We’re making more Squarespace Templates… Enter your email below to make sure you don’t miss out on the next one!
We’ll be creating a fictional brand (complete with a logo and custom brand elements) and then selling the entire thing in a fun way.
We love branding, design, building Squarespace websites, sharing our processes, documenting the journey, making money in unique ways, and THIS experiment is bringing all of those elements together!
What started as a simple comment I made to Jason (“I think I want to get back into doing some design work”) has turned into the in-depth post you are currently reading. Jason and I knew we didn’t want to actually take on a client and deal with the back-and-forth nature of that relationship, as we did that for years and it’s not what we’re focusing on now. So instead, we asked ourselves, how could we get creative with this idea and do something different with brand and website design?
Watch the introduction video Jason and I recorded about what we’re calling Building A Squarespace Site from Start to Finish (or BASSSF, as Jason loooves to say):
In the next couple sections of this post, you’ll get to watch me break down every step as IF I were working with a client. I’ll be walking you through the processes I’ve honed over the years, which include:

We love doing things differently around Wandering Aimfully. We believe thinking outside the proverbial box can not only help you stand out but it can help you generate revenue. Well, we’re putting that belief to the test with this project.
At the end of this post, ONE person (or company) will be able to purchase the completed brand and Squarespace site. But, we aren’t just slapping a price tag on things, we have something fun up our sleeves.
If you enjoy projects like this, jump our email list so you don’t miss when we announce the next one:

Hello friends and welcome to the Week One update of BASSSF! 👋 If you were wondering, yes, Jason is constantly saying “BASSSSSSFahhh” around the house (not just in these videos).
As you’ll see in the mood board video below, I deviated from my normal branding process just a bit by starting with color palette inspiration and building out the mood board from that starting point.
If I was working with a client to build this brand, I would go through the steps that I layout inside Better Branding Course (our in-depth branding course included in our Wandering Aimfully membership #shamelessplug) to uncover the client’s Brand Story. This would include things like:
However, since I didn’t really have a business or person to inform my tone words, I was left to my own devices to come up with my own. Rather than pull five random words out of thin air, I let creative inspiration guide me to a color palette I thought was interesting and I assembled my tone words as I found each of my mood board images.

I know this project is supposed to focus on building a Squarespace website, but in my experience designing something just to “look good” isn’t fulfilling or challenging. In order to end up with a site that I felt could translate to a real business out there, I needed to know what “brand” my final website would be promoting.
Even if you’re a business with an existing brand you’re happy with, I recommend putting together a new mood board if you’re planning on refreshing your website. You may just find new details and design inspiration that elevates your final site that much more.
Once I had my mood board finalized, it was time to turn that into a brand that would inform the design of my website.
Many of our members inside Wandering Aimfully and those of you who read our content primarily fall into the category of “freelancer looking to also sell digital products.” I knew I wanted my final site to be able to serve an ultimate business owner who would need a way to both promote their services AND their products. So, I decided my placeholder brand is a “creative studio” who offers marketing consulting packages and an online marketing course. This, of course, could easily be swapped out for any kind of freelancer. A copywriter who offers writing services and a copywriting course, or a designer who offers design services and a design course. You get the idea.
For those of you who aren’t full-time designers, making the leap from a mood board of random images to suddenly picking out fonts and designing a logo is daunting. That’s why in this video I walk you through a process I go over extensively inside Better Branding Course called “building your visual vocabulary.”
Building a visual vocabulary simply means accumulating an understanding of how certain visual details translate to an emotion, tone, or feeling.
Why does a dark indigo watercolor painting evoke a sense of moodiness? Why does a skinny serif font feel traditional and delicate while a thick sans-serif font feels bold and modern? These are the connections you want to pay attention to and use them to build a rolodex of design decisions.
This will make it much easier to turn your mood board and tone words into a brand identity design (logo, color palette, typography, graphic elements, etc.)
In the Brand Styles video (below), you’ll see me speak to each of the tone words and what visual details in my mood board connect to those tone words. Then, you’ll see me take that detective work and turn it into a list of graphic elements or “building blocks” to formulate my brand.
You’ll see my tricks for testing out custom fonts and graphics before you buy them, and you’ll see me experiment with creating my own graphic elements based on the inspiration found in my mood board.
Here’s a look at the final brand board. Now that we have this completed, we’re ready to START the Squarespace website build next week!


Alright, we are back with another exciting installment of BASSSSF! Who’s ready to actually jump into Squarespace?!
Now that we have solidified the brand, it’s time to bring that brand to life by creating a unique and custom website design. The first step in the process for me is to pick a Squarespace template and set up the basic pages in the site. Lately, I’ve been using the Brine Squarespace template because it has all the features and flexibility any small business could need and plenty of design options to choose from.

I took a few minutes to plan out what pages I wanted this basic site to have, as well as to brainstorm some ideas about what content would live on each page so I could make sure this site had the basic necessities a future owner would need to run their business. I also sketched out a VERY basic site map just to figure out what pages I wanted to have in my navigation. For a more complicated site, I would advise spending more time to think through the architecture of the site, but in this case, every page is basically accessible from the home page so it’s pretty straightforward. I did decide that I wanted to separate my pages into a primary and secondary navigation, just to keep the main options in the navigation as streamlined as possible and really lead users to the two money-making pages on the site, being “Work With Us” and “Course.”

With my site architecture decided, I easily add these various pages to my Squarespace site in the corresponding navigation sections. Before I add any content to those pages, though, there’s a very important step in the process I have to tackle: my brand styles page!
A very important step in the process that you’ll watch me complete in the first video below is creating a “Brand Styles” page in my Squarespace site. I do this before I ever layout any content on my pages.
For my Brand Styles page, I add all my headings and paragraph text (in index sections with a background banner and without), all the various image block style designs, and a few blog summary blocks. This way, I can take a half-hour or so to decide on which brand fonts to apply to my headings, how I want to apply my brand colors to various elements on the site, and I can install my custom brand font before I even lay out my pages.
Isn’t the Brand Styles page super fun??

Adding the creation of a Brand Styles page as a step in my Squarespace design process has been a GAME CHANGER. It allows me to apply my brand identity elements (fonts, colors, etc.) and style some basic content blocks before I ever start adding content to my pages. This does two things: 1) It saves me time from having to adjust my site styles every time I add a content block during my layout phase and 2) it reduces decision fatigue during my layout process because I’ve already decided on most of the visual styling. Plus, after the end of laying out the content on my pages and inserting all my content blocks, my site already looks incredibly “branded” and then all I have to worry about is final customizations and design details.
Once the Brand Styles page is created, the next step in the process is to actually add content to each page and decide on the overall layout—the order and arrangement of elements on the page. Again, before I ever hop into Squarespace I like to sketch things out just a bit on a loose wireframe. This allows me to see at a glance whether I’ll need text vs. images or any other visual components in order to communicate the basic things I want to include.
For the more complex pages that might require more information, I’ll turn those into “index” pages in Squarespace, which just gives you the ability to stack multiple sections on top of one another.
I start with my home page, sectioning out the content I want to include as needed and then adding the basic content blocks that I need. For example, if I know I want an image in a particular section, I’ll add an image block and play around with the design settings to utilize the different image styles that Squarespace offers. (This is also when it’s nice to have pre-branded elements thanks to our Brand Styles page stage of the process.)

I DON’T obsess over the final layout at this point in the site creation process. My only concerns are that a) all the content I want on the page has been added via content blocks, b) it’s in the order I want it scrolling down the page, and c) I’ve thought about arranging the position of elements in a visually pleasing way.
I do this for every single page of the site, adding text, images, buttons, and galleries where I see fit and making sure to include filler text and images so I can start to see the visual design of each page emerge.
Watch as I lay out the home page and about pages, and share some of my basic tips for this layout stage of the process…
Okay, once I had each page’s basic layout and content solidified, it was time to crank up the magic! This last phase of the process is where the design really starts to feel custom and one-of-a-kind.
These details basically fall into one of these three categories:
I use custom background banners to layer in my branded graphic elements and break up the recognizable “striped” look of a Squarespace template index page. Then, for my image blocks, I embellish my photos with things like borders or shapes to create a more custom and finished effect that goes beyond the standard website photo. And lastly, I pepper in small graphics and content separators to add unexpected moments between more standard layout elements like photos and text blocks.
Watch as I go through each of these design additions to customize the home page:
Pro-tip: I use the home page as a sort of sandbox to test out different design executions before jumping into any other pages.
Once I’m happy with the final home page design, that’s when I repeat those design executions in similar ways throughout the rest of my pages to make the whole site more custom. After all my pages are designed, that’s when I head back into my Squarespace settings and finalize every last detail like my favicon, styling the different add-ons like an announcement bar or email pop-up and optimize my designs for mobile.

Sound the trumpets, it’s time for the big reeeeveeeeeal! We are so excited to share the finished website for BASSSF and showcase the brand in action…
In that reveal video (not an HGTV show, sorry Jason) we talked in detail about the finished website, but here’s a list of everything that was completed in the final week:
WHEW! That’s quite the list of stuff to accomplish and make sure was branded and looking sharp.
Head on over to the Galactic Creative Studio website and click around!
You can also click this fancy image too…


If you watched the reveal video then you know we sold the entire BASSSF brand and Squarespace site using a blind auction. But if you didn’t watch the video, we simply held a blind auction where people submitted bids to buy the brand and site over a 5-day period.
Once the auction ended, we contacted the high bidder and started the process of payment and transferring all the goodies. And a friendly reminder: This was NOT a template or kit that will be sold again! Only ONE person/company now owns the Galactic Creative Studio brand and site 👍
Thanks for checking out our BASSSF project and we hope you enjoyed it! If you want to see more projects like this from us in the future, hop on our email list and stay tuned!
We, Caroline and Jason Zook, the people behind Wandering Aimfully, both come from a client-business background. I, Jason, started my first business in 2007 called Thought & Theory which was a small web design company. Caroline started a design business focused on branding in 2014 called Made Vibrant.
(Ps. Feel free to watch the abridged video version of this guide here:)

We know it’s unconventional, but we’re happy to give away some of our resources without making you give us your email address first. That said, if you DO find this guide and this worksheet helpful, sign up for our newsletter where we share worksheets like this every Monday.
We’ve worked with thousands of clients and know how helpful it can be to create a revenue stream that isn’t directly tied to trading time (one-on-one) for money.
But, transitioning your business from clients to digital products can be daunting. Where do you start? What digital product is best? How the heck do you find the time to create a digital product while barely having enough hours in the day to run your client business?
We’ve got you covered! In the next few sections of this guide, we’ll break down the transition from clients to digital products in manageable and practical steps.
Wait, what? We aren’t diving head-first into the digital-product-creation waters? No friend, we are not.
You see, part of making any transition in life (or business) is to do so gradually so that you don’t overwhelm yourself and sabotage your chances of actually completing the process.
Raise your hand if you’ve tried to make a big shift in your life only to fall back into old habits a few weeks later? Yeah, we’ve been there too.
This is why we start this guide with an important foundational task…
Everyone put on your Practical Pants (patent pending), it’s time to get a few key pieces of your client business humming along as smoothly as possible.
We can’t stress the value and importance of time blocking enough. The basic principle is to look at every hour of your day (or 30-minute chunk) as a block of time that you can spend on work, life, etc. Let’s say you want to only spend five hours working every day. Your time blocking might look like this:
That’s just one example of how you can structure your day using time blocking. One important thing you might notice is that time blocking isn’t reserved just for working hours.
You want to use time blocks for your life/adulting schedule as well because if that’s not in order it will impact the time you have available to work on client projects each day.
 time
time
This example image of time blocking shows the hours you block off for client work. It’s also a great way to see how many billable hours you spend each week to ensure you’re getting paid for your time spent work. In this visual, you’d ideally be working 25 hours per week!
timeWhen you run a client-based business your time IS money. Each hour you work you need to be getting paid for otherwise, you’ll run a business that isn’t profitable. Use a time-tracking app like Toggl.com to actually “clock in” when you start working.
As example, you could start tracking your time using the schedule above at 10am. Did you, in fact, get two hours of work done for Client ABC as you planned? Did the tasks and milestones you had for that client get accomplished?
By actually tracking your time and comparing it to your client proposals/estimates you can find out how efficient your business is currently running.
Time is a funny thing. When we give ourselves as much time to accomplish a task it can feel like that task goes on forever. This is proven in science by Parkinson’s Law:
Parkinson’s law is the adage that “work expands so as to fill the time available for its completion”. If you give yourself three hours to complete a task your brain will think it has three hours even if the task could be completed in one.
By constricting the amount of time you can spend on any given to-do item, you’ll get better at working quickly and efficiently. Both Caroline and I saw this happen firsthand with our design businesses. What used to take us multiple hours could get accomplished in a fraction of the time when we only allowed ourselves a certain amount of time to complete what we were working on (yes, that included getting into “design flow”).
When your working hours are efficient you’ll get faster at accomplishing your work, thereby freeing up hours for… you guessed it… digital product creation!
But hold on, we’re not quite ready to jump into digital product creation. Let’s tackle one other big foundational topic…
You know those people that say, “describe for me your perfect day – what does that look like for you?” and you just want to slap them? We get it. We want to slap those people too at times. However… they bring up a really valid exercise.
It can be easy to dismiss the perfect day question as impossible. No one has a perfect day, right? Well, just because no one actually HAS a perfect day, doesn’t mean we can’t set ourselves up for the best day possible.
Part of transitioning from client work to digital products is understanding what your life looks like during the transition and after (depending on what your specific goals are).
Your Lifestyle Vision for the 6-month part of the transition could look something like:
Now, obviously, those 6-months milestones aren’t going to happen just because you envision them happening. That’s what the rest of this guide is for! But before we jump ahead, let’s also outline examples for 12 months.
Your Lifestyle Vision for your business in 12 months:
It’s great to imagine your perfect life. It’s wonderful to think about your work days filled only with work you love doing. But these things don’t happen because you simply think about them.
Your ideal life happens when you prioritize making it happen.
What are the steps you need to take to get yourself from where you are right now in your transition to digital products?
Use your Lifestyle Vision to write out a plan of action to get you where you want to go in the next 6 or 12 months. Break it down month by month or week by week to give yourself an action plan.

Odds are if you run a client business right now you may not have an email list of any kind. You might have social media accounts but they’re used more for photos of your dog and your food adventures than anything business-related. Unlike digital products, having an audience isn’t a necessity when it comes to landing clients and working with a handful of people each month.
If you want to transition to selling digital products, building an engaged audience around your product topic is an absolute must.
Fear not! Building an audience doesn’t have to be scary and intimidating. You also DON’T need to build a big audience. What you need to focus on is building the right audience of people, people who will become customers of your digital products.
I’m going to highlight some high-level audience building tactics in the next few paragraphs but we also have an accompanying guide devoted to Audience Building if you want to bookmark that for future reading: The Ethical Guide To Building An Email List Without Sleazy Tactics
For the rest of this guide let’s pretend you’re a web designer (haven’t you always dreamed of pushing pixels around??) You currently offer your web design services to clients and that’s as far as you’ve gotten. This is you and this is the example we’ll focus on going forward. Cool? Cool.
As a web designer who works with clients you know what it takes to run a web design company, or just work as a freelancer, or however you want to describe it. The person you KNOW you can help is a previous version of you!
So often people want to embark on a completely new journey with digital products, forgetting that they’ve spent years honing a skill they can teach other people (read: previous versions of themselves).
One example customer: Someone who is just getting started as a web designer.
Okay, great. We have a customer in mind, but let’s define a few more things about them to make them your ideal customer. Some questions to think about (and answer):
By answering those questions and adding more texture to your example customer you create your ideal customer. Now you might talk about your ideal customer like this:
I help web designers who want to work a flexible schedule, who won’t work with companies that harm the environment, who aren’t afraid to make jokes about The Office, and who predominately build Squarespace websites.
Holy moly, that’s specific, right? Do you immediately think that feels limiting? Well, guess what? It’s not.
It’s unlikely that you will always be talking to your ideal customer but your goal should be to try to so you can attract the RIGHT people and push away the wrong people.
By getting specific with who your ideal customer is you can speak more clearly to the things that resonate with them. Trust me on this one, the more you can create a connection with customers, the easier it is to help them AND get them to purchase from you.

Remember that Lifestyle Vision exercise where we said 6 months and 12 months were the milestones? Well, that’s on purpose because it takes time to build a digital product business while running your existing client business.
The things you’re going to need extra time for while you make the transition from clients to digital products are:
Right now we’re just talking about the third bullet in that list, so you can see how thinking you’ll build an audience overnight might not be a practical idea.
We do have another in-depth guide that goes into audience building, but we won’t leave you high-and-dry here. The quick hits of what you need to think about when it comes to building an audience of your idea customers are:
Now, granted these five items all have their own bit of nuance and tactics, but they are the most important things should focus on.
Two items of additional reading if you want to dig deeper on building an audience:
The Ethical Guide To Building An Email List Without Sleazy Tactics – Our in-depth guide I mentioned on building an audience. This is the way we’ve built email lists over 25,000+ people who support us and have been the main source of our income since 2013.
Define Road Runner Rules To Create A Foundation For Your Business – To go a bit deeper into identifying your ideal customer you can use this Road Runner Rules article to create a set of rules for your business.
We’ve watched it happen time and time again: Someone puts up a website, has defined their ideal customer, starts creating content, has an email list, and then two months later completely stops showing up. Why does this happen so often? Because people’s expectations about how many audience members they’re going to attract in a short amount of time are never clearly defined (and if they are, are unrealistic).
It’s time to work your way backward from your 6-month Lifestyle Vision and see what needs to be done in the audience building part of this transition process.
When it comes to digital product sales, a really good email list will convert at 3-5%. To be honest, if you’re starting your audience from scratch right now, you’ll probably see a much higher conversion percentage because you’re going to build an audience around a specific topic and digital product offering.
For our example, let’s assume you’re selling a $100 online course. Quick math would tell us that you’d need 20 customers per month to reach your 6-month goal of $2,000 per month in revenue.
(Feel free to adjust these example numbers with your own estimates to get the most realistic idea for your situation!)
With 20 customers being your estimated number, if we go back to that 3-5% conversion metric and pick 5%, you would need to grow an email list of 400 subscribers in 6 months (400 * .05 = 20). That doesn’t sound too bad, right? It shouldn’t! But remember, you’re trying to make $2,000 per month, so you may need to set your sights a bit higher by the end of 6 months if you want to get 20 customers per month.
So, let’s recap:
These numbers are ABSOLUTELY doable! The key is going to be establishing realistic numbers for yourself and then making sure you’ve built a content funnel to attract and help the right customers.
Speaking of content, ready to talk about that?
There’s one simple thing I want to ask you to kick off this section on content:
Where do you go when you need to find the answer to a question?
You answered Bing, right? It’s totally Bing! Okay no, you probably said Google (or maybe even YouTube).
The way you think of searching for answers to questions is the way you should think about creating content to grow your digital product audience!
While social media can be important, we believe digital product businesses need searchable content FIRST. Sure, an Instagram and Twitter strategy can be helpful, but those platforms don’t readily offer up answers to people’s questions (unless, you know, that question is how many cute puppies can I scroll through in the next 4 hours??)
If you guessed that we had a separate guide dedicated to content creation and search engine optimization (SEO), then you would be correct! I’m not going to leave you high-and-dry in this guide, but you may want to bookmark our SEO Guide as well.
Bookmark this sucker for future reading: Everything You Need To Know From My Experience With SEO
When I say “searchable content” I’m explicitly referring to written posts/articles or videos. Seeing as Google and YouTube are the #1 and #2 places people go to search for answers to their questions, it makes sense to focus your content creation efforts on one of those platforms first.

That image shows you two articles that are the #1 result in Google and drive significant traffic to this website. But, and this is important, those articles were never written to be the #1 result in Google, they were written to be helpful and to answer a specific question we knew people were searching for (because we searched for it ourselves!)
One of the biggest myths when it comes to creating content is that you have be a “writer” in the sense that most of us think about that word.
Raise your hand again if you have imposter syndrome when it comes to writing. It’s okay if your hand is up, we’ve been there too!
I was most certainly NOT a writer when I started my previous website JasonDoesStuff that shared a helpful entrepreneurial article every week from 2014 – 2018. Each week I set out with the intention of writing a helpful article about taking more action in your life and business (a topic that, admittedly, was a bit too vague). From 0 website visitors and 0 email subscribers in 2014 my articles started to gain some traction in Google search results and through my own promotion efforts. At the end of the first 6 months, I’d written 26 articles, my website was consistently getting over 10,000 visitors per month, and my email list had grown to 2,500+ people. This was without having a guide like this to help me speed up that process (or have any concrete plan of action!)
Those five little words were an amazing jolt to my writing muscles. All I had to do was fill in the rest of that sentence with something I wanted to help people with and I had a topic to expand upon.
Now, for you, we’re going to take that tactic up a notch and go back to the focus on searchable content. I’m using a web designer for the examples below, feel free to replace with your current focus and come up with a few “I want to help yous…” for your ideal customer/audience member:
On and on and on. My guess is you can probably rattle off 10-20 “I want to help yous…” in the next 5-10 minutes. And the beauty of that is you just came up with your first 10-20 articles!
When you’re just dipping your toes in the content creation waters it can be easy to think an article isn’t good enough. Yet, unless someone emails you and tells you that, there is no reason you should think it.
Now, I’m going to be 100% honest with you: Your early content is probably going to suck. This is OKAY!
Every couple years I go back and read through my old articles and I’m embarrassed by them. How the heck did people not cringe at what I wrote? But then I remember that most people are just looking for answers to their questions, they don’t really care about how well something is written.
Consistency will prove to your readers that you’re going to deliver helpful information to them and on a schedule you’ve promised. You are delivering value directly to them and they will thank you for it by continuing to give you their attention (and hopefully eventually some of their money for your digital product).
We, humans, love consistency. Our brains enjoy repetitive patterns. Rather than letting perfectionism or thoughts of self-doubt keep you from hitting publish on your writing, remember that consistency is more important than quality early on.
Further reading: Afraid to start writing? Give yourself permission to start ugly.
If you’re new to the content creation and audience building world, it can feel like you’re talking to absolutely no one. We should know, Caroline sent her first weekly email newsletter to just FOUR subscribers (yes, 4, and two of them were her email and my email).
One way to avoid feeling like you’re talking to no one is to go where people are already spending their time. This is known as “guest posting” in the content creation space.
Important Note: We want it to be clear you should be creating content for your website and audience FIRST before doing guest posting. It’s important to have your own content and audience building stuff in place for when you direct people from other sites to you!
You aren’t going to be awarded a guest post on someone else’s website just because you want it to happen. You’re going to need to pitch yourself and your content so it makes sense for someone to let you get access to their audience.
There are a couple important things to think about when it comes to pitching an article to someone:
Think of guest posting as one segment of your Totem Pole of Content (also patent pending). You don’t need your entire totem pole to be devoted or reliant on other people’s websites, but it is helpful to tap into existing audiences now and again.
This may seem like a no-brainer, but even on your own website, it should be extremely clear that someone should join your email list after reading an article. Heck, you may even think about having an email signup form in the middle of an article if that feels right.

Remember, you want to help people, but you also want to reach your goal of transitioning away from a client-focused business. Having an audience gives you people you can help and promote your digital products to. Whether that’s on someone else’s website or your own, be sure to have an easy way for people to get on your email list for more helpful content and updates around your specific topic of focus.
We looooooooove pre-selling around these parts. In fact, I believe we’ve pre-sold every single digital product we’ve ever created (and we have around 30+ products under our digital belts!)
Pre-selling your digital product does two things really well:
Idea validation is wonderful, especially when there is money associated with it.
Someone giving you money just for your idea is all the proof you need to know you’re on the right track to running a digital product business!
You may be thinking this is going to be a long section, but truthfully, pre-selling does not have to be very complicated. In fact, all of our pre-sales pages have been simple and straight to the point.
In these few paragraphs, we’re going to keep up the web designer example and pretend you’re selling a course that helps web designers get more clients.
Problem: The first thing you want on your simple pre-sale page is a headline that grabs your potential customer’s attention and addresses the clear problem you’re solving for them.
Example: Is finding your next web design client stressing you the heck out? Do you wish you had a system you could follow to land clients consistently?
Outcome: Next, after you’ve stated the problem, you’ll share your solution to that problem and the outcome your customer wants for themselves.
Example: Years ago when I was doing web design the bane of my existence was wondering where I’d get my next client from. Every week it would weigh on me and it effected my ability to work without stressing out about where the next client would come from. That all changed when I created a simple process that carved out actual time with practical tasks to help get more clients. In just a few short weeks of work, I was able to go from stressed out about where my next client would come from to being booked 3-6 months in advance! I can help you have the exact same results!
Product: You addressed the problem, you shared your own outcome, now it’s time to show how the product you want someone to purchase is the answer to the problem.
Example: I’d like to introduce you to Web Designers Who Get Booked, my step-by-step online course that walks you through the exact processes I created to go from stressing about clients to booking my web design services months in advance. In Web Designers Who Get Booked, I’ll share the client outreach tactics that actually work, my non-complicated system for staying ahead of my client schedule, and a few pointers on how to feel more confident when it comes to selling your web design skills.
Example Part Two: You may also want to share a bulleted list of the lessons included in the course (doesn’t matter if you’ve created them yet) and if you can get some social proof (testimonial) from someone who’s used your processes, include that as well.
Purchase: Finally, you stated the problem, your own outcome, you described your digital product offering, and now it’s time to let someone pay you in advance!
Example: You’ll obviously have a buy button and connect that to a payment processor of your choosing (Gumroad is really easy to use for this, or if you’re building an online course my software company Teachery can help you pre-sell your course). Alongside the buy button, you want to make it 100% clear that the online course/digital product isn’t quite ready yet but will be delivered in X amount of days (or on a specific date). Let your customer know they are getting early access and maybe even offer them a discounted price on the course since it’s a pre-sale. It’s also a good idea to only offer a pre-sale for a short amount of time so you can get out of sales/marketing and actually make your digital product!
Click here to view the example pre-sale page 👍
These are two great questions to ask yourself, but as you can imagine we have some advice and personal experience with both.
If you have a larger audience and you’re not trying to hit some huge financial goal (remember your Lifestyle Vision from Step #2!), you may want to constrict your pre-sale to a shorter amount of time (48 hours). Why? Having fewer customers, in the beginning, is actually better because you’ll have fewer people to get feedback from and manage.
If you have a smaller audience you might need one full week along with multiple emails to convince your customers to jump on your pre-sale.
Whichever audience-size category you fit into, we recommend at least sending this many emails and on this schedule for your pre-sale:
This may seem like a lot of communication with your email list but remind yourself how often you launch and create digital products. Especially if this is your first product, you’ll need more touch-points to get your audience warmed up to buy.
A customer purchasing your product from you before it actually exists is a really awesome thing. If you can afford to offer a discount and can make it reasonable (a 5% discount is dumb, don’t do that), then we firmly believe in offering a pre-sale discount.
You can position this in your emails and on your pre-sale page by saying something to the effect of: Web Designers Who Get Booked will be $100 when it goes live, but for this pre-sale, you get 25% OFF and only pay $75!
Offering someone a discount during a pre-sale doesn’t devalue your product. If anything, it rewards a customer for taking action and proving to you that your idea is worth paying for.
Remember, these folks are taking a chance on you. They’re buying something from you that doesn’t even exist yet and you owe it to them to communicate effectively and honestly.
During my previous pre-sales, I’ve sold a product that would take two months to create. During the two months after the pre-sale was over and leading up to the release of the product, I communicated with my pre-sale customers every two weeks. Not only did this make them feel at ease and that they knew I wasn’t going to move to a tropical island and never deliver the course I promised, but it gave me a chance to get some feedback on content within my product and to get customers excited by showing behind the scenes photos and screenshots.
If you want to avoid angry or complacent customers, plan to reach out to your pre-sale buyers and they will thank you for it by sharing your digital product for you once it exists for other people to buy it!
Yes, your pre-sale customers probably got a discount on your digital product, but you should think about planning to surprise them with something else along the way.
When I pre-sold my Get Sponsorships For Podcasts course back in 2015 I had a digital book called One Week To Profit (priced at $99) that had seven helpful tips for online business owners. To me, it felt like a nice surprise to give them this digital book for free and it felt like a good fit since most podcasters own their own businesses. When I surprised my pre-sale customers with this added bonus people were shocked and excited. Many of them went to Twitter and Facebook to talk about how happy they were and how other people should look into buying stuff from me.
What is something you can surprise and delight your pre-sale customers with? It doesn’t have to be a full-blown digital book, it could be as simple as a few extra worksheets, templates, or even a group call once the course is live to answer Q&As.
Keep something in your back pocket and your customers will thank you for it by using word of mouth to promote you and your products!
Now, there’s a lot to unpack here and we aren’t going to pretend we can walk you through the digital product creation process in just a few paragraphs.
Shameless plug, if you’ve read the majority of this guide and have found it helpful but you’re looking for some step-by-step processes, accountability, and want to transition from clients to digital products without burning out in the process our Build Without Burnout Academy is perfect for you!
Pros to online courses: Online learning is a humungous industry and people don’t want to go to physical buildings or crack open long boring books to learn anymore. People want to learn from people who’ve been where they want to go and online courses are the perfect medium for that. One of our favorite parts about online courses is the blend of teaching content, written word, and a contained space for knowledge that’s easy to access.
Cons to online courses: It can be difficult to limit yourself on how much you want to teach in an online course. It can also be hard to price your online course, especially if you’re creating your first one. There are some technical abilities needed, but that’s really dependent on the complexity of your course (does it have videos, timed components, worksheets, etc?) And, you typically need to pay for an online course software, you can’t easily host a great online course on your own website with a few clicks.
Pros to e-books: E-books are a great way to give someone an in-depth look at something. Heck, we could’ve turned this guide into an e-book and it would probably sell on its own. Unlike paper books, you can update the info in an e-book easily and it doesn’t have to “go to print.” Plus, e-books can be sold easily through other marketplaces (think: Amazon, iBooks, etc).
Cons to e-books: Designing and laying out an e-book that doesn’t suck isn’t something all of us have the ability to do (I know I don’t!) Prepare to invest money and pay an e-book designer to help you make your e-book easy to read and fun to page through. E-books can get a bad rap but that’s mostly because people phone-in the production quality and try to charge a lot more than the knowledge in the book is actually worth.
Pros to membership communities: Creating monthly recurring revenue with a membership community is a great way to have a consistent income. For us, having a paid membership community (shameless plug!) is also personally fulfilling because we’ve surrounded ourselves with people who are on a journey we know we can help with (and are on ourselves). Membership communities are great because they’re flexible and can evolve over time.
Cons to membership communities: The technical logistics of a membership community can be challenging depending on what you’re trying to do/build. Also, churn. Churn is the term for people canceling their membership and this is something that’s bound to happen. Fighting the good fight against member churn takes effort and can give you some mental hurdles in the beginning.
There are many other types of digital products you could create. We simply wanted to highlight the three we have the most experience with that most folk (like you!) can create on your own.
Cool with you if we bring back our Web Designers Who Get Booked online course example? Great. Let’s do that!
Creating an outline as the first step in your digital product creation process is mandatory. You may want to dive into the more fun aspects like design, video recording, etc, but your product outline is your foundation and you NEED a solid foundation.
Okay, I think you see what I did there, yeah? But that’s exactly how you want to think about the outline for your digital product. Let’s look at an outline example for Web Designers Who Get Booked:
Hopefully, that outline example gives you food for thought on how you might structure the content of your digital product. The great thing about putting together a simple outline is that you can move different parts around easily and it sets you up for…
If you put on your to-do list, “make an online course” you will never get it done. Ever. That’s a really big task. Instead, you want to use your digital product outline as your guide and then pepper in all the ancillary things it takes to bring your digital product to life.
Remember the Time Blocking exercise we brought up wayyyy back in Step #1 of this guide? Use it again and block time off on your calendar each day for your digital product creation process.
Here’s an example for you:
To make the time blocking process even easier you may want to do a separate bulleted list of every single task you can think of related to creating your digital product. This may seem like a waste of your time, but it’s actually really helpful when you want to start time blocking!

We know it’s unconventional, but we’re happy to give away some of our resources without making you give us your email address first. That said, if you DO find this guide and worksheet helpful, sign up for our newsletter where we share worksheets like this every Monday.
If you’re a go-getter, read the previous section, and started writing your outline, you’re on your way to building your digital product! YAY YOU!
We like to think about building digital products in these phases:
After we’ve completed building our digital product we do our own simple testing:
This list of things may seem daunting. Remember, you want to break all of this stuff down into smaller pieces that you can tackle in different time blocks.
Out of all the digital products we’ve created we have the most experience with online courses. We actually have TWO How To courses about making online courses.
If you’re looking for a step-by-step guide to creating an online course (or e-course) as your digital product, please read this article: How To Build And Sell Your First E-Course
Before we wrap up this section on creating your digital product we want to remind you of one important thing: Digital products are digital. Yep, mind-blowing info, right?
It’s so easy to get stuck in the weeds trying to create a perfect digital product out of the gates. There’s no doubt you’re going to obsess over some part of the creation process (we know, we’ve been there). However, it’s incredibly important you remember how easy it is to update a digital product!
Your digital product is not etched into a slab of stone, so be okay with an imperfect product that you iterate on and improve over time.
You’ll most likely have a list 20 bullet points long with new things you can add to your digital product but odds are you may only need to add 3-4 of those things.
Pro-tip: Build the smallest, best version of your digital product and then survey your paying customers with questions about what could be added to it.
Don’t ask strangers on the street. Don’t ask your friends. Ask the people who paid you money for your digital product and then add the stuff that gets asked about the most.
This mindset of starting with an imperfect digital product and being willing to iterate on it over time is the BEST way to keep your sanity in the process. Plus, when you do add new stuff to your digital product and you give that new stuff to your existing customers, they’ll love and appreciate you for it!
If you recall, this guide is about making the transition from clients to selling digital products. The last part of that transition is going to be the part where you launch your product and continue to sell it.
There’s a lot that goes into launching and selling but we’re going to break down the bigger parts in five separate topics.
Okay, let’s rip the band-aid off a few important things:
It’s impossible to avoid the trappings of a “big launch” or a “six-figure launch” or any of the other headlines and success stories you read about in the digital product space. But… there is so much context to those stories that we don’t have. Instead, you need to define a realistic measure of success that matches your Lifestyle Vision.
Time and time again we’ve watched fellow entrepreneurs gear up for a big first launch, have less than amazing results (mostly because they didn’t define their own success), and then never launch again. Ugh. You should think of your first launch as your next starting line. It’s not a finish line in your digital product journey, it’s an entire new marathon you opt in to run.
It’s just a weird thing to do! You’re asking strangers on the Internet to buy a thing from you that you created out of thin air. That’s bizarre! Accept this. Understand it. Embrace the fact that you’ll feel uncomfortable but don’t count yourself out and NOT sell your digital product.
You’re seeing a recurring theme in this guide, aren’t you? Iteration. Tweaking. Testing. Using an experimenter’s mindset is part of the game, especially when it comes to crafting a sales page for your digital product.
Remember the P.O.P.P. method (Problem, Outcome, Product, Purchase) we told you about back in Step #5? It’s time to bring it back around, but expand it to: P. O. P. S. E. P.
You already know the Problem, Outcome, Product, Purchase part, you can almost copy and paste from your pre-sale page for your main digital product sales page (maybe expand slightly if you have more to share in those topics). The two new things are:
Take a minute and remember the last thing you purchased that was recommended by a friend. It could be anything. The purchase was a no-brainer for you due to one important factor: You trust your friend!
Social proof on a sales page is how you show strangers on the Internet that other strangers on the Internet trust you. It’s as simple as that.
Do you have customer’s who have experience with your digital product? Send them an email and ask for 2-3 sentences about what they liked (make sure to get their approval to share their response). Boom, easy peasy.
If you don’t have customers yet? Get a few! Even if they get your digital product at a steep discount, or for free, spend the time to have someone actually use your product and give you a testimonial about it.
Add at least 2-3 pieces of social proof to your sales page and use photos of the actual people if you can (again, trust!)
When your digital product is ready to be sold you shouldn’t be afraid to play a little show and tell. One of the most frustrating things for me when I’m looking at sales pages is when I can’t see the actual digital product in any shape or form.
Are you selling an e-book? Give away the first chapter or two. Don’t be afraid to share what’s inside, if someone loves it, they’ll purchase the rest.
Are you selling an online course? Show people a screen recorded video that walks through the lessons, the content, and gives people an exact look at what they’re getting into.
You get the idea. Share visual examples of what you’re selling to instill trust in your prospective customers (and remove any guesswork on their part of what they’ll get).
No matter what digital product you sell, keep the P. O. P. S. E. P. method handy (Problem, Outcome, Product, Social Proof, Examples, Purchase)
Whether you’re selling your digital product on an ongoing basis (“evergreen product”) or your doing a couple launches per year (“open and closed cart”) you are going to need a series of sales emails that convince someone your digital product is worth spending money on.
We really like doing open and closed carts for our digital products. We choose this method because it puts us in control of when we have to be in sales and marketing mode. Selling things as evergreen is fine, but we don’t like having the thoughts of sales and marketing in the back of our minds at all time. Plus, experience has shown us that an open and closed launch provides the urgency many people need to make an actual purchase.
That being said, here’s what our 7-email sequence looks like:

If you’re interested in getting a thorough walk-through of our 7-email sequence, we recorded an entire workshop about selling and our Wandering Aimfully Members get it included in their membership. If there’s one thing we have down to a science, it’s the process of selling and launching!
As much as some online marketers and entrepreneurs want you to believe, it’s pretty damn difficult to create a hands-off passive income digital product.
Myth: Creating passive income isn’t as passive as you think.
We’ve created over 30 digital products since 2013 and none of them have been 100% hands-off. Even the digital products that have sold consistently we’ve spent time:
Remember the example 12-month Lifestyle Vision from Step #2? It’s okay if you don’t we’ll remind you of what those things were:
As “passive” as you hope your digital product business to be, it will require time and effort. Just remember, you chose to transition away from client work for a reason!
If you’ve read this far into this in-depth guide we have to imagine you are willing to do the work it takes to transition from clients to digital products. We also realize you might be a tad bit overwhelmed as there’s a LOT to unpack and implement here.
Within our Wandering Aimfully Membership is our cornerstone program Build Without Burnout Academy. It’s a six-month program to help client-based business owners transition into selling digital products —without burning out in the process.
This isn’t some secondhand knowledge we Googled, this is our exact experience as we transitioned from designers doing client work to creative entrepreneurs selling digital products.

The first and most important thing is it’s a 6-month long program. It’s not 6-weeks. It’s not a 6-month program you can cram into 1 month. It’s a program that forces you to stick to the timelines we’ve set to ensure that you don’t get overwhelmed and give up on transitioning from clients to digital products.
If you nod your head in agreement to any of these statements Build Without Burnout is for you:
You currently have clients but you know you want to create a digital product (like an online course, membership community, e-book, etc) and feel like you’ll never have the time.
You’re tired of trading time for money and feel like you’re always scrambling to find your next client to pay yo’ bills.
You’ve experienced burnout before due to overworking and you want to avoid it at all costs while still having a plan of action moving forward.
You’ve been sold the “you’ll make 6-figs with an online course!” dream and you aren’t having any of that (you’re okay with making fewer figs and enjoying your life in the process).
You’ve read nearly every word of this massive in-depth guide and thought, “I wish Jason just had this stuff as a guided program that I could follow because it seems kind of overwhelming just reading all of this.”
You’ll have weekly action items and to-dos, but the entire goal is to make it manageable with your current client business.
If you’re excited and ready to learn more, check out our Wandering Aimfully Membership page (remember: Build Without Burnout Academy is our cornerstone program within our membership).
We put a ton of time and effort into these guides. This one could have been twice as long and three times as thorough but we had to draw the line somewhere.
If you took our advice in this guide, don’t hesitate to reach out and let us know what was most helpful.
And if joining our Wandering Aimfully Membership feels right so you have a group of folks who are on a similar transition from clients to digital products, we’d be delighted to have you!

NOTE: As of March 2019, I’m no longer a part-owner of Bumpsale. If you need any help with Bumpsale check the website for contact info. I still love Bumpsale and use it myself – so don’t worry about that!
Do you want to sell more products or services, but felt like you’ve exhausted all previous sales efforts?
Maybe you have a brand new thing to sell, but you aren’t sure how much your audience will pay for it? Or, you simply want to make a few extra bucks and give your audience an exciting way to purchase what you already make?

This in-depth guide will walk you through these topics:
(Feel free to click any of them to jump to that section or simply keep scrolling.)
Bumpsale is a unique way to sell something using a bump in price after every purchase is made. The idea was originally conceived by me (the person writing to you), Jason Zook, when I created the project IWearYourShirt in 2008. I used the Bumpsale concept back then to sell spots on a daily t-shirt wearing calendar, where each day would increase in price (Jan 1 was $1, Jan 2 was $2, etc). Truthfully, I wanted to create some marketing and momentum with my pricing, little did I know that idea would turn into the Bumpsale app you see today.
Bumpsale does NOT help you sell spots on a daily t-shirt wearing calendar. That’s a very niche business model and we’d have gone defunct many years ago had that been our customer focus. Instead, we took the concept of bumping the price after each purchase and made a much more flexible product.
Bumpsale DOES let you quickly create a buy button that will increase in price after a purchase is made. The increase happens right on the page as your customers look at the buy button.

These are the things you set when creating a Bumpsale (more on the specific steps in the How To Bumpsale section):
As people purchase via your Bumpsale button, the price will bump live on your site. There’s a small snippet of code you add to your sales page that takes care of all the wizardry and selling-magic behind the scenes.
Quite simply, Bumpsale is an incredibly fast and nimble way to sell your product with some fun added urgency.
We know how it goes: You create an online course, a digital book, a photo-pack, a membership site, a consulting call, a package for your freelancing services, or maybe even a Zebra Training Certification program. Whatever it is, you go through the normal sales cycles and while those can work, you want to shake things up a bit.
That’s where Bumpsale comes in! We created Bumpsale to spice up your sales and to give your customers an exciting way to purchase whatever it is you create (especially if it’s Zebra Certifications!)
⚡️ Bumpsale is lightning quick to set up: It’s about 4 clicks of your mouse and your Bumpsale button can be ready to start collecting sales. There’s a step-by-step video walkthrough below if you want to jump to that.
👍 Bumpsale is super versatile: We give you some basic styling options, but if you know some CSS, you can make your Bumpsale button look like anything your heart desires.
👌🏻 Bumpsale will cost you almost nothing: There’s no monthly fee for Bumpsale. There’s no per button setup cost. We simply collect a small 3% fee on every sale made with Bumpsale. Example: If you sell $1,000 worth of online courses, you’d only pay us $30. Not. Too. Shabby!
💃🏻 Bumpsale is fun for your audience: As you’ll see in the Proof of Concept section below, customers actually LOVE buying through Bumpsale. Usually, they’re getting some kind of discount, so that tends to help, but the excitement and uniqueness of a Bumpsale stands out from other standard sales tactics.

Using Bumpsale isn’t reserved just for Black Friday, Cyber Monday, or other holiday discounts. We DO recommend using Bumpsale around those times, but it’s also a very successful way to drum up sales whenever you need a little revenue bump!
Bumpsale does not bring an audience to your product (you handle that). We simply have a mechanism that helps make the sales process more fun. The most successful uses of Bumpsale occur when you give your audience a heads-up that you’re going to use Bumpsale, and have them waiting and ready for it (more on this in the How To Warm Up Your Audience section).
It’s not that you can’t use Bumpsale for longer periods of time, we’ve simply seen the best results when a Bumpsale is run through a shortened time period. There’s no perfect amount of time, but 24 hours, 48 hours, 2-3 days, or a week tend to do really well.
NOTE: As a heads-up, there isn’t an expire feature within Bumpsale, you’ll just remove the button when your Bumpsale time period has ended – easy peasy!
Pre-orders tend to work really well with Bumpsale because your audience is getting a discount and more people can get in at a lower price than they’d normally. Plus, the math can add up very quickly with Bumpsale over a standard discount. Here’s an example scenario:
Feel free to use the Bumpsale Calculator to get an idea of how much revenue you can generate with Bumpsale. Here’s a video of the calculator in action:

Looking at the example above, if you were to try to sell your $200 course, starting at $180 and bumping by $1, you probably wouldn’t see any traction at all. There’s simply no motivation for your customers. Plus, the urgency to purchase before the price increases doesn’t really matter. We aren’t advocating that every product has to have an enormous discount with Bumpsale, but the bigger the discount, the more traction and sales we’ve seen happen time and time again. If we look at the example scenario used a minute ago with a tiny discount, here’s how the math works out:
Most likely, your audience has never heard of Bumpsale or seen it in action before. If you don’t clearly explain how it works, it can lead customers to be confused (never a good thing!). Give your audience at least a week’s notice, along with explaining how the Bumpsale will work and what they can expect. (Again, more on this in the How To Warm Up Your Audience section).
We hope this goes without saying, but some folks miss this critical step. Purchasing your own Bumpsale will give you the best experience to see what your customer will see. Did you notice anything weird? Did the redirect URL after a purchase go to the correct place? Did anything else happen that you expected/didn’t expect? Do a test purchase and refund yourself after!
Hopefully, that rest of this guide fills the gaps on the shoulds and shouldn’ts with Bumpsale. There’s an FAQ section at the bottom as well.
ALL OF THEM! Okay, if you’re selling sustainably raised goldfish, you probably won’t use Bumpsale to sell those. But, these things can be sold via Bumpsale and work really well:
*Bundles work especially well with Bumpsale because they are a grouping of products sold at a discounted price. The price is usually completely arbitrary, and potential customers of the bundle just want to snag a great deal on the total value of the bundle.
Anything you sell, that you are willing to make incremental revenue on, will work with Bumpsale.
My wife and I put together a bundle of online courses, digital books, and a few downloadable goodies called The Vibrant Stuff Bundle (her site at the time was Made Vibrant and mine was JasonDoesStuff).

The total value of the resources inside The Vibrant Stuff Bundle was well over $2,500 if we sold every item in it at full price. But instead of offering a flat discount on the bundle, we used Bumpsale and generated over $20,000 in sales by starting the bundle at $1 and bumping the price by $1 after every purchase. These are the steps we took to create and sell our bundle:
The great thing about doing a bundle is that you usually don’t need to create any new products at all! Sure, you need to create the sales page that explains and sells the bundle, but that’s way easier than building yet another product from start to finish. Plus, who doesn’t love finding ways to repackage existing products you’ve created (while also giving folks a fun opportunity to buy a suite of products from you).
As I’ve mentioned a few times, setting up a Bumpsale is a mere few clicks of your mouse. I’m going to walk through the setup step-by-step, but there’s one important thing to keep in mind:
You need to put a Bumpsale button on your existing website (whether your site is on WordPress, Squarespace, Leadpages, Wix, Weebly, Dreamweaver, Geocities, etc).
As long as you can inject our small piece of Bumpsale code into an area of your website, you can use Bumpsale! And if you aren’t code-friendly, we’re happy to help you figure things out.
This is how you create your Bumpsale account. There’s no need for you to make an actual login, password, etc with Bumpsale. We let your existing Stripe account handle that info. If you don’t currently have a Stripe account, it’s completely free to set up and Stripe is the way to process credit cards (your customers won’t know Stripe exists).
NOTE: Stripe will send a receipt after a successful purchase. If you want to customize the way your receipt looks, you’ll do this in your Stripe account settings.
We do NOT support PayPal with Bumpsale (yet).

You’re rockin’ and rollin’! We told you this was easy. With one click of your mouse, you’re on your way to building your first Bumpsale.

Next up, you’re going to fill out a couple simple fields. You can ALWAYS edit this stuff later, even while a Bumpsale is active (so don’t worry about getting it perfect). These are the fields you’ll fill out:

*Setting your post-purchase redirect URL: Where do you want your customer to go after they finish their purchase? You don’t want them to just land back on the sales page, that’s confusing. We recommend creating a Thank You page of some sort on your website and redirecting to that page. This gives your customer a great experience AND give you a chance to lead them to the next step in the process (if there is one).

Adding social intent on your thank you page is a great way to get someone to share your Bumpsale on Facebook or Twitter. You can use Share Link Generator to make the links, then just add those to friendly share icons on your thank you page.

You’re almost done! Grab the little snippet of javascript code and add it wherever you add other custom scripts to your website (in WordPress this is probably in your header.php or footer.php, in Squarespace this is in your “Code Injection” area within Settings). Here’s a little example of adding it to WordPress.
Note on WordPress: You DO have to publish the WordPress page/post to see the Bumpsale code in action – it will NOT work in preview mode.

Bumpsale is going to handle the purchase itself, but it’s on you to give your customer whatever they just bought from you. This could simply be having your redirection URL go to a page on your website with a promo code to use or a secret link to access your product/service.
We highly recommend using Zapier for digital products (redeeming courses, ebooks, etc): You will use your Stripe account as the first step in any Zapier Zaps.
There’s a section below with Bumpsale + Zapier Tips
We cannot recommend this step enough. Use an Incognito Window in Google Chrome, or simply use an entirely new browser. This will give you the complete experience of viewing your sales page and your Bumpsale as a potential customer. Go through the entire buying process yourself and make sure everything works properly.

Huzzzzah! It’s time to get your Bumpsale out into the world and bringing money into your bank account. Feel free to check out our tips below on setting up a sales page and things that help land the sale.

(How you should feel after people buy your Bumpsale.)
This one is easy! All you need to do is log in to your Stripe account, navigate to the Payments area, and click the Export button. You’ll want to select the “Default” option and you’ll find all your customer emails in the resulting CSV.
Another option is to use Zapier to automatically send your customer emails from Stripe and add them wherever you want (more on this in the Zapier section below).

Warming up your audience for a Bumpsale is incredibly important. Did we mention that enough yet? It’s likely your audience has no clue what Bumpsale is, how it works, or why you’re even talking to them about it. That’s why you need to warm them up!
Feel free to copy, paste, and customize this text which helps explain how Bumpsale works (use this in emails and on your website near the Bumpsale button so it’s very clear how it works):
Hey there! On [INSERT DATE] I’m doing something fun that I’ve never done before. I’m going to be offering [INSERT BUMPSALE PRODUCT OFFER] at a super discounted price, but with a twist!
Starting on [INSERT DATE AGAIN] at [INSERT TIME] I’ll be using something called “Bumpsale” to sell [OFFER NAME] starting at just [INSERT BUMPSALE START PRICE] and with every purchase, the price will bump [INSERT BUMP PRICE]. The earlier you purchase, the lower the price you’ll pay.
The total value of [OFFER NAME] is [TOTAL VALUE] so you’ll have the chance at snagging a crazy discount. This “Bumpsale” will only be available for [TIME AVAILABLE] so make sure to get ready as I won’t be doing this again for quite some time.
Keep your eye on your inbox for my next email that will have the link to purchase the [OFFER NAME]!
Here’s an example of how we explained a Bumpsale right on the sales page:

From personal experience running multiple Bumpsales, I’ve found that this schedule works really well:
Email #1: Announce the Bumpsale is coming (using the text above) a few days ahead of time
Email #2: Share the link to buy, with a clear explanation of what’s being offered, how great the discount is, and a reminder of how Bumpsale works
Email #3 (24 hours left): Remind people that the time to purchase is running out and remind them how great of a deal the Bumpsale still is*
Social media promo? If you’re promoting your Bumpsale on social media, feel free to give updates on a similar schedule!
*Recommendation: Take the current price of the Bumpsale and divide by the total value of what you’re selling. For example, if your Bumpsale is at $75 and the total value is $400 your customers are getting an 82% discount on the total price!
This section is for you if you want to have some sort of automated event happen AFTER someone purchases your Bumpsale.
Example Zapier automation events:

If you’ve never used Zapier before, it’s incredibly powerful and really easy to use. There is a free account level, but I would recommend opting for the Professional ($49/month) level DURING a Bumpsale (you can downgrade immediately after your Bumpsale finishes). Using the Zapier Professional Plan, you take advantage of the 5 minute Zap runtime, which will give your customers a good experience. You absolutely do not have to use the $49/month plan, we just find it’s best experience for a customer.
Bumpsale is NOT the first step in a Zapier Zap, that will be your Stripe account. After you follow the steps in the Zap creation process to connect your Stripe account to Zapier, you can choose from one of two triggers to use from Stripe:
NOTE: If you’re connecting a Stripe account to Bumpsale that has other purchases happening with it, you’ll need to use a Filter step in your Zapier Zap to look for the name of your Bumpsale in the purchase data. More on this in Zapier Tip #3.

On the Thank You page, or wherever you redirect someone after a successful purchase of your Bumpsale, make sure you mention that it can take 5-15 minutes to receive whatever you’re triggering via Zapier (an email, etc).
One of the simple triggers after a successful purchase of your Bumpsale is to send an email using the Email By Zapier action. In this email you can add your product redemption itself (maybe a link to a page or a password), or you can simply say thank you and let the customer know what to expect next now that they’ve purchased.
Reminder: Stripe will send a receipt after purchase, so you do NOT need Zapier to send a receipt of any kind via email.
Heads-up: The “Email by Zapier” can only send 10 emails per hour (yep, 10). If you know you’ll have more than 10 sales per hour, you’ll want to use a different way to send an email. Maybe it’s a 1-email sequence people get added to in your Zap?

If you currently use your Stripe account to sell any other products at the same time you’ll be running your Bumpsale, you’ll need to use a Zapier Filter to make sure your Zaps only run when the Bumpsale is purchased (and not all products associated with your Stripe account).
After your Stripe account is connected, the Zapier Filter step will give you an option of Only continue if…

In the first input field, look for the entry that has the name of your Bumpsale.
In the second input field, select (Text) Exactly Matches.
In the final input field, type your Bumpsale name exactly as it’s named in Bumpsale.
This will ensure that every Stripe purchase Zapier sees associated with your Stripe account, the Zap will ONLY run if it meets the Filter requirement.
Important: If you’re only using your Stripe account for your Bumpsale you DO NOT need a Zapier Filter.
The additional steps in your Zapier Zap will be up to your choosing. Again, you could add your Bumpsale customer to your email list, or immediately add them to your online course, etc.
You do NOT need to make multiple Zaps if you want multiple actions to happen after a Bumpsale purchase. In one single Zap, you can:
All of those would be Actions within the one Zap you create. Yay, you!
You’ll want to double-check that your completed Zaps are turned on and ready to go. You can triple-check this by completing a real purchase of your Bumpsale and seeing if the Zap fires in your Zap History. Remember, it can take 5-15 minutes depending on whatever Zapier pricing plan you chose.
👉 How come multiple people can pay the same price if it’s increasing after each purchase?
If you have a large audience, odds are you will get a handful of people who pay the exact same price for your Bumpsale. I’ve had this happen multiple times and it’s simply a byproduct of having a larger, engaged audience (that’s a great problem to have!)
Your Bumpsale button will automatically bump the price as insanely fast as possible after a purchase happens. But… if someone clicked the Bumpsale button and they’re looking at the purchase pop up window, that customer’s price is locked in until the Bumpsale timer expires.

Even if you have multiple customers pay the same price, Bumpsale will keep track and update the button with EACH purchase (regardless if the same price was paid or not). Example: If your Bumpsale button is at $20 and 5 people click it at the exact same time before another purchase happens, each time one of those 5 customers completes their purchase the Bumpsale button on your sales page will increase based on your bump price setting.
We do NOT recommend setting the Bumpsale timer to anything less than 180 seconds. It can take a minute or two for people to fill out their payment information. You’d rather have happy paying customers, than angry customers who had a buying window close on them and they missed out on the price they were looking at.
👉 Does Bumpsale create my sales page for me?
Nope. Bumpsale is just the button and the purchasing mechanism. You’ll need to create your own sales page and add the Bumpsale javascript and Bumpsale button code to your own website.
👉 I’m not a CSS expert, do I have to use the CSS provided in the Bumpsale installation instructions?
We would highly recommend at the very least copying + pasting our Bumpsale CSS and adding it to your website. Otherwise, your Bumpsale button is going to look pretty crappy. Odds are you know someone who knows CSS and they’d be willing to help you for the price of a beer or cup of coffee.
👉 Does Bumpsale bring customers to my sales page?
We wish! You bring the customers to your Bumpsale. I’ve personally seen amazing results using the social intent on a thank you page after a Bumpsale purchase. Don’t be shy in asking someone who just bought from you to share that they purchased (because hey, how the heck often do you run a Bumpsale??)
👉 Can a Bumpsale button expire after a certain number of purchases or certain amount of time?
It cannot. While Bumpsale is smart, you’ll have to be the one to turn it off. And by turn it off, we simply recommend removing the button itself from your sales page. There is nothing that needs to be done in Bumpsale itself to “end” a Bumpsale.
👉 Why only Stripe? Why not PayPal?
Guh, PayPal just sucks. It’s an awful experience. For years we’ve tried to get PayPal added and it’s a huge thorn in our side. Eventually, we’ll support PayPal, but Stripe makes everything sooooo smooth and simple.
👉 How long should I run my Bumpsale for?
Again, we recommend a shorter time period for your Bumpsale. Anything over one week is pretty long and the urgency built into using Bumpsale kind of wears off. We recommend running a Bumpsale for a minimum of 24 hours and a maximum of 5 days. But hey, if you want to use it for longer than that, it’s completely up to you!
👉 If I have trouble with Bumpsale who should I contact?
Ghostbusters! No? Send an email to conrad (at) cdevtech.com. Conrad will happily answer any questions you have!
A few years ago my wife and I found ourselves overwhelmed with debt. How much debt? $124,000 spread across six credit cards, a car loan, and student loans. We could never have imagined being debt free at that time.
This article shares our debt story, but more importantly shares our debt payoff plan: the exact steps we used (and that you can use) to become 100% debt free in just 15 months!
Before we dive in, I want to be absolutely clear that we didn’t get into overwhelming debt overnight and we didn’t get out of our debt overnight.
Our debt didn’t come from buying extravagant things. The majority of our debt came from a business I ran from 2009-2013. I got behind on the monthly operational costs, things like employee salaries, design and development expenses, advertising and marketing, and countless products and services that kept my business running. Then we had my wife’s business debt, her student loans, and our car loan.
These were our specific debts and where they came from:
I want to point something out before I move a step further, and my guess is you can relate to what I’m about to say.
You can also watch the video version of our debt-payoff plan:

Did you know the average credit card debt per U.S. adult, excluding zero-balance cards and store cards is $4,878*?
How about the fact that 26% of small business owners carry a balance of nearly $10,000 on their business credit cards*?
Or did you know that more than 35% of Americans are seriously concerned about being able to meet essential financial obligations such as their mortgage, loans, credit card, or bill payments*?
Some of us are riddled with debt, stuck in its invisible grasp with no sight of escape. Some of us just have school loans, which seem harmless because of low fees and payments, so we ignore the soul-sucking and bank-account-syphoning elephant in the room. Some of us are able to use debt to our advantage to escape a bad month of business or get through hard times. But debt is dangerous and it needs to be dealt with head-on.
Let us help you attack your debt, just as we attacked and vanquished ours!
Around 2013 I realized our total debt was over $120,000. That was the moment when I knew something had to change.
Unfortunately, that change came with the tough decision of closing my business’s doors. That meant letting people go, cutting as many expenses as possible, and accepting the fact that my business was no longer profitable and was failing.
I hope, for your sake, that $120,000 is not your number. I hope it’s a drastically lower number. But if you do have more debt than we did, don’t be ashamed of it any longer. It’s just a number.
Make today the day you announce you aren’t getting any further into debt. Draw your line in the sand right now.
It would have been easy to let the feelings of shame and embarrassment continue to control how we felt about our debt. We could’ve given in to those feelings as we’d been doing and as a lot of people do, but instead we decided to do something different.
Bear with me, as I know this is going to sound weird, but we started to think of becoming debt free like playing the original Donkey Kong video game:

This Donkey Kong metaphor may sound completely bizarre to you, but it really helped us shift how we thought about our debt. It went from a dark cloud that loomed over our heads, to a silly game we could try to beat. With each ladder we climbed and every barrel we jumped over, we’d be getting that much closer to rescuing the princess (AKA gaining financial freedom).
Whether you want to buy into our Donkey Kong metaphor or not, maybe there’s a way you can reframe how you think about your debt? The most important thing at this point is to draw your line in the sand and to tell yourself: I WILL GET OUT OF MY DEBT!
TIP: A great thing to help draw your line in the sand is to have someone hide your credit cards so you can’t have access to them. Or just cut them up. Start using a debit card or cash only.
We’re a society driven by consumerism.
Turn on any TV. Open any magazine. Browse any website. Scroll through any feed on your phone. There’s a new gadget or clothing company begging you to spend money you don’t have. Today is the day you tell yourself you don’t need to buy any more stuff.
“I don’t need to buy XYZ thing. I want it, but I don’t need it.”
How many things have you purchased with your credit card(s) in the past year that you can actually name off the top of your head?
If you can’t remember what you spent your last couple thousand dollars on, it wasn’t that important and you didn’t actually need to buy it.
What’s more important in your life: Owning a couple new material goods, or NOT being stressed out over your current financial situation?
Commercial after commercial tells us that the credit card companies just want to help us! They want to give us nice low rates (which most of us can’t actually qualify for) and they want to reward our spending by giving us awesome perks (redeem those double points!).
Except, when you’re in debt, the last thing you should be thinking about is credit card points. One of the important mindset shifts in becoming debt free is greatly reducing your spending. I’ll talk more about reducing spending in a moment, but credit card companies are great at convincing us that “cash back” feels like we’re somehow saving money. Or that “airlines miles” will help you travel for free. If you’re in debt, getting minuscule amounts of cash back or accruing airline miles are thoughts you need to put on hold.
At one point my wife and I had 12 active credit cards and the majority of them were opened because of the so-called “rewards” they offered. Here are a couple of examples, along with the rewards we never actually enjoyed:
Best Buy Rewards Card – A simple VISA card that helped us purchase electronic goodies. Except, when we bought them with Best Buy’s friendly payment plans, we didn’t take into account we’d up spending 20-30% more on the items we purchased because we could only ever afford to make the minimum monthly payments.
Southwest Airlines Card – I remember the day I signed up for this card and thought I’d grab the reward offer of a free companion pass for Southwest flights. Within a month I’d met the qualifying spend of $3,500 on the card, except, I didn’t have the money to pay it off. You don’t get the free companion pass if you don’t pay off required spend. Not only did I not get a stupid free companion pass, I now had $3,500 of debt that probably didn’t need to exist. (Also, FWIW, I can count on one hand the number of Southwest flights I’ve taken in the past decade, we never fly with them.)
CitiBank Diamond Preferred Card – This was a card I signed up for because it would 2x or 3x your points depending on what you purchased. It took me six months to realize I could only ever use those points for stuff I didn’t need (like a blender, or headphones, or other consumer goods that I already owned or absolutely didn’t need).
I hope these examples help you take a look at the cards you currently have in your wallet/purse. You may think these credit card companies are trying to help you, but they’re not. These companies have very well crafted systems in place to keep us all in debt.
TIP: Stop using credit card points cards until you’re completely debt free. When you’re debt free, start to identify one or two credit cards that offer rewards you might actually use.
The un-sexy secret to getting out of debt is exactly the headline you just read: Spend less money or earn more money.
Sure, there’s a lot more to becoming debt free (hence the length of this article), but along with acknowledging your debt and avoiding consumerism, this is the next mindset shift that will help you get rid of debt.
I could write an entire article on why buying a home is a terrible financial investment for the majority of us. Instead, I’ll let the economic crash of 2008 do the talking for me. I would, however, like to explain how renting a home (AKA “throwing money away”) was incredibly helpful in our journey to financial freedom.
When you have a home with a mortgage, as we did for 8 years, you do NOT have stable expenses. In fact, most homes are a ticking financial time bomb.
What do I mean by that? Oh, how about when your air conditioner breaks and you have to spend $8,000 to get it replaced? Or how about when you wake up one morning to an inch of water in your living room, only to find out you had a “slab leak” which still cost you $2,000 (after insurance!)? Or how about the $20,000 “invested” in redoing the kitchen and bathroom which was never actually recouped. Not to mention every stupid little thing that pops up and needs to be fixed (and paid for) when you own your own home.
Deep breath Jason, deep breath.
When my wife and I moved from Florida to California and chose to become renters, we knew one very important thing: Renting gave us the piece of mind that we’d incur $0 in surprise costs when it came to our home.
As renters, we’d never have to worry about an $8,000 air conditioning system. We’d never have to worry about little costly odds and ends. We would pay our rent every month and that was it. If something went wrong, it was on our landlord’s dime. Every dollar we used to have to spend to cover unexpecting home costs could now go toward aggressively paying off our debt.
Renting can be the best thing for people who are in debt. It’s a completely predictable expense every month, and you are guaranteed NOT to lose money in the long run.
A home you buy? Not an investment to be made when you’re trying to get out of debt. Heck, we’re years removed from being in debt and we still (proudly) rent our home.
I want to share a more personal example of spending less money: For me, that was a 15-year passion of owning nice cars.
I love cars. LOVE them. They’re easily the biggest money-pit I’ve had besides my business. Except, unlike my business, there is no potential ROI (return on investment) for a car. Sure, a 1950 Ferrari Dino is a great investment, but let’s be realistic here, you and I are not collecting Ferraris.
Aside from our mortgage and food, my monthly car payment was always our highest household expense. Over the years I had car payments ranging from $500 per month to as high as $1,200 per month—the latter being the time when I needed to own a Porsche Cayenne Turbo as a 25-year-old (dumb, dumb, dumb). Not to mention all the extra hidden costs of cars like gas, insurance, maintenance, etc.
When we decided to attack our debt, I knew my “fun car” hobby had to take a back seat (get it? It’s a car pun folks!). My wife and I talked about this decision together and I made the commitment to our get-out-of-debt plan that we’d purchase an affordable car and be more responsible when it came to spending money on depreciating assets (cars). We ended up leasing an extremely practical Volkswagen SUV, a car that would be very low in maintenance costs, yet not feel like we were driving a 1982 Ford Taurus.
I’d be lying to you if I said I loved driving that VW. Truthfully, I loathed it. It wasn’t a bad car by any means, but it was quite the departure from the BMW M5, BMW M3, Porsche Cayenne, Infiniti G35, etc, I was used to driving. But I just had to keep asking myself: “Do I want to feel cool driving around in a nice car, or do I want to save the financial princess and stop having a looming cloud of debt over my head?”
Think of spending less as short term pain, for long term gain.
I really hope this point settles in with you. Your current TV, couch, bed, car, etc, are all enough right now. They are good enough and will do the job you need them to do until you become debt free. If you can commit to making short-term sacrifices and not focus on upgrading anything in your life, you can make huge dents in paying off your debt right away.
You are spending less now so you regain control of your finances. It will be uncomfortable to change your lifestyle and remove lavish things from your life, but I can tell you from firsthand experience: the feeling you get from paying off all your debt is a lasting positive feeling that greatly outweighs the short-term blips in happiness you get from buying stuff.
Now that I’ve gone over the spending less part, let’s talk about earning more money with two specific examples.
Let me start off by saying that I realize earning more money is not easy. If you don’t own your own business and you work at a conventional 9-5 job (for someone else), it can be difficult to think about earning more money. I do want to tackle both scenarios though, as I believe it’s possible to earn more money whether you work for yourself or you work for someone else.
I’d like you to meet my wife Caroline, she’ll be taking over the keyboard here for a moment to share her story of earning more with her business:

Hi y’all! Caroline here, Jason’s better half (obviously!)
When I was running my own branding design company in 2014 I had a stunning realization: Quite simply, I wasn’t making enough money.
I think this problem can take different forms for different businesses – not enough clients/customers, prices too low, terrible margins, etc. In my case, I was taking on far too many small projects for far too little money. $100 here for a hand-lettering project, $200 here for a small graphic design job, giving deals to friends and not being more vocal about the real amount of time a job would take. Then, when I had bigger branding design projects, I was working way more hours than I was charging my clients. Something had to change.
Jason and I sat down and starting talking about how I was running my business and where we might be able to make improvements (you know, make more money!) As we started talking it became clear that with any service-based business (AKA freelance), time truly is money. If it took me two hours to finish a job that could have taken me one hour, I just lost an opportunity for additional revenue. And if I had a bigger job that I only charged the client for 40 hours of work, but it took me 80 hours, I just missed out on a ton of revenue.
To give you an idea of just how much money I was losing out on, after implementing a simple time-blocking exercise (which I’ll explain in a moment) I was able to TRIPLE my revenue! Not only was I able to earn more money, I gained more time back because I became extremely diligent with how I was spending it on a day-to-day basis.
What is time-blocking and how did it help me triple my revenue?
Jason and I looked at a normal work-week for my branding design business and figured out a few simple things:
1. I did my best work between 11 am – 4 pm each day (5 hours of work per day)
2. Working Monday – Friday, I had 25 billable hours
3. Over the course of 4 weeks, working at $75/hour, I should be making $7,500 per month (25 hours a week x 4 weeks = 100 hours x $75 = $7500)
Seeing that $7,500 was defeating and empowering at the same time. I certainly wasn’t making $7,500 a month (I was lucky to be making $2,000 per month), but seeing how just 5 hours of focused work per day could generate so much more revenue for my business was incredibly motivating.
From that meeting with Jason, I started to block off time on my Google Calendar with client work. Whether it was a tiny 1-hour project, or a bigger 80-hour project, all of the working hours I committed to would go on my calendar and I would do my darndest to ruthlessly stick to the time I’d estimated. This time-blocking system gave me clarity in my work days and was a great way to understand how much my time was worth.

As I mentioned earlier, getting a grip on my hours, estimating my time better, and working during specific time blocks helped me triple my revenue in just a few short months. If you’re a freelancer (or you work for yourself), time is money and you should definitely keep track of it.
You thought that Caroline might be passing the writing-baton back to me, but she has another story to share with you about earning more money. This example specifically applies to you if you work a full-time job and don’t think you can earn more money.
It’s Caroline again, I’m back on the keyboard!
If you would have told me that I could make an additional $3,000 per month in revenue with a project I did on the side, I wouldn’t have believed you. If you read the last few paragraphs then you know I was doing branding design as my full-time job. Now, I wasn’t working for someone else in a 9-5 capacity, but the story I’m about to share happened in my “off work” hours.
Whenever I wanted a break from my client work, I would open up a sketchbook and start doodling. I didn’t consider myself an artist, but I enjoyed filling blank pages with drawings and hand-lettering. For months I filled sketchbook after sketchbook, not at all thinking I was honing a skill that would lead to earning more money, I simply enjoyed the creative outlet.
I started sharing some of my hand-lettering creations on my Instagram account and people started asking where I learned how to do hand-lettering. I responded in truth, I hadn’t really learned it anywhere, I just started doing it in my spare time. When enough people asked me about my hand-lettering, I had the spark of an idea: I should write a blog post that explains the basics (that I’d learned) of hand-lettering. Just a really simple guide if someone wanted to go on a hand-lettering adventure of their own.
That blog post started to get a little bit of traffic. Then it started to get shared on Instagram and Pinterest. Before I knew it, hundreds of people were reading my introduction to hand-lettering post and I saw an opportunity. I added an email capture to the blog post that asked people to enter their email if they’d be interested in an online course about hand-lettering (I’d never made an online course, but Jason had, and it seemed like something I could create if there was interest).
After a month I had over 500 email subscribers waiting for me to create a beginner’s hand-lettering online course! I hunkered down one weekend and created my first online course, without grand expectations about how it would sell. I worked on the sales page for the course and some other odds and ends in my non-working hours, and a few weeks later I launched the course. I was happy to make a few hundred bucks from the small email list and decided to change the callout on my blog post from “sign up to my email list” to “purchase my beginner’s course to hand-lettering.”
All of the sudden I was waking up to course sales. Then the traffic to the post would increase and I’d see more sales. Day after day, week after week, month after month, the sales steadily increased and I’d created my first passive income source. In the first two months that hand-lettering course generated over $7,000 in additional revenue I never saw coming and over $82,000 in total revenue!

The best part about the extra money I earned was that it happened on the side of everything else I was doing. It didn’t take an extraordinary amount of effort or time, I just saw an opportunity to create something and there was a demand for a quality hand- lettering resource for beginners.
I share this with you because I want you to realize what is possible. I want you to feel the way I felt when I made my first online course in my spare time and it started making passive income.
There are so many opportunities waiting to be had out there. You just have to find the drive and the commitment to make them happen.
Hopefully, after reading those two stories from Caroline your wheels are turning on how you might be able to earn a bit more money. And maybe after reading how we starting renting our home and I gave up a passion for cars, you’re already thinking about ways you can cut back on larger expenses you don’t need (for the time being, so you can become debt free!)
TIP: Grab a notebook and jot down a couple ideas of how you might be able to make more money right now: Is it using time blocking? Or creating a small product in your spare time that you’re interested in? Also, write down larger expenses that you may be able to cut back on.
Have you ever logged into your online banking or your credit card company, only to realize it’s kind of a pain in the ass to figure out how much money you’re actually spending? Sure, you can see your expenses in a vertical list with a total balance (usually always decreasing, ugh!), but banks and credit card companies don’t try to help you see where you can save money or cut costs.
It’s time for you to take control of all your expenses, and get a firm grip on every dollar you spend and make.
There’s a simple exercise that my wife and I did that opened up our eyes to our spending: We exported the last three months of activity on our bank accounts and credit cards, put them in ONE spreadsheet, and did our best to organize them by spending category (separated by month).
The silly thing about the name ETAC, if you say it out loud it kind of sounds like you’re saying attack. Which is neat, because you want to be attacking your debt!
Anyhoo, here are the simple steps for the ETAC exercise (video walk-through below):

📊 Click here to use the ETAC spreadsheet.
We encourage you to save yourself time and use our example Expense Tracking and Categorization spreadsheet with the categories we use to organize our expenses. If you’re creating your own spreadsheet, here are the categories we use and recommend:
The reason these categories are so important is two-fold:
1. You want to compare the category month over month and see if there are any big spikes and what your current monthly average spend per category is (this is how you can find where to spend less).
2. Later on, we’ll show you how to create an ongoing monthly budget for these categories, so you can be a wizard at tracking exactly where your money goes and have ZERO financial surprises (you know, like barrels thrown by a digital monkey).
I cannot stress the importance of the Expense Tracking and Categorization (ETAC) exercise enough! Even if you think you have a good idea of what you spend, I 10000% guarantee listing out and organizing all your expenses will surprise you.
NOTE: If you have spouse or family member, this is a great person to do this exercise with. You’ll probably be embarrassed to show them your expenses—but you know what—that’s a huge red flag that you NEED to show someone your finances!
When my wife and I organized our expenses for the first time, a few items within categories of spending jumped out as potential places to save money (and put towards our debt).
We were paying $260/month for our “family” cell phone plan. We’d had the same (unlimited) plan for more than two years and I had a hunch there was a better plan available. I went into an AT&T store (gasp! I know!) and asked them if they had a better option based on our actual phone usage. Come to find out, we were only using around 8GB of total data and didn’t need the costly unlimited plan. We switched to a $140/month plan and netted $1,440 in annual savings.
At the time of doing our first ETAC exercise, we were paying $185/month for all bizallion cable channels (that we only watched a small handful of). Back in 2014 cutting cable wasn’t as prevalent, so I didn’t think about that as an option, but I did think maybe I could call the cable company and simply ask for a better plan since I had been a loyal customer for years. I navigated my way through the painful customer support phone tree and was able to reduce our bill to $135/month, saving us $600 per year.
Drinks with friends, seeing movies (and getting popcorn), two Netflix subscriptions in one house, and a bunch of other stuff quickly filled this spending category without us even noticing. We decided we’d set some boundaries for our entertainment and hopefully save money. We allowed ourselves to see two movies (in the theater) per month and have two nights per month to have drinks with friends. Setting these boundaries saved us $150 per month or $1,800 per year. Remember, Short term pain for long term gain!
We were spending $2,000 per month on food ($1,400 was eating out). For two people that is a lot of money each month! However, neither of us love to cook and because we work from home, going out to eat is one of the nice breaks from our day-to-day routine. That being said, we challenged ourselves to cut back by $500 and only spend $1,500 per month going forward (this included eating out and groceries). That $500 added up quickly, saving us $6,000 (!!) that we could put towards our debt in one year!
Just by reassessing a few categories of our spending we were able to find nearly $10,000 we could apply to our debt!
Do a little bit of cutting back in the short term and you’ll find hidden money you can apply to pay down your debt. You’ll be amazed at how living frugally for a short time can help get you out of debt exponentially quicker.
TIP: Don’t waste any time, do the ETAC exercise today and categorize all your spending for the past three months. Where can you find hidden money?
The one thing that stood out to us, and that would become critical to our success in our war on debt, was building a better income flow.
If you’re anything like we were a few years ago, you deposit money into your bank account, you pay your credit cards from your bank account, and there’s not much else to it. There’s nothing inherently wrong about this, but there is a better way!
Here’s what we did to create our income flow:
#1 Established our bare minimum monthly household expenses
After doing the Expense Tracking and Categorization exercise, we had a bunch of categories of spending that we could total up to see our average monthly budget. We took every category except our business expenses, added them up, and that became our minimum monthly household expense number.
#2 Established our bare minimum monthly business expenses
Similar to the household expenses, the category from our ETAC exercise that grouped our business expenses together showed us our average monthly budget for business. Keeping this separate from household expenses is helpful if you have a bank account specifically for your business (which, if you work for yourself, you should!).
#3 Created a monthly schedule for transferring all excess income to a new account
It should go without saying that you need to be making more money than you’re spending every month. If this isn’t happening for you right now, you have a bigger problem at hand. Hopefully, after going through the ETAC exercise, you have some excess income that you can apply to your debt (especially if you found hidden money!). For us, we identified the excess money we made over our expenses every month and would transfer this to an external savings account to be applied toward our debt (more on this savings account in a moment).
#4 Scheduled a weekly budget meeting
Weekly budget meetings helped us deal with the shame and embarrassment of our debt.
This may sound crazy to you, but my wife and I decided to put a standing meeting on our calendars every week to start talking about our finances. This meeting would involve doing a couple things:
I could talk for hours about how vitally important these weekly budget meetings were for us (and continue to be). Not only did they help us get a firm grasp on our financial situation, but they also helped us deal with the shame and embarrassment of our debt. The more we discussed and attacked our debt every week, the less shame and embarrassment we felt about it.
If you don’t have a spouse to do weekly budget meetings with, find one! Just kidding… But ask a friend? Get a financial advisor? (More on the latter option in a bit as well).
#5 Set goal numbers of how much debt we could pay off each month (debt payoff schedule)
I’ll get into much more detail about this in Step #7 of this article. But the idea is to look at how much excess money you have above your expenses that you can immediately apply to your debt. Some weeks it may be $50, some weeks it may be $0, and some weeks it may be $500. The key is to continually know more information about your financial situation based on your income flow.
Creating an income flow isn’t rocket science, and I felt like we already had some semblance of a household budget, but using this new process was incredibly helpful. Our income flow consisted of these things:

When all your bank accounts can be seen on the same online banking dashboard page, it’s easy to see the money in one account as money available to any account. It wasn’t until our financial advisors introduced us to creating a completely separate external savings account (with a completely different bank) that we understood how important this was.
Our new savings account was nicknamed our “Debt Crusher” because that was its sole purpose for existing. We would transfer our excess cash from our Household Account (or sometimes Biz Accounts) and make debt payments from the Debt Crusher account.
Having a completely separate bank account that we couldn’t see next to our business and household bank accounts really helped us build momentum in paying off our debt.
No longer did excess money sit in our main bank accounts where it could easily be spent. That excess money got transferred to an account with one important job: Crushing debt!
Have you ever had a month where you realized you didn’t have enough money in your bank account to pay your electric bill? Maybe you’ve overdrafted a time or two and cursed yourself each time it happened? We’ve been there!
When you create your own income flow it’s extremely beneficial to add goals to each section. Our financial advisors gave us the sound advice to keep a goal amount of money in all our accounts as a buffer to never drop below (this helps avoid those crappy overdrafts!) I’m sharing our example numbers to give you an idea of how to set this for yourself…
For Caroline Biz and Jason Biz, our goal number was at least one month of average expenses. The idea was to never drop below that number again if we could avoid it. For Household, our goal number was also one month of average expenses.
And if you’re wondering, YES, we had to work our way up to these goal numbers. When we first set these goal numbers we did NOT have those amounts saved in each account.

This income flow exercise showed us that we should be able to pay down $4,500 of our debt every month (that was $54,000 in a year!). At the end of each month, we’d look at our debt payoff sheet (again, coming in Step #7 of this article) and pay down the different areas of our debt.
We didn’t always hit our exact $4,500 number, but it was extremely helpful and motivating to have a goal to hit each month.
TIP: Create an income flow of your own! Add goals for all your accounts, transfers, and get a clear picture of how much money you can apply to your debt every month.

There’s a reason why this article didn’t start here. It may seem like the “plan” should’ve been first, but what my wife and I realized through our journey to debt freedom was that we needed to get all our financial ducks in a row BEFORE we started climbing ladders and dodging barrels (yep, still running with the Donkey Kong metaphor, folks!).
Truthfully, you already have a big part of your debt payoff plan if you’ve done the Spend Less/Earn More, ETAC, and Income Flow exercises. But, let us show you four additional pieces to your debt payoff puzzle based on our experience paying off our $124,000 in debt.
Yeah, yeah, I’ve said this phrase multiple times, but it’s such an important mindset shift that you need to make when it comes to getting out of debt.
To remind you, we didn’t accrue our $124,000 in debt through lavish spending. However, do admit that our financial habits weren’t the best and there was plenty of room for improvement. A huge part of that improvement was setting budgets and sticking to them.
You cannot and will not get out of your debt if you continue to stick to the same financial habits you’ve had up until this point. You have to make changes.
The phrase that we came up with and that was a guiding principle over and over again while making sacrifices to get out of our debt was: Short term pain for long-term gain.
When we finally accepted the fact that cutting back for a few years didn’t mean cutting back FOREVER, it created a spark of momentum. Yes, we’d have to spend less money each month, travel less each year, and watch our dollars much closer every week, but those things would lead to removing the dark cloud of debt that hovered above our heads.
We want the same thing for you! So… say it with us: Short term pain for long-term gain.
Did you know that American Express has a hardship case that will lower your credit card interest rate (APR) to 0% for three months, 1% for the next 3 months, and then 9.99% for the 6 months that follow? All you have to do is call the number on the back of your American Express card and ask to talk to someone about a “hardship case.”
Hardship cases are made for people like you and us. We got into debt, it sucked, and we were worried about how we’d be able to afford the minimum monthly payments on our credit cards with how high the interest was on our cards. Credit card companies would rather lower your monthly interest rate (APR) then see you default on your payments (AKA: not give them your money).
I didn’t know a hardship case existed when I called American Express and was simply looking for any way to reduce my 24% APR. I hopped on the phone with a customer support person and explained my business was going through hard times and instead of defaulting on my payments, I was hoping there was some other option for me. That’s when the customer service person explained they had a program that would freeze all spending on my card, but would lower the monthly interest rate from 24% down to 0% for three months (then raise it to 1% the next three months, then raise it to 9.99% for the next six months).
These phone calls suck, but staying in debt sucks much worse.
If you apply for American Express’s hardship case, they do have to lock your cards during that time period. This sounds scary, but you shouldn’t be using your cards anymore anyway.
We also called the companies where we had other credit card balances with high APRs: CitiBank, Wells Fargo, and another American Express card. CitiBank and Wells Fargo didn’t have a hardship case like American Express they were both willing to lower our APR by over 10% on each card.
We spent just over an hour making these humbling phone calls to our credit card companies and were able to get our interest rates lowered to a point that would save us $400 in credit card fees each month.
That’s $4,800 annually, which when you add in the savings from our Expense Tracking hidden money we found, it meant we had nearly $15,000 to pay toward debt!
Ready to call your credit card company(ies) yet?
Note: We didn’t call our mortgage or student loan company to find out if they offered a hardship case of any kind. You could call and ask, it definitely wouldn’t hurt.
One of the craziest things I’ll never understand is that even when we were riddled with credit card debt, we could still get approved for additional credit cards! Insane.
Our financial advisors were happy with the hardship cases we were able to get with a few of our credit cards, but on some of them, the APR was still too high. They recommended we apply for cards with 0% APR and very low balance transfer fees. The idea is that we’d transfer the balance of an existing credit card with a high interest rate to a new card with a 0% interest rate and just pay the one-time balance transfer fee.
Here’s an example of exactly how we did this:
Step 1: I applied for the Discover It credit card (0% APR and 3% balance transfer fee)
Step 2: I got approved for the card with a line of credit of $12,000
Step 3: I transferred the balance of our Wells Fargo Platinum card to the new Discover It card ($12,000 balance x 3% transfer fee = $360 one-time balance transfer fee)
I repeated this process and signed up for the Chase Slate credit card, as they also offered a 0% APR. We moved over three separate cards that had over $9,000 on them and nearly 30% APR.
This part of the debt payoff plan is going to be dependent on your credit score and credit history. We were fortunate that we both had pretty great credit scores and credit history and could still get approved for new credit cards with reasonably high credit limits. If you can’t get approved for new cards, don’t worry, just skip this part of the debt payoff plan.
Note: We found the best 0% APR credit cards by checking out NerdWallet. They keep an up-to-date list and give you an easy way to apply. IMPORTANT: Be very careful when signing up for more credit cards, remember these are only for transferring your debt, not to use for spending!
You should aim to pay off the credit card or loan with the smallest balance AND highest interest rate first. As Dave Ramsey (“America’s trusted voice on money”) says, paying off one card creates a snowball effect. Once you see that first card (or loan) paid off, it motivates you to want to pay off the rest (instead of evenly reducing all debts). Think of paying off each credit card or loan like getting one level closer to that financial freedom princess!
Around the beginning of 2015, we had stashed enough money in our Debt Crusher account to pay off a credit card that had the highest interest rate. This was a CitiBank card with a 21% APR and a balance of over $14,000.
It was during one of our weekly budget meetings when Caroline and I hunched over my laptop. We logged into my CitiBank account. We clicked “Make A Payment.” We selected the magical option of “Pay Total Balance” (an option we hadn’t be able to select for many years). And we hit the glorious Submit button.
What a wonderful feeling that was! Up until that point, we’d only felt the mundane feelings that came along with paying minimum monthly payments. Yeah, some of our monthly payments had a little extra thrown in here and there, but none of them were as satisfying or motivating as paying off an entire balance. (I’d liken this to beating that first level of Donkey Kong where he not only throws barrels, but he starts throwing them rapid fire. Beating rapid fire Donkey Kong barrels proved to us that we could finally rescue our debt-free Princess!)
The little celebration we did lead to getting even more focused on wanting to pay off our debt as quickly as possible. We wanted to select all the “Pay Total Balance” buttons on all our debts. We couldn’t make it happen at that moment, but we could feel that snowball effect was in motion.
Hopefully this 4-part debt payoff plan gives you some really solid momentum toward debt freedom. Now would be a great time to make those hardship phone calls, look for 0% APR cards you can apply for, and get ready to organize all your debt in one place.
Congratulations friend, you are on your way to debt freedom! But before we release you into the financial wilderness with all the debt payoff strategies you’ve learned thus far, we have a pretty important spreadsheet to share with you.
Say it with me: Spreadsheets are our friends!
Just like you created a spreadsheet for Expense Tracking and Categorization (ETAC), it’s time to make another one that shows you exactly how much debt you owe. This additional spreadsheet will help you create a monthly payoff schedule that shows you exactly which debts need to be paid off in which order. This is the Debt Sucks Spreadsheet.
Seeing our debt laid out on one sheet was incredibly powerful. Yes, the total amount of debt staring us in the face sucked, but the fact that we could see a clear monthly path to paying off all our debt was incredibly helpful.
I’m going to walk you through how to use our Debt Sucks Spreadsheet step-by-step below. There’s also a video after the written steps if you want to see me using and updating the spreadsheet.
💸 Grab your own copy of the Debt Sucks Spreadsheet here.

When you open up the Google Sheet, you’ll need to make your own copy that you can edit. Simply go to the top menu bar: File > Make a copy… and boom, you’ll have your own version you can edit.

Now that you have your own copy of the Debt Sucks Spreadsheet, you’ll want to fill it out. Leave Column B as the last column you fill out.
Column A: This is where you’ll list your debts (credit cards, loans, etc).
Column C: Add the total current starting balance.
Column D: Add your interest rate (APR). Don’t be surprised if this information is hard to find!
Column B: The card or loan with the highest interest and lowest balance is your #1 priority (remember, this is the snowball effect).

If you have more than three debt items, we recommend copying and pasting one of the existing debt sections and adding it to the far right of the spreadsheet. Make sure to also add a new debt item in the top left section too.
You wrote down your credit card/loan balances in the top portion of the spreadsheet, now let’s add them to the corresponding color section below (to help you pay down those debts). Here’s a quick guide to where you need to match up your balances:
You only need to update cells C15, H15, and M15 in this step! The spreadsheet should update the rest of the cells automatically.
Once you’d add the Balance numbers to match, you can edit the Date and Amount Paid columns to match your debt payoff schedule. You may need to add more months, and you’ll certainly want to update the Date column to match your calendar. You enter monthly payment data in the Amount Paid that is your goal payment each month. (Once a payment is made you’ll change its background color to denote you made the payment.)
You will most likely not stick to the payment schedule you first write in. That’s okay! We didn’t either. Just make sure to go in and make the biggest payment you can and the Balance totals will update for you.

This is the only complex part of the Debt Sucks Spreadsheet, but it’s not as bad as you think! You want to update the formula that calculates the interest rate so you can see the actual amount of interest you’re paying each month.
To update the interest rate for the first debt item, click on cell D16 (or 16D). When you click that cell, you’ll see the formula in the bar at the top of the sheet. We’ve set the default interest rate at 10% (or 0.1 as written in the formula). All you have to do is take the interest rate you wrote in cell D2, convert it to a decimal, and update the formula.
Example: Let’s say you have a 5% interest rate (APR) on your credit card. You’d enter 5.00% in cell D2 and in the formula in D16 you’d change 0.1 to 0.05.
Example #2: If you have a 24% interest rate (APR) you’d enter 24.00% in D2 and in the formula in D16 change 0.1 to 0.24.
Repeat this process for all cells in the “Balance Plus Interest” column where a formula exists (when you click the cell).

Now that you have the Debt Sucks Spreadsheet setup with all your debts, your total starting balances, your interest rates, your estimated amount paid, you can start making monthly payments and denoting them in this sheet.
Don’t get discouraged if you can’t meet the goal you set for your monthly payments. Stick with paying down your debt and use this sheet to your advantage!
You know what sucks about debt? Talking about it often. But you know what helps get rid of debt? Talking about it often.
If you have a spouse or significant other, I highly recommend this being your financial accountability partner. Conversations about money SHOULD be had in a relationship. Money is evil. It causes so many problems when not discussed often.
Debt isn’t fun and neither is getting out of it. Don’t do it alone!
But if you don’t have a spouse or significant other, you’ll want to get some financial accountability from another source. Here are a couple of recommendations:
Online or local groups: Are you in any Facebook Groups or do you attend any local meetups? Could you ask around and see if anyone wants to team up on attacking debt together?
Financial advisors: I always thought of financial advisors as crusty old men who wore those bright green visors you see in paintings that usually involve games of poker. Maybe there would be cigars involved, but most certainly, being $124,000 in debt didn’t qualify to talk to financial advisors. Then we were proven wrong. We were introduced to our financial advisors through a friend and have been using them since 2013. I’ll also mention that you don’t have to be wealthy, rich, or even making much money to have financial advisors. We had none of those things when we started our relationship with the financial guys we use.
Ask your friends: It may sound crazy, but given the stats I shared earlier about the average debt in the US, you are very likely to have a friend who is in a similar debt position as you. Don’t be ashamed to ask. Heck, forward them this article and have that be the way you broach the subject.
No matter who you team up with, finding a financial accountability partner is hugely beneficial. It removes all the pressure from your shoulders and allows you to have someone to commiserate with. Debt isn’t fun and neither is getting out of it. Don’t do it alone!
I may sound like a broken record, but our weekly budget meetings were the turning point in our debt story.
I give my wife a lot of credit (money pun!), she was the catalyst for starting our weekly budget meetings. At first, I hated these meetings. It sucked to confront the debt we had, most of which was caused by me and my poor business decisions. But as we started to talk each week about our debt and how we were working through paying it off, it became a much easier topic to discuss. The shame and embarrassment started to melt away.
When you have 250+ conversations about anything, progress is bound to happen! Sure, some weeks our budget meetings are short and sweet. We download our data. We review our spending. We update our budgets. We’re on our merry way. But every few weeks it’s a much longer, and sometimes difficult conversation. Those tougher meetings are that much easier with all the boring meetings sprinkled in between.
We can clearly remember being blindsided by random bills, business expenses, or even income before these weekly budget meetings. Now, we feel completely in control of the flow of money coming in and out of our accounts. It feels really effing great.
When we created our first debt payoff plan I was hell-bent on paying off all $124,000 of our debt in 12 months. Well, things didn’t go according to plan. We didn’t make as much money as we’d hoped and we had a few unexpected expenses pop up. But just because we didn’t stick to our first debt payoff plan, doesn’t mean we gave up.
We were able to pay down $60,000 of our debt in the first 12 months of our debt payoff plan. And, a whopping $25,000 of that money came directly from doing our Expenses Tracking and Categorization exercise (and then setting budgets, making sacrifices, and making those tough phone calls). So, $25,000 of our first year’s debt payoff came directly out of money we already had and otherwise would have wasted!
Week after week my wife Caroline and I would sit down, go over our finances, make our monthly debt payments, and update our Debt Sucks Spreadsheet. It took just under two years, but we finally reached debt freedom.
On June 14, 2016, we jumped over that final debt-filled barrel and kicked Donkey Kong right in his credit-card-loving face.
I simply can’t type enough words to explain how great it feels to be debt free. That $124,094 used to make us feel ashamed and embarrassed, but now all we feel is pride.
Our very last credit card to pay off was carrying a balance of $9,639. When we paid it, we immediately grabbed a phone and took a selfie (which, obviously, needed emojis added to it).

Being 100% debt-free is a feeling like I’ve never felt before. It feels like so much more is possible in life. It feels like we’re in control of the decisions we make. It feels like we’re breathing some really sweet, sweet oxygen these days.
There is no perfect debt payoff plan. There is only the perfect plan you can create for your situation and your life.
Money is a deep, emotional subject for a lot of people and just talking about it can bring up a lot of negative emotions: guilt, shame, scarcity. But we promise the moment you acknowledge the barrel-throwing monkey in the room and make a plan to rescue your financial princess, things will start to change. They did for us.
Remember: It’s not going to happen overnight, and it’s not going to be easy. Short-term pain for long-term gain.
Is it too late to build an email list? Do you need a big audience somewhere else to get email subscribers? Why do we think you should forgo any effort spent on social media and redirect it to email marketing?
Those are the questions we’re going to answer for you in this ethical guide to building an email list. Since 2009 my wife and I have seen the power of having a great email list, and by power we specifically mean building meaningful connections with other human beings AND getting some of those folks to purchase products or services from us.
Just to give you some social proof so you don’t think we’re copying and pasting the success of other people here, since 2009 our businesses have generated over $3,000,000 in total revenue and 90% of that money has come directly from our email lists.
You may or may not be focused on generating revenue with your email list, but we believe there is no better way to create a deep and strong connection with people online right now (yes, even in a time when social media seems to dominate the virtual landscape).
Let’s not waste another minute, here’s everything we know and have learned from our experience building email lists and growing our audiences.
There are two main reasons why you should care about growing a great email list, and why you should focus on doing so before spending time growing a following on social media sites.
Think about it for a moment, people don’t quickly scroll through their email inbox, swiping past message after message, spending less than 3 seconds reading each email. Yet, this is the exact behavior when someone uses a social media application (scroll, scroll scroll, swipe, swipe, swipe) and they spend less than 3 seconds reading a Twitter or Facebook post. People open emails, they read them, and they spend quality time in their email inboxes every day.
Social media sites, on the other hand, have fancy algorithms that change every few months. The audience you grow on Instagram, FB, etc, may have seen your content one month and then a month later you’re getting almost zero viewership. This doesn’t happen with email (often). I’ll talk more about how email service providers (ESPs) do hold some power, but it’s certainly nothing to worry about when you compare it to social media companies and how they can pick up their entire playground out from underneath you and you’re left holding your kickball and standing in a pile of (lonely) dirt.
In Section 1 of this guide we’ll talk all about the nuts and bolts of starting to build your email list, but before that, let’s talk specifically about WHY building an email list is important.
Building an email list gives you the opportunity to create a value exchange with your subscribers. You deliver helpful or interesting content to their inboxes and they give you some form of patronage in return.
Trust is one of the most overlooked marketing tactics because it takes time. By showing up consistently in someone’s inbox and delivering them thoughtful content you will build trust. Your subscribers will come to appreciate the messages they receive from you, and in most cases will look forward to them and often times pass them on to friends (or save for reading again later).
Trust is what gets someone to go from curious onlooker to fan/customer. If you’re building an email list to generate revenue for an idea or business, building trust is something you simply cannot ignore.
My wife and I have been sending emails to our subscribers for years. We’ve honed our writing voices and we’ve found the niche topics we want to write about. You may feel like you’re completely in the dark with your writing voice and your topic, but have no fear, later on in this article, we’re going to help you discover those things too.
I put my first email signup form on a website (for my IWearYourShirt business) in 2009. I had no clue what I was doing, but several people had told me I needed to “grow an email list.” I had plenty of traffic coming to my website, so I started to get subscribers quickly. Actually, I started to get a lot of subscribers.
Over the course of a year, I racked up more than 25,000 email subscribers. There was only one big problem: I had no idea what to do with them.
I would send emails haphazardly. Sometimes on a Monday, sometimes on a Thursday, sometimes two emails on the same day if I felt like it. Whenever I thought I had an interesting thing to share, I sent an email to my growing list about it. This was problem number one, but not the biggest problem, by any means.
You see, after sending emails for a few weeks, I noticed a trend. The more emails I sent with giveaways, prize opportunities, or freebies, the higher the open and click-through rates. These two statistics were digital crack. I craved seeing them climb higher and higher. And the subscriber number? That was like, well, I don’t do drugs but whatever is better than crack. Super crack!
If you’re a veteran email marketer (or just marketer in general) you probably already know where this story is going. Either way, hold on tight because it’s about to be a bumpy ride.
The more giveaways and prizes I offered to this growing email list, the more interaction the emails garnered. An iPad giveaway here, a $100 visa card there, so on and so on. There were times when I could send an email to this list asking them to like a Facebook page, and more than 1,000 people would do it within an hour. That’s pretty damn powerful in the 2009-2011 era of social media.
But then I noticed another trend with my email list. When I sent an email without a giveaway or prize, the open and click-through rates were abysmally low. Even worse than that, those emails usually came back with negative responses and high numbers of unsubscribes. I’m not sure which hurt my ego more, but it’s silly to look back and think that I let any of that dictate my decisions so much.
Nevertheless, I kept the email list going for years. I reduced the giveaways and sent fewer emails.
I hated feeling like I built a sizable email list of people who only cared about giveaways.
I tried lots of different content in the emails. I varied the sending schedule and even tried a set day and time for a while. I tried segmenting the list. I tried deleting huge chunks of subscribers (we’re talking 5,000+ at a time). I took a break from sending any emails to this list for nearly a year (never a good idea by the way). I even tried changing the name and email address of who the email came from. Unfortunately, the damage was already done and the list was essentially worthless. In fact, it was costing me a couple thousand dollars every year.
So I sent three final emails:
One announcing the list was closing down.
One letting people know they could get on a new email list I was passionate about that wouldn’t feature any giveaways. I was very clear about the type of content the new list would receive.
And the last email simply thanked them for being subscribers and said goodbye.
Then I deleted the entire list. I didn’t back it up. I didn’t save it. I just deleted it. 25,000 subscribers gone.
After all was said and done, only about 200–300 people moved from my 25,000+ person email list. And that made me happy.
You still might be wondering why I would walk away from 25,000 subscribers. It’s simple. They were the wrong subscribers for me. They weren’t my “Rat People,” as my friend Paul Jarvis says. They weren’t my “Tribe,” as Seth Godin says. It was simply a list of people who wanted something from me that I wasn’t happy giving them.
To recap: Do not build an email list based on giveaways and incentives. Build an email list of people who want to read your emails and are interested in you and what you have to say.
My thoughts on email marketing have changed drastically over the years. You might assume I loathe email marketing and list building because of this story and my not-so-great-experience. But it’s actually the contrary. My second email list, the Action Army (for my previous JasonDoesStuff website), brought me a ton of value and dollars in my bank account from 2014-2018. I made a mistake and failed with my first email list, but I also learned a lot from the experience too.
Many people want to start by picking an email service provider (ESP). Or they want to throw some email signup forms on their site. But these two steps are way lower on the list of important decisions and steps you need to take.
If you can stick with me, follow the upcoming advice from loads of firsthand experience, you will be building a highly engaged audience in no time.
Have you heard the term “vanity metrics” before? If not, that’s okay, and probably for the best. However, we’re all guilty of getting sucked into vanity metrics. Vanity metrics are the little numbers associated with website traffic, social media followers, notifications of likes, amount of email subscribers you have, and many other things. Sometimes these metrics can be helpful, but the majority of the time they’re nothing more than a distraction from what really matters.
When it comes to anything that can be quantified, our egos quickly become our worst enemies. And boy-oh-boy, do we live in a time with numbers being shoved in our face at every turn. Almost every platform puts some sort of vanity metric front and center any chance it gets. The more numbers you see the more numbers your ego craves.
I wish I could tell you there was a magical way to tame your ego. Some ego-taming app you could download that would save you from the itches we get to check all our metrics. YOU simply have to be that ego-taming app.
I told you about the 25,000 email subscribers I deleted. During that time I was heavily focused on building an email list with lots of subscribers (quantity). What I should have focused on, and what I only focus on nowadays, is building a highly engaged list of subscribers who want to read my emails and who look forward to having my name show up in their inbox (quality). Don’t worry, I’m going to help you define your ideal subscribers in a moment.
Whenever you find yourself getting stuck worrying about how many email subscribers you have (or don’t have), take a step back and ask yourself if your email list is helping you build the connections and trust you seek. That could be with only 10 people or 100 people. That’s okay! And if you’re just getting started, give yourself the time and space to build a quality email list. It may take you a year or two to have enough email subscribers to help you reach whatever goals you’re setting for yourself/your business.
TIP: Instead of worrying about the amount of email subscribers you need, define a goal for your business that your email subscribers can help you reach. Then, focus on the goal of your business not the vanity metric of how many subscribers you have.
I remember that it took me an entire year to go from 400 email subscribers to 1,000 email subscribers. That was less than 2 new subscribers per day, and in the beginning, it was 0 new subscribers per day for quite a while. I constantly told myself not to check how many subscribers I had and to simply keep going on my mission of writing helpful and interesting emails no matter the amount of subscribers.
Learning to tame your ego can help you sift through the numbers and find the people who give you the most value.
The easiest way to attract the right people to join your email list is to be crystal clear about who the heck you want to talk to (and most likely who you can help).
Let’s look at an example and say that you’re a freelance web designer who has been doing design for years and wants to help up-and-coming designers learn the ropes of working for yourself, honing your craft, and staying up on design trends.
A fun way to always have this person in your mind is to give them a name. Let’s say your ideal subscriber’s name is Linda (everyone say, “Hi Linda!”).
Now, describe Linda. Answer these questions about your fictitious person to help you understand how to speak to her, how to be helpful to her, and how to make sure she’s the right person to join your email list:
These questions may seem silly, but we’ve seen the value of them and how much easier it becomes to attract the RIGHT subscribers and detract the tire-kicker subscribers who are just going to waste your time and money (because, you pay for subscribers!).
Here are some example answers to those questions, just so you have an idea of how to build this avatar of Linda:
Once you’ve defined who Linda is and answered all the questions about Linda, keep this persona in a safe place. This is your audience definition filter. Constantly remind yourself of the traits that make Linda who she is, and get ready to speak directly to Linda in every piece of your content, especially in your email signup forms on your website*.
*Again, we’ll get into the weeds of what email service provider to use and some tips and tricks to help improve your subscriber conversion rates on your website. Just hold on tight, we’ll get to that.
So, the wrong way to entice Linda to signup to get your emails on your website is by having the text, “Subscribe to get my updates” next to the email signup form.
The right way to speak to Linda and help her understand how your emails are going to help her is to write something like:
“If you’re a freelance designer who lives in Adobe Photoshop or XD and you want to get more quality design clients, my weekly emails will help you!”
In the answers to the questions about Linda, you should have found things to add to this copy you’re putting on your website. Remember, you created this little fictitious persona to have as an audience filter.
Going forward, whenever you finish writing an email or article (or creating any piece of content) ask yourself, “Will this help or resonate with Linda?” If it doesn’t, make it helpful.
Don’t be afraid to be polarizing when it comes to defining your audience. The best audience you can build is a small, highly-focused one. It will reward you for many years.
Your audience connects with you because you share strong values. And the only way they’ll know how you think and what you value is if you’re outspoken and clear about it.
If you’re starting with ZERO subscribers I’m not going to sugarcoat this: Getting your first subscribers can be hard work.
But before you throw up your hands and give up, think about getting your first subscribers like getting your first… anything. It’s always the hardest in the beginning! Replace getting subscribers with any new thing you’re trying to do. Going on dates, learning a new skill, building a new business, etc, it’s always the hardest in the beginning. KNOW THIS. Mentally opt-in for it and your journey to getting your first subscribers will be easier.
I know this subscriber tip sounds super obvious but if you’re reading this section of this article it might not actually be obvious to you.
The BIG key to going where you already have an audience is going to be aligned with the next section. Do NOT just say “subscribe to my new email list.” People need a compelling reason to sign up. They need to know what your emails will do to help them. (Read the next section for more on this.)
📥 Do you have a friend with an email list? Can you write a guest email for them?
🗣 Do you know someone in your industry who hosts webinars? Can you be a guest teacher on one of their webinars?
📝 Do you know someone who has a blog/site that’s right in your wheelhouse? Can you be a guest writer?
🎙 Do you listen to podcasts in your industry that have guests? Pitch yourself to them!
The super-important part of any of those existing audiences to ensure you’re offering value to their audience. There has to be a reason they let you get in front of their audience.
I offer up this piece of list-building advice with an important caveat: If you don’t know how to use paid ads to build an email list you absolutely should find someone who does and pay them to help you.
Paid ads are great if you do them correctly. Over the years we’ve dabbled with paid ads and a good cost per email address (or “lead”) is $1.00 per subscriber. Now, there’s a ton of gray area with that number, so take it with a BIG grain of salt.
I cannot imagine you’re reading this guide and that you don’t have a website, or at least have a plan to create a website. But here’s the thing, there are some dos and don’ts when it comes to converting websites visitors into email subscribers.
DO: Clearly explain on your email signup forms why someone should subscribe and what they will get from your emails.
DONT: Use vague generic messaging on your emails forms, like: “Sign up to get my weekly newsletter.” Instead, say something like: “Sign up to get my best advice about running a graphic design company (new helpful emails every Tuesday!)”
DO: Put email signup forms on more than one page of your website. On our site you’ll see email forms on the Homepage, About page, Newsletter page, the bottom of every article/guide, and a few other places.
DONT: Just put an email signup form on your homepage and call it a day. People may need to see your email signup form a few times and learn more about you via your website to decide if they want to subscribe. Don’t shoot yourself in the email-list-growth-foot by using only one or two email forms.
DO: Treat your website visitors like YOU want to be treated. Do you like landing on a website and immediately getting a pop-up message to enter your email?
DONT: Try to convert every website visitor into a subscriber by smacking them in the face with pop-ups and exit intent windows at every turn. Sure, maybe try using an exit intent email signup form on a page or two on your website. The key word is “try,” because you want to test the results of using that tactic (don’t just blindly do it).
Picreel and OptinMonster have great tools for helping you grow an email list. Just be careful and remember to treat your website visitors how you want to be treated when you land on a site.
DO: Remember what I said earlier about building an email list based on incentives. It can lead to an email list of people who only want free crap. If you’re going to offer free downloads make sure they’re in direct alignment with what you’ll be sending your subscribers emails about.
DONT: Use crappy “lead magnets” (free downloads) just because it’s a tactic you can use. Create a really helpful email course that actually solves a problem for your potential subscriber.
DO: Talk about your email list on social media or any other places you create and share content of any kind (yes, tweets are “content”). Just because you’re tired of asking people to join your email list doesn’t mean they’ve heard you or even know you have an email list.
DONT: Spam every other platform with asks to join your email list. Lead with value. Remind people what they can get from your emails. Get create and try to have fun infusing the ask of subscribing in with your other content.
DO: Focus on sending valuable emails that people will want to share. When you’re crafting your email content ask yourself, “is this something worth talking about?” If the answer is No, that’s okay, just realize your emails aren’t helping you grow your audience.
DONT: Take the opportunity of visiting someone’s inbox lightly. I’m not saying put pressure on yourself and psyche yourself out, I’m just saying that you should be thoughtful and spend time and effort crafting quality content for your subscribers.
This Audience Guide started out as a simple email to my subscribers about the things I’d learned building an email list. My subscribers found it quite helpful and shared it for me by forwarding it to their friends.
We’ll get to WHAT you should send emails about in Section 2 of this guide, but there’s an important mindset that my wife and I strongly adhere to:
Creating great content can attract your audience members but creating consistent content keeps them.
No matter what sending schedule you intend to use for your email list, staying consistent and giving your subscribers a schedule they can look forward is important.
Are you worried that you don’t have any subscribers at all right now and that thinking about sending consistency isn’t important for email list growth?
My wife sent her first newsletter to just 4 subscribers, 2 of which were her and me. She stayed consistent and two years later had a list of more than 10,000 subscribers!
Are you worried that if you commit to a weekly email sending schedule you’ll run out of things to email about after a few weeks?
I keep a running list of topics I want to email my list based on things that interest me but also regularly get inspiration from questions I get from my audience. Out of the 400 articles I’ve written over half of them (200+) have come from questions people emailed me about.
Are you not getting emailed any questions at all right now? Then you need to start creating and sharing your work! You need to make stuff. You need to be known for something. It won’t be perfect when you start and that’s 100% normal.
The beauty of building an email list and sending an email newsletter is that YOU determine the schedule at which you publish, and you can rest assured that your audience is going to actually have a chance to read that content. On Facebook, you could post every day and those that have liked your page (or you’re friends with) might never even see your posts. On Twitter or Instagram, your followers have to come across your post at the right time to see it, or it’ll likely never enter their consciousness.
An email, on the other hand? An email patiently waits in someone’s inbox to be opened. They may or may not read your newsletter that week, but just by hitting send you’re subconsciously communicating to them that you’re reliable and that you continue to care about how you can provide valuable content to them.
Consistency is an email growth tactic, whether you want to believe it or not. Think about the people you subscribe to, listen to, read stuff from, watch on YouTube, etc. You come back to those folks time and time again because they create and share things consistently. You can do the exact same thing and be in a similar position as them when it comes to having an engaged audience. Commit to consistency, right here and now.
I remember back in 2013 when I was transitioning from a failed business to not knowing what the hell I was going to do with my life, I felt like I needed something concrete to build an email list around. I needed a focus, a niche, something that people could latch onto!
But I had nothing… Hah!
Probably not what you were expecting, right? Well, it happens to all of us.
I did what any scrappy entrepreneur does and decided to start ugly. I decided to not have the perfect focus or niche and instead just get my email list going and use these next two mindsets to guide me.
Let me give you two example scenarios, one of which was my own email strategy back in 2013 when I had no focus at all. But before I do that, here’s one important mindset shift to make: No one starts out as an expert. You don’t have to get to some arbitrary level to be “good enough” to help other people.
You don’t have to be Ansel Adams to give advice on photography. Odds are if you’re making money by taking photos, you have a LOT you can help aspiring photographers with.
I could go on for hours because I’d sign up for those emails! I don’t even want to make money from photography, I just want to read helpful content about it from someone who isn’t stuck up or boring.
One pro-tip on finding content for well-known niches (like photography): Head to YouTube and search “photography tips.” Find the 10 most viewed videos and write articles/emails that put your spin or take on those things. Boom. Rinse and repeat for many additional content ideas.
For this example feel free to replace photographer with whatever craft or talent you focus on. That could be videography, cooking, running, writing, etc. Just remember to be helpful and focus on giving tons of value to your subscribers!
Here’s my non-example, example! So, what the heck do you create helpful email content about if you don’t know what you can help with?? Great question. This is exactly what I did, broken down into three content types:
1 – Help people avoid your mistakes. At the time in 2013 people would email me asking for marketing or business advice. Even though I felt like a fraud answering them (because my million dollar business tanked, I realized I could share all my mistakes and lessons learned and THAT was helpful). What lessons have you learned from your mistakes? How can you help someone avoid the pain you ran into?
2 – Help people by sharing your journey with them. A big part of my success building an email list in 2013 while not having a specific focus was that I brought people along with me. In my weekly email newsletters, I’d share something I tried or a book I read or anything that was helpful to me on my own journey. What journey are you on that people can relate to? What things are you trying that folks may find interesting? Don’t sell yourself short, people love watching/reading about other people doing stuff!
3 – Try latching onto something. For me, as vague as it was, I tried latching on to the idea of “taking action.” I told you it was vague! But, it helped. Even though taking action doesn’t excite everyone, there are people out there that align with it. Having something for people to resonate with is better than having nothing at all (no matter how vague). What is ONE thing you can have people latch onto? What’s something you believe that’s slightly unique to you that you can talk about?
My favorite email newsletter I’m currently subscribed to breaks every email marketing rule in the book. It’s insanely inconsistent in the delivery schedule. The formatting of the email is not great. The thought and effort that goes into the email itself is sad. BUT… the actual content I receive is worth dealing with all that stuff.

Yep, the comics from The Oatmeal are my favorite email newsletter. The content is so fun and entertaining that I look past everything else.
Would I love and appreciate The Oatmeal even more if I received consistent emails? Absolutely! But, the cartoons are so good that when they do finally arrive I love them to death and am so glad I’m subscribed.
There’s a ton of value in being entertaining. There’s a lot to be said for bringing joy and happiness into people’s lives.
We live in a culture dominated by entertainment. Look around and you’ll see entertainment at every turn, on every billboard, it’s nearly impossible to escape. Sure, there’s good and bad entertainment, my point is that people love to be entertained, so find a way to authentically entertain them if you can!
I’m nowhere near as talented as Matthew Inman (creator of The Oatmeal), but I do my best to infuse my own humor and try to entertain my email subscribers when I can. A couple simple ideas that go a long way:
Don’t be afraid to entertain and build an audience around your personality. I wouldn’t say try to be the next Jersey Shore contestant (woof), but embrace who you are and what people say stands out about you.
Obviously, you need a few email subscribers knocking on your door for this tip to work, but even if you have 15 new subscribers a month, this strategy can work for you.
Your Welcome Email, aka the email that a new subscriber gets right after they sign up is going to be the email with the HIGHEST open percentage… ever.
Take advantage of that opportunity and ask your new subscribers a question in that email. A couple questions I’ve asked in my Welcome Email over the years:
You’d be shocked at how willing people are to answer a question after they receive your Welcome Email. You have to remember the mindset they’re in: They just signed up and they’re probably never going to be more engaged with your email content.
In 2014 I used the “…struggling with right now?” question in my Welcome Email and amassed over 600 responses in one year. About half of the replies I received led to creating an email, blog post, or product I could sell. The great thing about asking something of your subscribers is you get to learn what they want/need and then you can help them with that thing!
It can be easy to get caught up in the monotony of writing emails, staying consistent, keeping up with your business, and letting the quality of your email content dip.
A simple way to make sure you aren’t letting your content get stale or boring is to ask yourself: Would I be excited to open and read this email?
If your honest answer is No, then you need to write a better email. If you send your subscribers mediocre content, you shouldn’t be surprised when they unsubscribe or start ignoring your emails. Send emails you’d want to read!
At this point, I have to assume you already have an email list or you’re on your way to creating one. Yay you! Having been in the email marketing game for over a decade I can safely say that I’ve made my fair share of mistakes and learned plenty of lessons. I’m guessing you caught wind of that already, huh? Let’s dive into a few of those things now!
I’m going to give you an abridged version of my answer to this question because I wrote a separate article that does an in-depth breakdown of my top three email service providers (you can find that here).
Instead of answering this question by reviewing every email service provider (ESP) in existence, I’m going to instead give you my choices based on where you might be on your email marketing journey. You know, focus on your actual needs and not just focus on features or price!
MailChimp is probably the most well-known ESP and it’s for good reason. They’ve built an amazing email platform and it’s continually getting better.
These are the three best things about MailChimp:
Two not-so-great things about MailChimp:
I don’t think those two items are deal-breakers though. MailChimp is a FANTASTIC option and you’d probably be super stoked to use it.
I was a happy ConvertKit customer for two years. The only reason my wife and I left was that we wanted to get into some much deeper email automation and at the time ConvertKit’s automation builder was very ho-hum (spoiler: that’s changed).
Three great things about ConvertKit:
My only (personal) drawback for ConvertKit at this point:
I had a really crappy experience with the company Mailgun back in 2012 and haven’t felt like letting go of that grudge (nor do I think I need to #sorrynotsorry). That being said, I also saw quite a dip in my email open rates over time with ConvertKit, even after doing email list pruning. This may not be an actual problem for you and maybe Mailgun is run by better people now?
Drip is the current email provider we use for Wandering Aimfully and we’ve been pretty happy with it. There have been a few blips in the road, which I’ll share, but overall I’d recommend Drip over extremely complicated solutions like InfusionSoft, Ontraport, AWeber, etc.
Three things we love about Drip:
Two things we wish Drip would do better:
Have better email form analytics (of all the data Drip can show, not having form analytics easily accessible is so bizarre)
I’m all for paying for great products, which I believe Drip is, but MailChimp is inching closer and closer when it comes to features and they charge half the price for the same amount of subscribers (for our ~15,000 subscribers we pay almost $300 on Drip and would pay $150 with MailChimp).
When it comes to picking the right email service provider the good news is that it’s not that difficult to switch.
Since 2013 we’ve moved from MailChimp to ConvertKit to ActiveCampaign and finally to Drip. The process is actually fairly painless to switch and each service has offered a hands-on migration to help make the process smooth.
There are a plethora of articles you can read on the topic of writing great subject lines. I’ll link to a few at the end of this section, but I do want to share a few simple principles with you.
Don’t play the clickbait game: It’s super easy to get caught up in the open rate success of “you’ll be shocked to read this!” style subject lines. The problem and I’ve witnessed this firsthand, is that the shock value wears off and so does the attention of your subscribers. Instead of playing the clickbait game, just be straightforward with your subscribers and let them decide if they want to read your content.
Your best subject lines are almost always going to be the simplest: The email with the highest open rate I’ve ever sent (outside of the Welcome Email) had the subject line “can you help me out with this?” Just a simple question that piqued people’s interest. K.I.S.S. applies to writing subject lines too!
Don’t over emoji it: Listen, I adore emojis. I use them constantly. However, you can overdo it with emojis in subject lines, especially when you understand that not all email inboxes interpret emojis the same way (Gmail, for instance, has it’s own emoji library that sometimes conflicts with Apple’s emoji library – ugh, so dumb). I’m not saying don’t use emojis, just don’t go 🦍💩.
As I mentioned, I have a few additional resources you can check out that can help with your subject line writing:
And while all these tips I’ve shared and linked to are great, the most important thing you can do to write better subject lines is just to write and share them. Let your own data educate you on what YOUR audience resonates with (and what entices them to open your emails).
This may seem a weird topic to have an entire section dedicated to it, but that’s how strongly I believe that people need to stop including social media links, share buttons, etc in sales emails.
Let me paint a picture for you, ready?
Jeremy is a photographer and he’s created an awesome online course that can teach other photographers how to book more clients and create a more streamlined photo editing process. His photography course is wonderfully helpful and people are going to love it!
Jeremy sends out a weekly email to his list and is about to queue up a sales email for his course. He meticulously writes his sales copy, addressing all the necessary pain-points and highlights around his new course. He’s happy with his email and he schedules it to be sent. Go fictitious Jeremy!
His loyal subscribers start opening the email and reading about his course. They’re excited! They know this course will help them. But then, they get to the bottom of the sales email, ready to learn more and potentially purchase his photography course when they see a Facebook icon. “Hmmmm…” the subscribers’ brain perks up. “We love mindlessly scrolling through baby photos on Facebook, let’s go do that, it makes us feel good!”
And boom, now Jeremy’s potential customers have scurried off to the catacombs of social media, never to be seen again.
So yeah, that story is a bit silly, but it illustrates my point. Social media sites like Facebook, Twitter, etc, have created immensely strong mental connections and if you give someone’s brain a chance to, it will run off any scrollable feed possible.
If you’re going to sell something in an email, remove any chance that someone could get distracted from making a purchase.
If you have data to back up that your subscribers use your social media sharing icons and links when you aren’t sending a sales email, then leave those links/icons in place. But if you’re trying to sell your product, you better believe that your subscribers need ONE clear focus (and it’s not baby photos!).
These are by no means mandatory, but I wanted to share a few of the more advanced email-related things I’ve learned over the years.
For quite a while I used mail-tester.com every single week when I was queuing up my newsletters. This 100% free service is a great way to see if your emails are going to run into any trouble when you send them. Mail-tester will grade your subject line, email content, let you know if there are any issues with your from email address being on any sort of sending blacklist, and they even have some super-nerdy trickery you can do to help your email deliverability (setting up DKIM and dmarc stuff).

I was super hesitant to ever survey my subscribers because I don’t ever fill out surveys when people send them to me. But then, on a whim in 2015, I decided to send my very first survey. Out of the 2,000 people that opened my first survey email, over 500 of them filled it out! WHAAAT?? This wasn’t a simple score-based survey, I asked folks to leave long-form answers (and they did). Those email survey replies led to the creation of multiple products, a podcast, and loads of content topic ideas. Plus, some subscribers asked simple questions that I could answer, which helped increase trust, and made me feel like I was over-delivering on value.
Here are some questions that are great to include in a survey:

Once I got the taste of sending a survey and see how people actually enjoyed responding, I decided to put another task to the test. I’d heard of people sending surveys to their audience and offering a unique product after survey completion, but it seemed weird to me. Why would these people A. take a survey and then B. buy something right after!? But if you think about it, the subscribers that are willing to fill out a survey, are your BEST and most interested subscribers. Of course, they might want to buy something from you! So, in 2016 I sent out a survey to a segment of my audience (the folks who opened my emails the most) and at the end of the survey, there was an opportunity to buy a $1,000 product discounted to $500 (with only 15 purchases available). Just a few short hours after sending out the survey all 15 purchases had been made and I had $7,500 sitting in my bank account. Crazy!
I can’t guarantee you the same success, but by all means, give this a chance or two, and start sending those surveys!
I feel like A/B testing is really great when you’re first gaining some email list growth (around 1,000 subscribers). You do need enough people to have the data help you make decisions, because let’s be honest, having only 50 subscribers and knowing what 25 of them want versus the other 25 may not prove too helpful. When you do start to get some traction, A/B testing your subject lines, or the first or last paragraph with a call-to-action, or other small tweaks, are great things to test… just not all at the same time! Pick one thing to A/B test each week. Learn from the data and then test something else. The idea behind A/B testing is really to understand how you can speak directly to your audience and have them stay thoroughly interested.

Do you have any awesome email marketing tricks you think I should include in this section? I’d love to know what’s worked for you! Shoot me an email and let me know.
At this point, you know why having an email list matters and you’re starting to build a plan of attack to grow that email list and send your subscribers consistent valuable content. But hold the phone, how can you avoid a bunch of common pitfalls during that process?
Let’s look at the five most common email list building mistakes I’ve seen (and even committed myself) over the years and how to avoid them:
Be crystal clear about what your subscribers are going to get if they sign up for your email list. Let them know the schedule, the type of content, and what kind of value you are providing them. Put this information right next to your signup form on your website and remind them of it in a Welcome Email.
Note: When/if you sign up for our Wandering Weekly emails (at the bottom of this page) it should be very clear what we’re going to send you. Once you sign up we have a very thorough “what to expect” page that leaves no stone unturned so there are zero unwanted surprises.
Do not worry about the numbers. I know this is a very difficult task as a human being as we’re simply wired to pay attention to the numbers. The number of subscribers you have isn’t going to grow because you refresh your subscriber analytics on a daily (or maybe hourly) basis. Instead, spend all that time and energy on creating great content for your readers. If you only have 15 subscribers, that’s totally fine. Pamper the heck out of them, engage with them, but make sure you’re doing it with the content you want to be sending.
Fun fact: I launched my BuyMyLastName idea to an email list of just 600 people. That project had $30,000+ in revenue in the first 24 hours because of that small email list. Quality, not quantity!
Don’t hide the unsubscribe button or unsubscribe link in your emails. I know you don’t want people to unsubscribe, especially in the beginning. But as weird as it sounds you WANT people to unsubscribe as soon as possible. If what you are emailing isn’t in alignment with a subscriber why would you want to pay to keep them on your list (paying in time or money)? I’d advocate that you should make the unsubscribe option prominent in your emails and easy for people to find. I promise you, if someone wants to leave your list, you should let them go and wish them well on their way.
You remember my 25,000 email subscriber story from Section 1, ya? Unless you’re Groupon, do not create an email list with giveaways, deals, and prizes. Trust me on this one—you’ll build a list of people who only want those things. It’s not worth the extra subscribers because they won’t bring you any value in the long run. They’ll actually end up costing you time and money.
The majority of emails I love getting in my inbox barely have any formatting. Good content creators know to let the content do the talking and to avoid distracting the reader with too much extra fluff. Should you include an image or two in your emails? Absolutely! Might you want a nice header image that shows some of your personality and branding? Yep. But do you need to use all the fancy email templates, designs, background images, blah blah blah? Nope. Make your content great and easy to read. That’s your goal.
Your main goal with your email marketing strategy should be to deliver unique value to your subscribers with every email. Don’t copy someone else’s strategies. Don’t copy subject lines. Just pour your uniqueness into every email you write. If you want to figure out what your subscribers want you to send them, ask a question in the Welcome Email they get after signing up for your email list. Something like, “what’s your biggest struggle right now?” or “what can I help you with?” Those replies will become perfect topics to send emails about going forward.
This mistake is so egregious I had to give it its own section. I’ve watched too many creative business owners waste countless hours of time by trying to build slick email automations too early on. The thinking goes something like this:
“I need someone to get my free email course, then after they finish my course get bridged into an automated sales pitch, and then that sales pitch needs a countdown timer and all of that needs to update stuff on my website too.”
No. No. No. No. You may think you need this type of “email sales funnel” so you can make passive income, but you absolutely want to skip this in the beginning.
Getting caught in the weeds of automation too early can cause way more headaches than it can generate revenue for you. Instead, just send simple email broadcasts to your subscribers. Deliver value to their inboxes and establish trust with them. Then, by okay with selling via emails that don’t have any automation and don’t have any bells and whistles.
If what you are creating is unique and helpful, you don’t need slick automations, you just need consistency.
Consistency is sooooooo underrated when it comes to online business and email marketing strategies. You’d be shocked at how few people can stick with a consistent content schedule, even if that schedule is just one email a week (a tactic I’ve used since 2014 and I’ve generated plenty of revenue with it).
When you feel yourself starting to go down the automation path ask yourself a simple question: Am I selling enough stuff with manual effort right now that I need to automate?
That’s the only time to start thinking about automation. Not in the beginning. Not when you’re just getting started and figured everything out and trying to build good consistent creation habits. Automation too early on will rob you of your creativity and derail you.
Work with your strengths! My wife and I loooove to write and tell stories about our lives so our emails tend to be longer and that’s perfectly okay with us. If you don’t love writing but you love talking, try filming a short video and sending that out to your subscribers instead. Remember, going with something that feels natural to you will make it easier to keep up with consistently because you’ll enjoy the process.
You can include links to posts on your blog, but save some content that feels tailored and specific to just your email subscribers. In other words, give them a reason to subscribe and not just to visit your blog. My wife and I tend to always write for our email list first, then we decide if that content should go on this website or not. This is something you can highlight on your email signup forms and when you talk about your email list. Something like: “Every Monday I send out my best writing exclusively to my email list on what it takes to run a creative online business.” Sounds enticing, right? Don’t you want to get exclusive writing? I know I do.
Finding your unique creative voice is hard. It’s tempting to simply go with what you see works for other people, or sometimes it’s just hard to get other people’s voices out of your head if you often consume more content than you create. But, similar to the point above about finding a structure that works for you, you’re only going to want to stick to your newsletter consistently if you write in a way that is natural and unique to you. When I started writing my email newsletter I had all kinds of self-doubt that my writing wasn’t very “good” and that I didn’t know all the proper writing “rules.” But who cares!? You and I aren’t trying to win a Pulitzer Prize with our words, we’re simply trying to build a passionate audience and run a profitable business. People will be able to tell when your personality comes through so do yourself a favor and let it shine!
If you focus on delivering valuable content to your subscribers on a consistent basis you will build an audience in an authentic way. The key is to start, stick with it, avoid getting caught up in the numbers and continue to create and share things with your subscribers.