by
Caroline Zook

NOTE: As of March 2019, I’m no longer a part-owner of Bumpsale. If you need any help with Bumpsale check the website for contact info. I still love Bumpsale and use it myself!
Maybe you have a brand new thing to sell, but you aren’t sure how much your audience will pay for it? Or, you simply want to make a few extra bucks and give your audience an exciting way to purchase what you already make?
Enter Bumpsale.
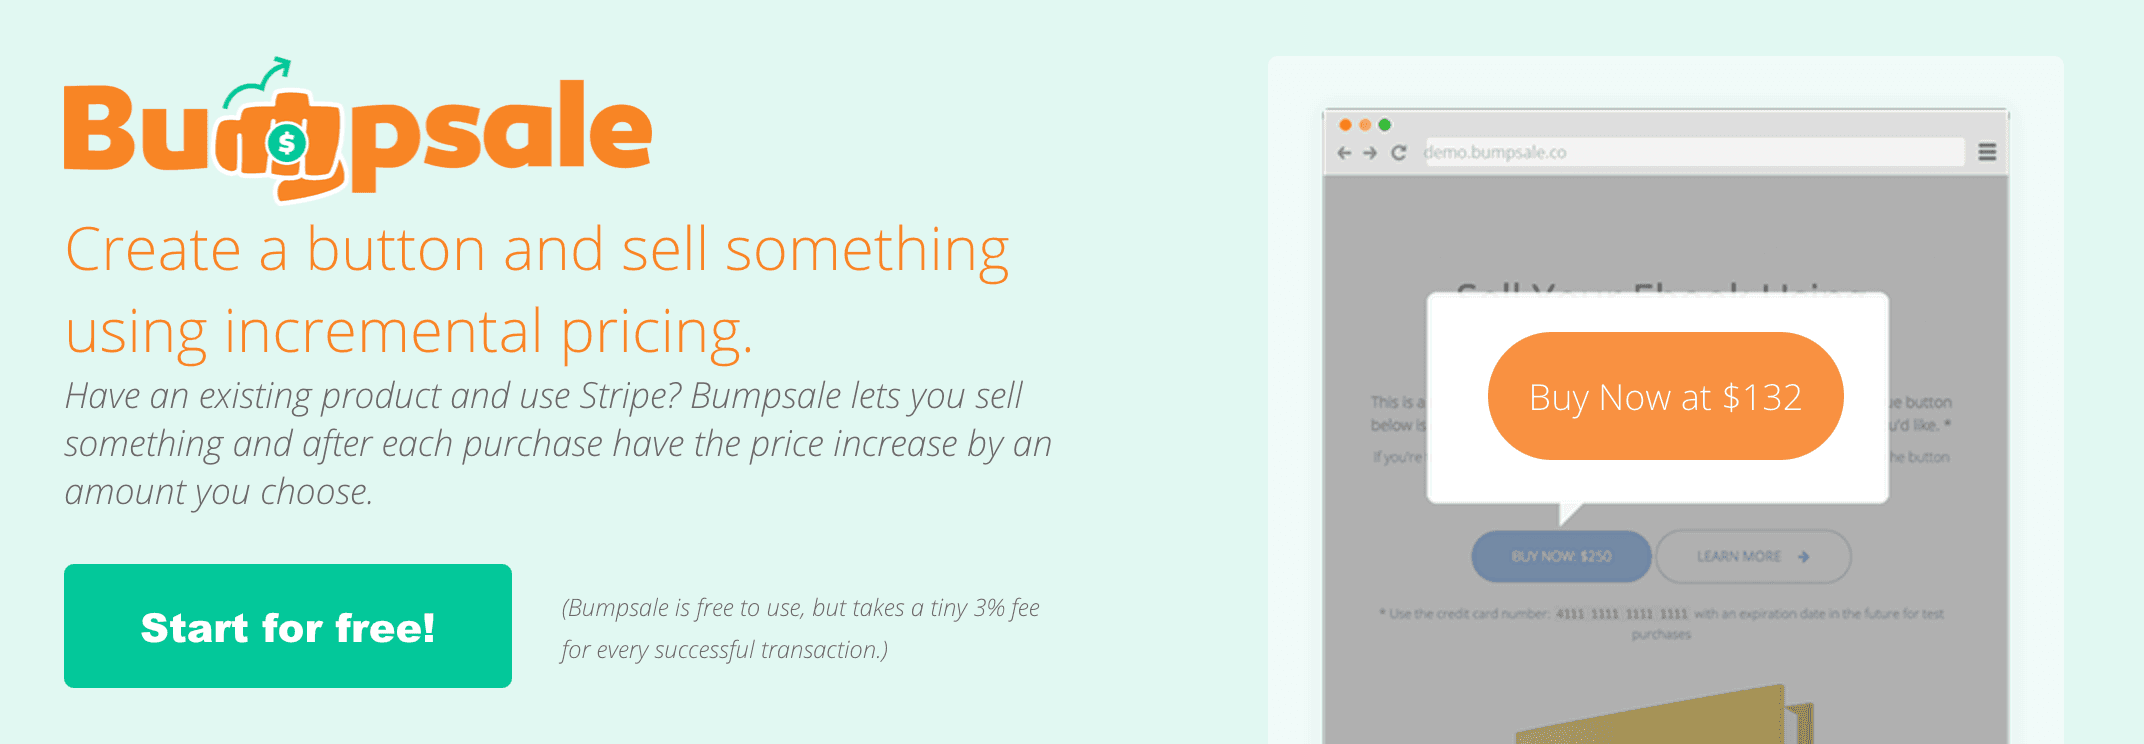
First Up, What The Heck Is Bumpsale?
Bumpsale is a unique way to sell something using a bump in price after every purchase is made. The idea was originally conceived by me (the person writing to you), Jason Zook, when I created the project IWearYourShirt in 2008. I used the Bumpsale concept back then to sell spots on a daily t-shirt wearing calendar, where each day would increase in price (Jan 1 was $1, Jan 2 was $2, etc). Truthfully, I wanted to create some marketing and momentum with my pricing, little did I know that idea would turn into the Bumpsale app you see today.
Bumpsale does NOT help you sell spots on a daily t-shirt wearing calendar. That’s a very niche business model and we’d have gone defunct many years ago had that been our customer focus. Instead, we took the concept of bumping the price after each purchase and made a much more flexible product.
Bumpsale DOES let you quickly create a buy button that will increase in price after a purchase is made. The increase happens right on the page as your customers look at the buy button.
These are the things you set when creating a Bumpsale (more on the specific steps in the How To Bumpsale section):
Starting price (start as low as $1 or as high as your heart desires)
Bump price (how much the price increases after each purchase)
Currency (over 135+ currencies supported!)
Set the amount of time someone can lock in their price
Style your button (button color and text)
Post-purchase URL (where customers go after the purchase is made)
As people purchase via your Bumpsale button, the price will bump live on your site. There’s a small snippet of code you add to your sales page that takes care of all the wizardry and selling-magic behind the scenes.
Quite simply, Bumpsale is an incredibly fast and nimble way to sell your product with some fun added urgency.
Why Should You Use Bumpsale To Sell Your Stuff?
We know how it goes: You create an online course, a digital book, a photo-pack, a membership site, a consulting call, a package for your freelancing services, or maybe even a Zebra Training Certification program. Whatever it is, you go through the normal sales cycles and while those can work, you want to shake things up a bit.
That’s where Bumpsale comes in! We created Bumpsale to spice up your sales and to give your customers an exciting way to purchase whatever it is you create (especially if it’s Zebra Certifications!)
⚡️ Bumpsale is lightning quick to set up
It’s about 4 clicks of your mouse and your Bumpsale button can be ready to start collecting sales. There’s a step-by-step video walkthrough below if you want to jump to that.
👍 Bumpsale is super versatile
We give you some basic styling options, but if you know some CSS, you can make your Bumpsale button look like anything your heart desires.
👌🏻 Bumpsale will cost you almost nothing
There’s no monthly fee for Bumpsale. There’s no per button setup cost. We simply collect a small 3% fee on every sale made with Bumpsale. Example: If you sell $1,000 worth of online courses, you’d only pay us $30. Not. Too. Shabby!
💃🏻 Bumpsale is fun for your audience
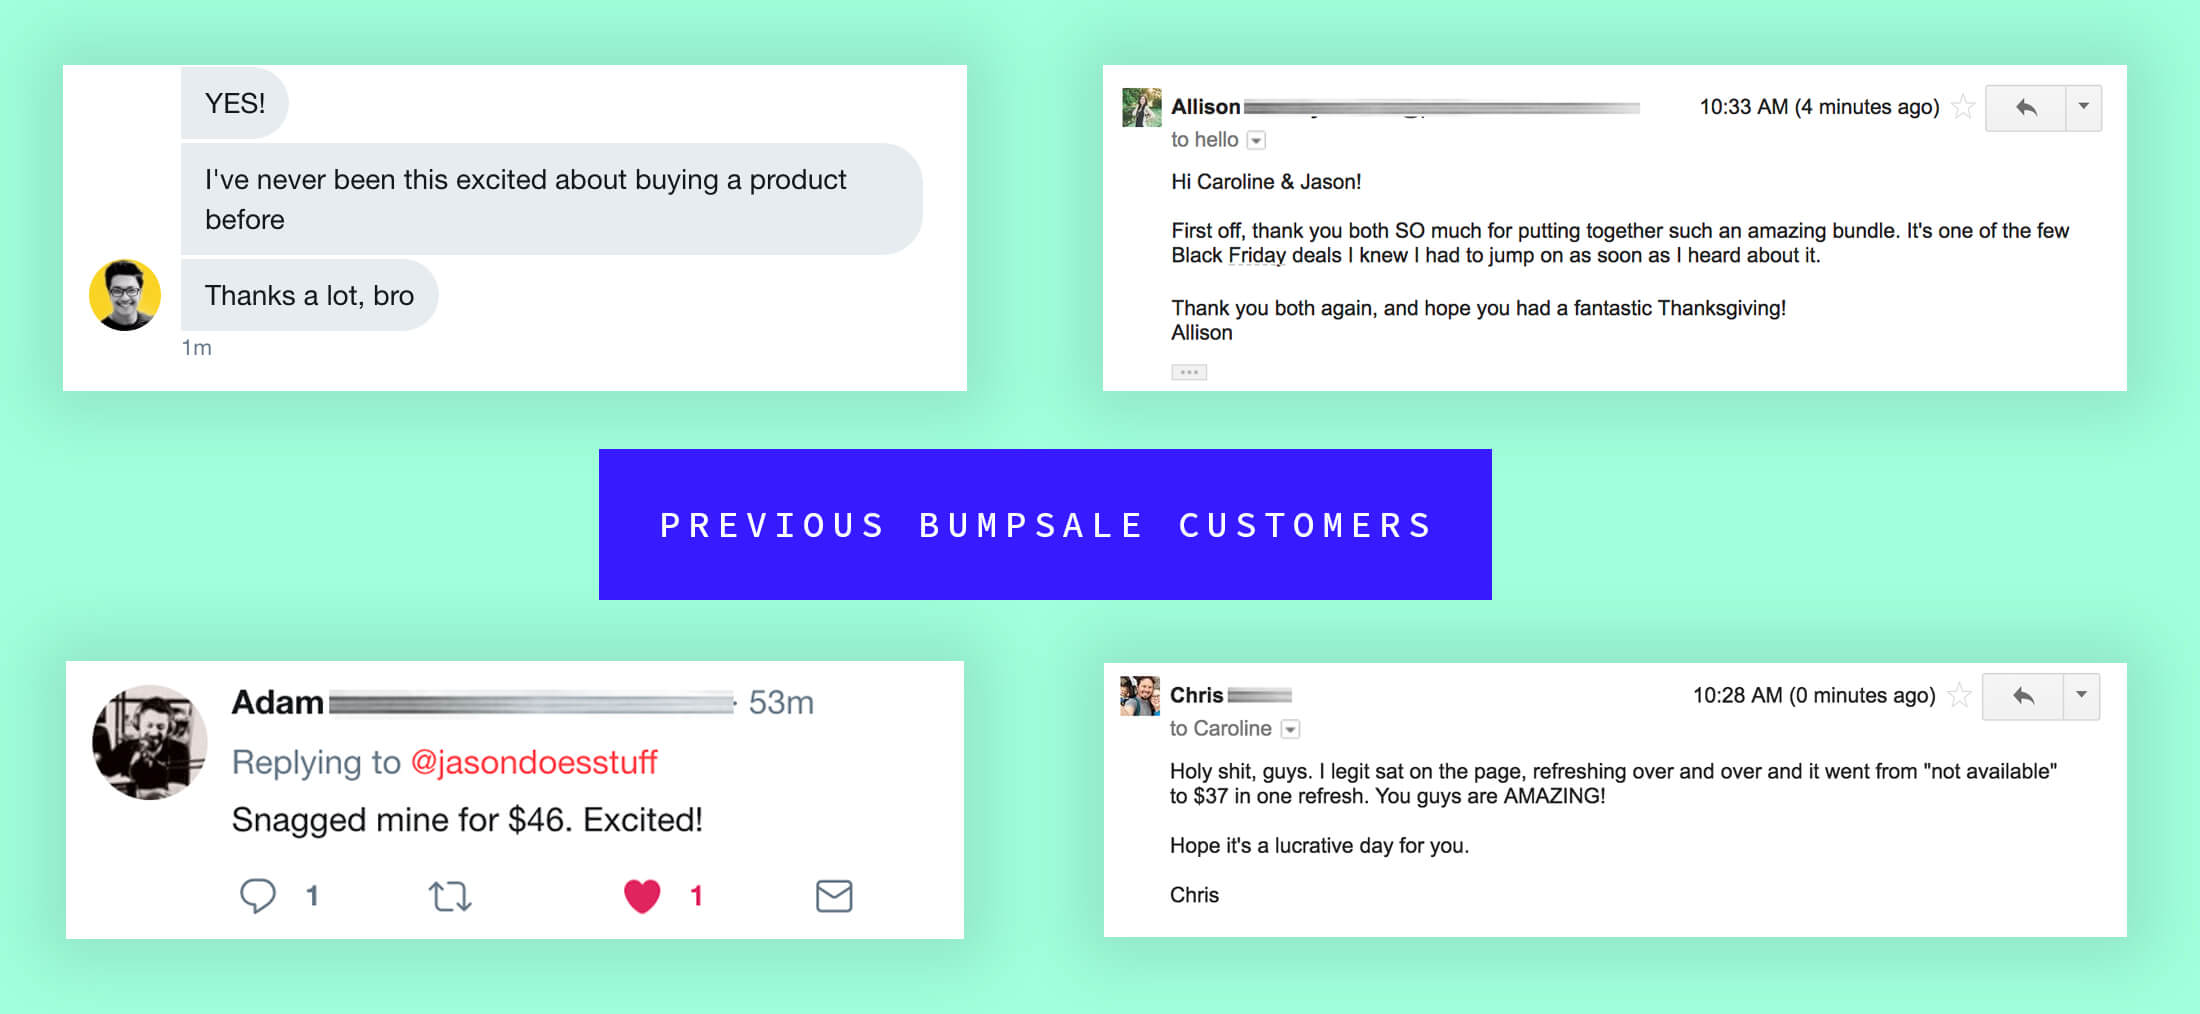
As you’ll see in the Proof of Concept section below, customers actually LOVE buying through Bumpsale. Usually, they’re getting some kind of discount, so that tends to help, but the excitement and uniqueness of a Bumpsale stands out from other standard sales tactics.
When Should (And Shouldn’t) You Use Bumpsale?
Using Bumpsale isn’t reserved just for Black Friday, Cyber Monday, or other holiday discounts. We DO recommend using Bumpsale around those times, but it’s also a very successful way to drum up sales whenever you need a little revenue bump!
You should use Bumpsale if you already have an audience of some kind.
Bumpsale does not bring an audience to your product (you handle that). We simply have a mechanism that helps make the sales process more fun. The most successful uses of Bumpsale occur when you give your audience a heads-up that you’re going to use Bumpsale, and have them waiting and ready for it (more on this in the How To Warm Up Your Audience section below).
You should use Bumpsale for a short period of time.
It’s not that you can’t use Bumpsale for longer periods of time, we’ve simply seen the best results when a Bumpsale is run through a shortened time period. There’s no perfect amount of time, but 24 hours, 48 hours, 2-3 days, or a week tend to do really well.
NOTE: As a heads-up, there isn’t an expire feature within Bumpsale, you’ll just remove the button when your Bumpsale time period has ended – easy peasy!
You should use Bumpsale for pre-orders.
Pre-orders tend to work really well with Bumpsale because your audience is getting a discount and more people can get in at a lower price than they’d normally. Plus, the math can add up very quickly with Bumpsale over a standard discount. Here’s an example scenario:
Let’s say you have a $200 online course
If you start your Bumpsale at $20 and bump by $1
If you get 100 sales, you’ll make $6,950!
(The final bump price would end up at $119, which is still a 59% discount!)
Feel free to use the Bumpsale Calculator to get an idea of how much revenue you can generate with Bumpsale. Here’s a video of the calculator in action:
You should NOT do tiny discounts with Bumpsale.
Looking at the example above, if you were to try to sell your $200 course, starting at $180 and bumping by $1, you probably wouldn’t see any traction at all. There’s simply no motivation for your customers. Plus, the urgency to purchase before the price increases doesn’t really matter. We aren’t advocating that every product has to have an enormous discount with Bumpsale, but the bigger the discount, the more traction and sales we’ve seen happen time and time again. If we look at the example scenario used a minute ago with a tiny discount, here’s how the math works out:
You have a $200 online course
You start your Bumpsale at $180 and bump by $1
If you get 20 sales (because people won’t pay OVER full price), you only make $3,790
(The final bump price would obviously end up at $200)
You should NOT drop a Bumpsale on your audience last minute:
Most likely, your audience has never heard of Bumpsale or seen it in action before. If you don’t clearly explain how it works, it can lead customers to be confused (never a good thing!). Give your audience at least a week’s notice, along with explaining how the Bumpsale will work and what they can expect. (Again, more on this in the How To Warm Up Your Audience section).
You should NOT run a Bumpsale without doing a real purchase of your own Bumpsale:
We hope this goes without saying, but some folks miss this critical step. Purchasing your own Bumpsale will give you the best experience to see what your customer will see. Did you notice anything weird? Did the redirect URL after a purchase go to the correct place? Did anything else happen that you expected/didn’t expect? Do a test purchase and refund yourself after!
Hopefully, that rest of this guide fills the gaps on the shoulds and shouldn’ts with Bumpsale. There’s an FAQ section at the bottom as well.
What Products Or Services Work Best With Bumpsale?
ALL OF THEM! Okay, if you’re selling sustainably raised goldfish, you probably won’t use Bumpsale to sell those. But, these things can be sold via Bumpsale and work really well:
Online courses
Digital books
Consulting spots
Freelance client spots
Coaching calls
Physical goods (you know, fidget spinners)
Music albums
Bundles*
Etc etc
*Bundles work especially well with Bumpsale because they are a grouping of products sold at a discounted price. The price is usually completely arbitrary, and potential customers of the bundle just want to snag a great deal on the total value of the bundle.
Anything you sell, that you are willing to make incremental revenue on, will work with Bumpsale.
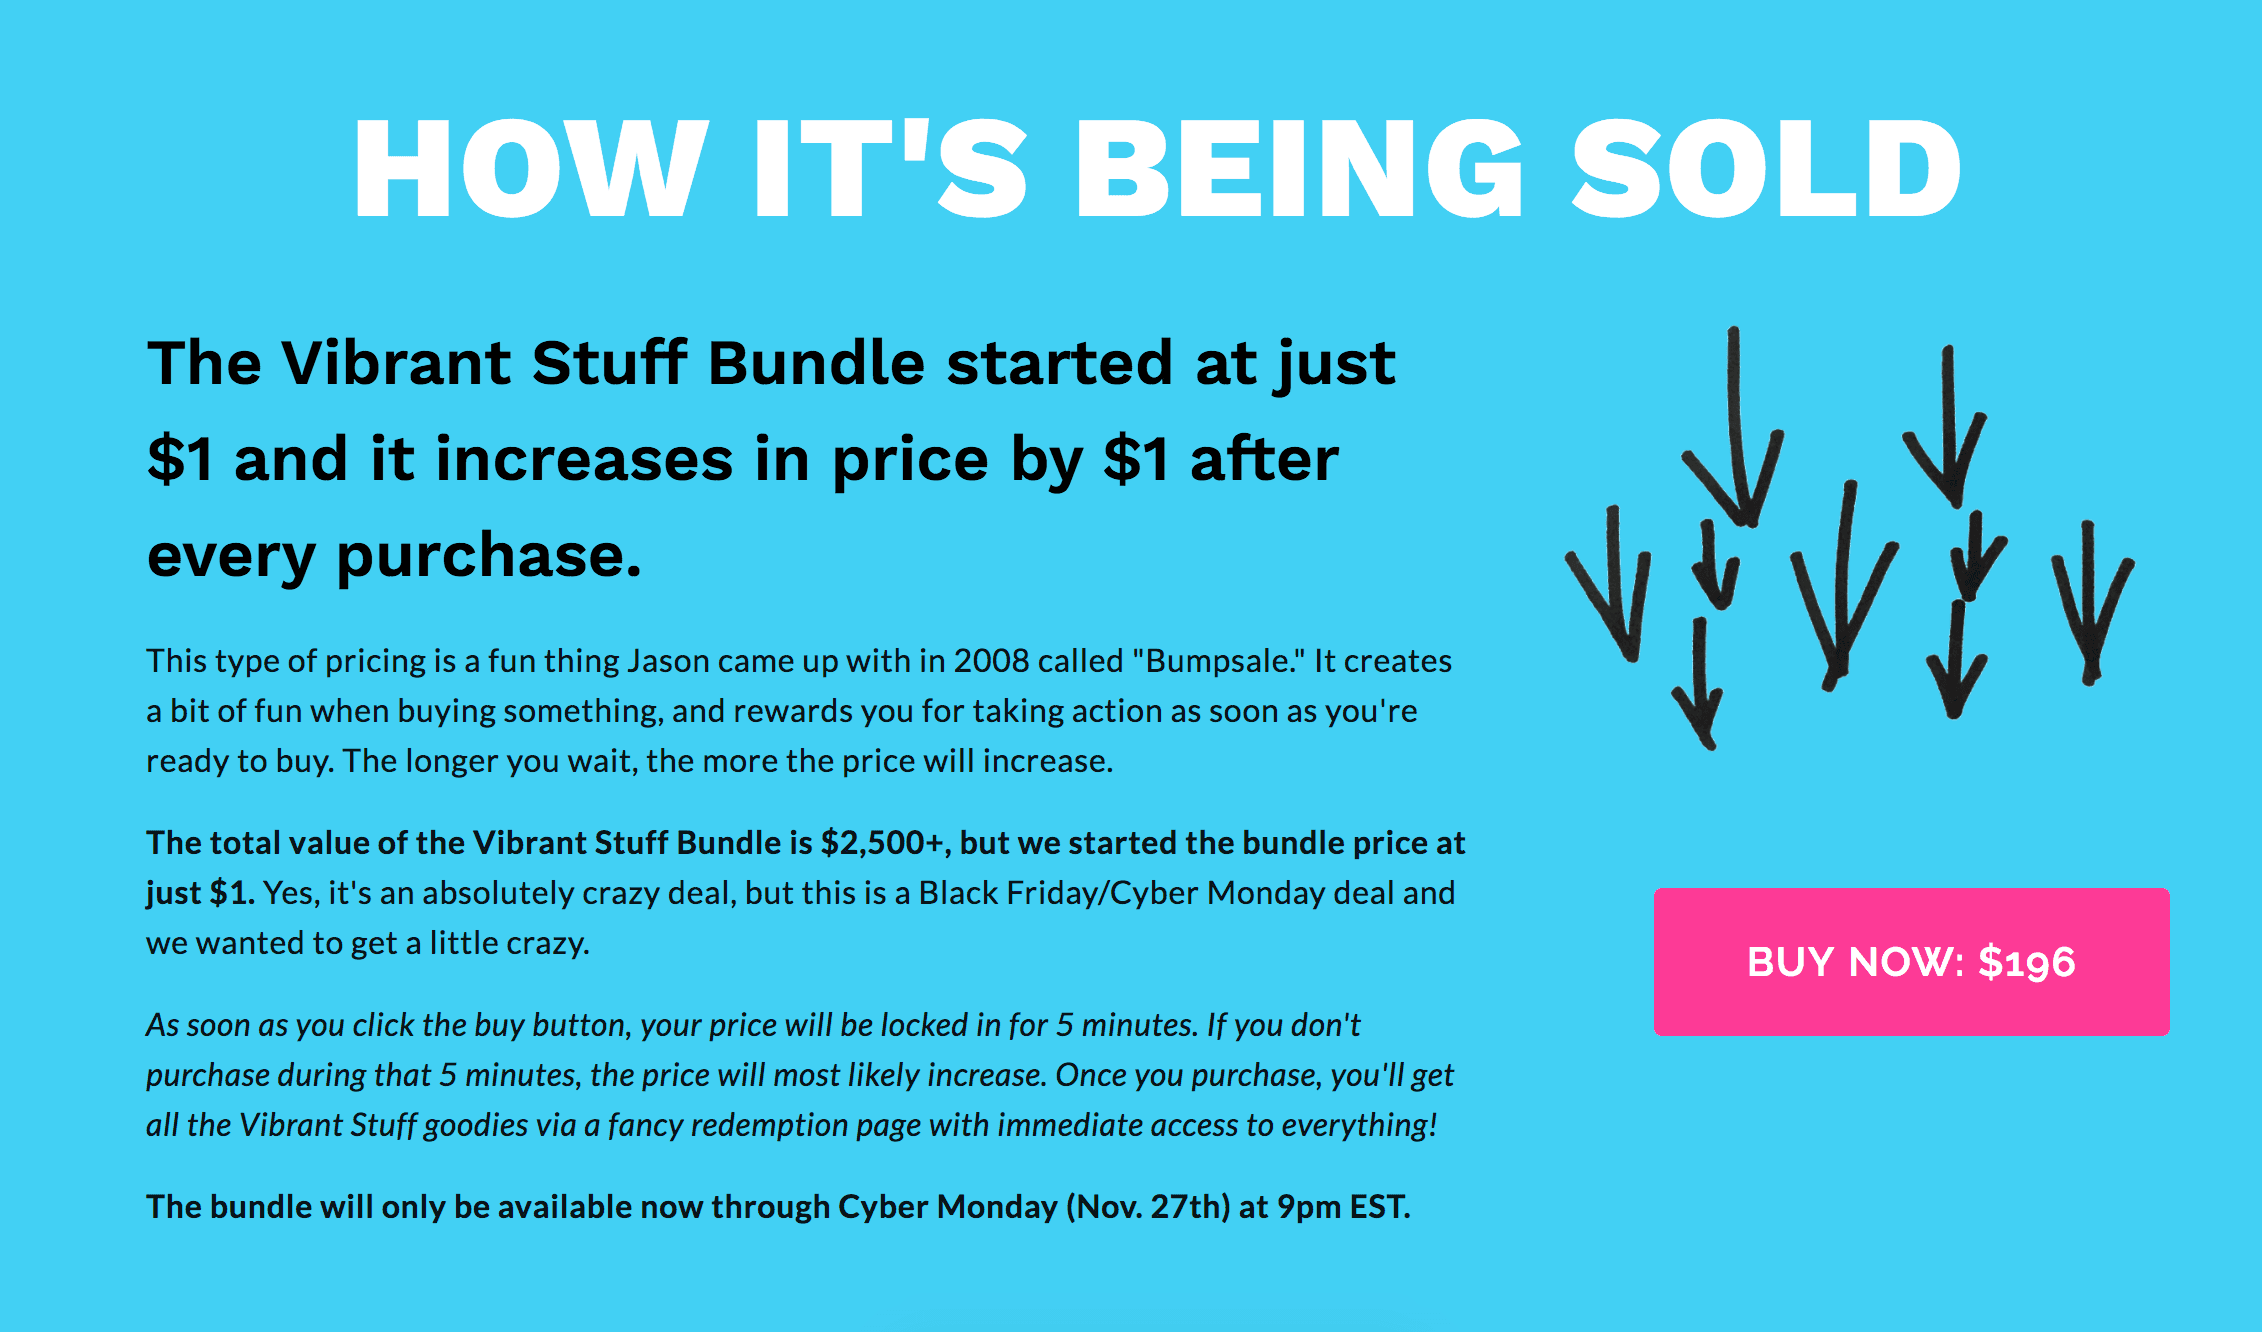
An example of using Bumpsale to sell a bundle of products and services.
My wife and I put together a bundle of online courses, digital books, and a few downloadable goodies called The Vibrant Stuff Bundle (her site at the time was Made Vibrant and mine was JasonDoesStuff).
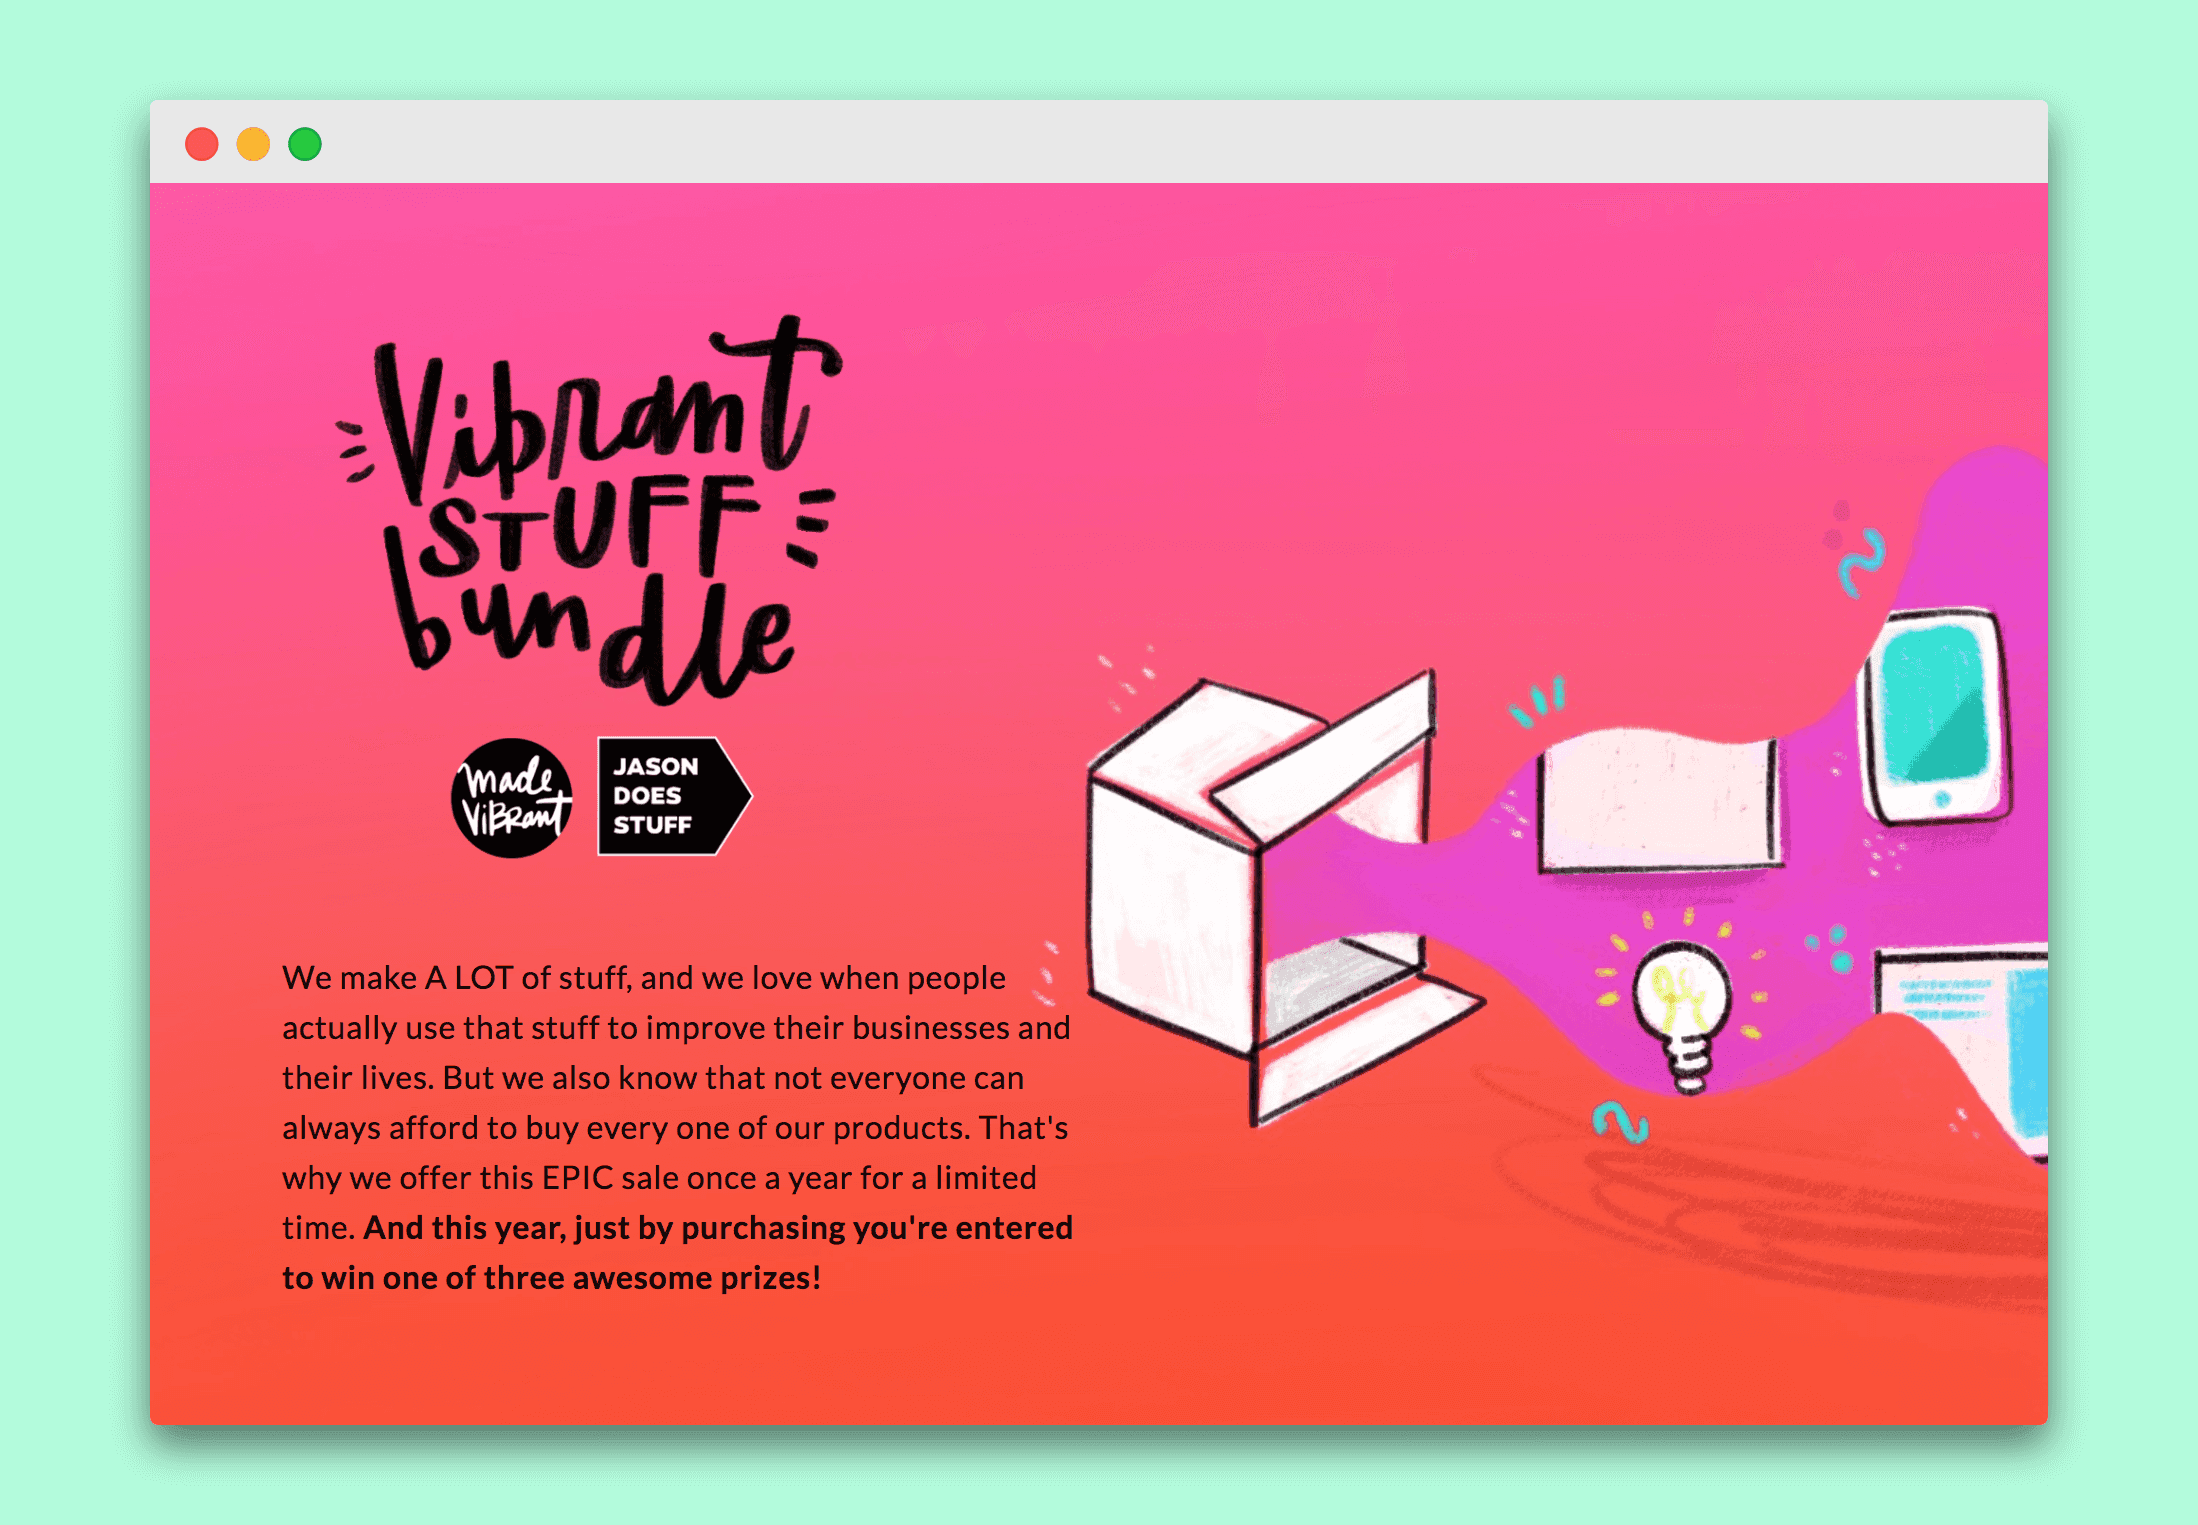
The total value of the resources inside The Vibrant Stuff Bundle was well over $2,500 if we sold every item in it at full price. But instead of offering a flat discount on the bundle, we used Bumpsale and generated over $20,000 in sales by starting the bundle at $1 and bumping the price by $1 after every purchase. These are the steps we took to create and sell our bundle:
We whipped together a website on Squarespace just for the Vibrant Stuff Bundle
We figured out how to do the redemption of all the resources inside the bundle (which ended up being a password protected page on Squarespace with links to redeem each product or service)
We created the Bumpsale button, styled it with simple CSS, and added it to our sales page on Squarespace
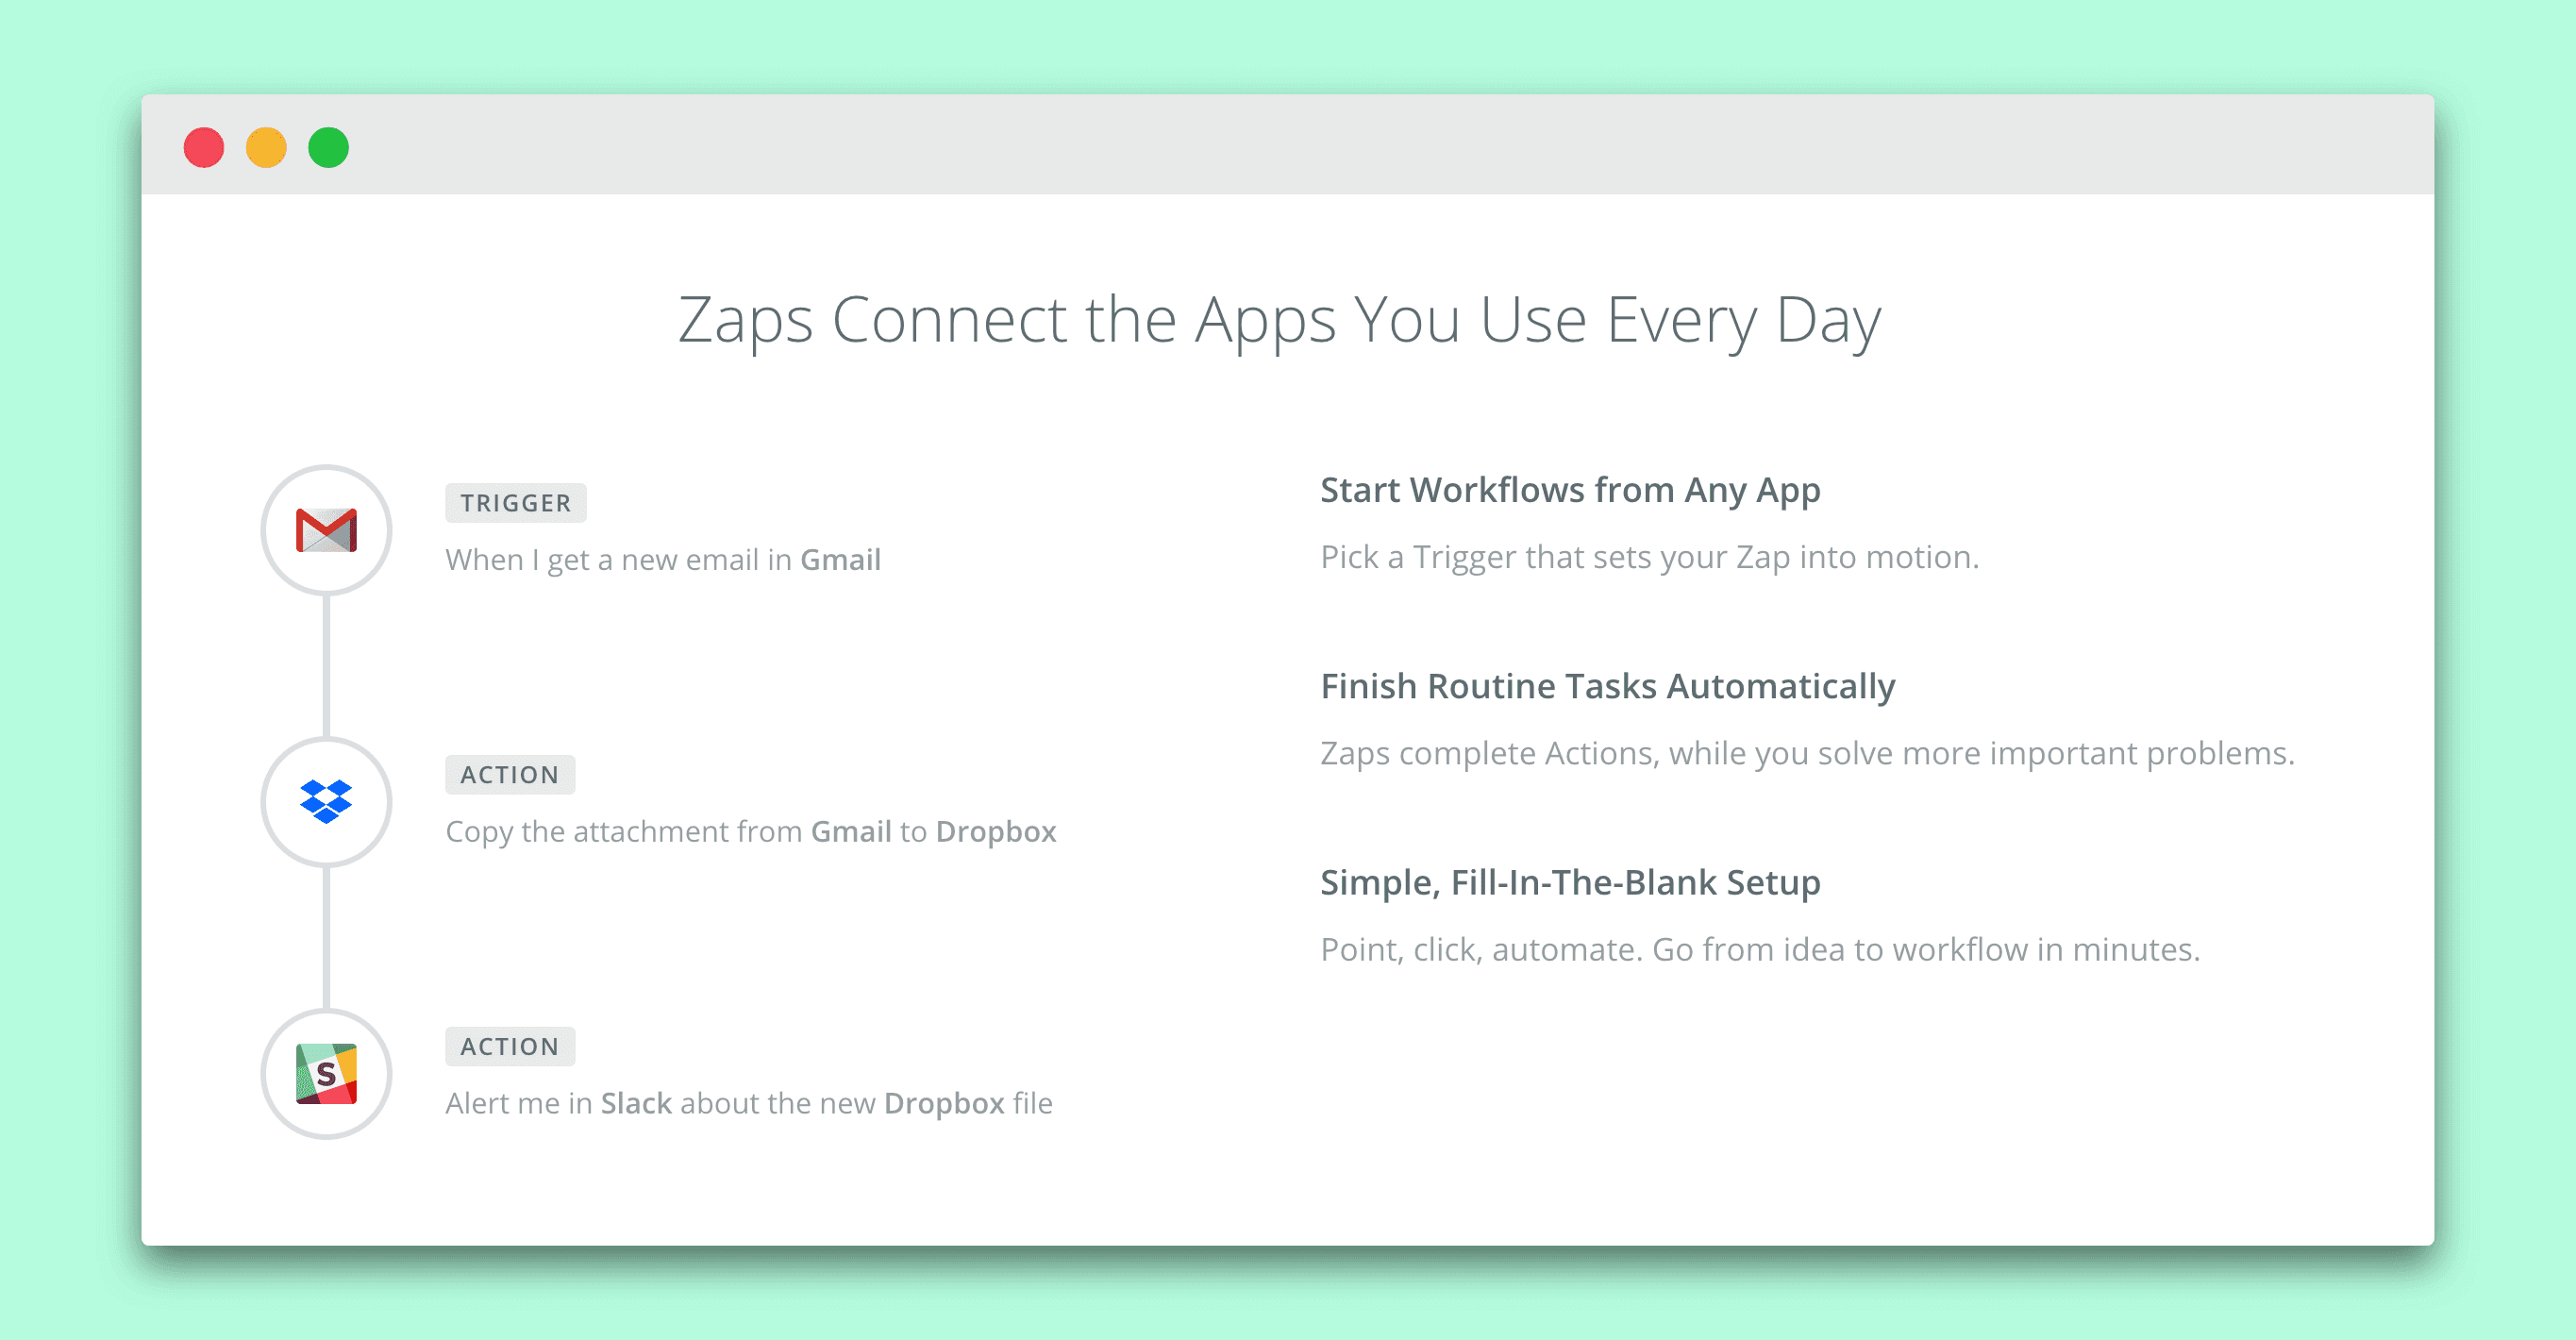
We used the automation service Zapier to create a “Zap” that would send an email upon every successful purchase of our Bumpsale to the customer (the email had a link to the password protected page and the secret password)
We warmed up our audience and sold the bundle for 5 days (more on this a minute!)
At the end of 5 days, the price had increased from just $1 to just over $200, netting us over $20,000!
The great thing about doing a bundle is that you usually don’t need to create any new products at all! Sure, you need to create the sales page that explains and sells the bundle, but that’s way easier than building yet another product from start to finish. Plus, who doesn’t love finding ways to repackage existing products you’ve created (while also giving folks a fun opportunity to buy a suite of products from you).
How To Set Up Your First Bumpsale Button
As I’ve mentioned a few times, setting up a Bumpsale is a mere few clicks of your mouse. I’m going to walk through the setup step-by-step, but there’s one important thing to keep in mind:
Bumpsale is just the button people click to purchase your product.
You need to put a Bumpsale button on your existing website (whether your site is on WordPress, Squarespace, Leadpages, Wix, Weebly, Dreamweaver, Geocities, etc).
As long as you can inject our small piece of Bumpsale code into an area of your website, you can use Bumpsale! And if you aren’t code-friendly, we’re happy to help you figure things out.
Watch the step-by-step Bumpsale video walkthrough:
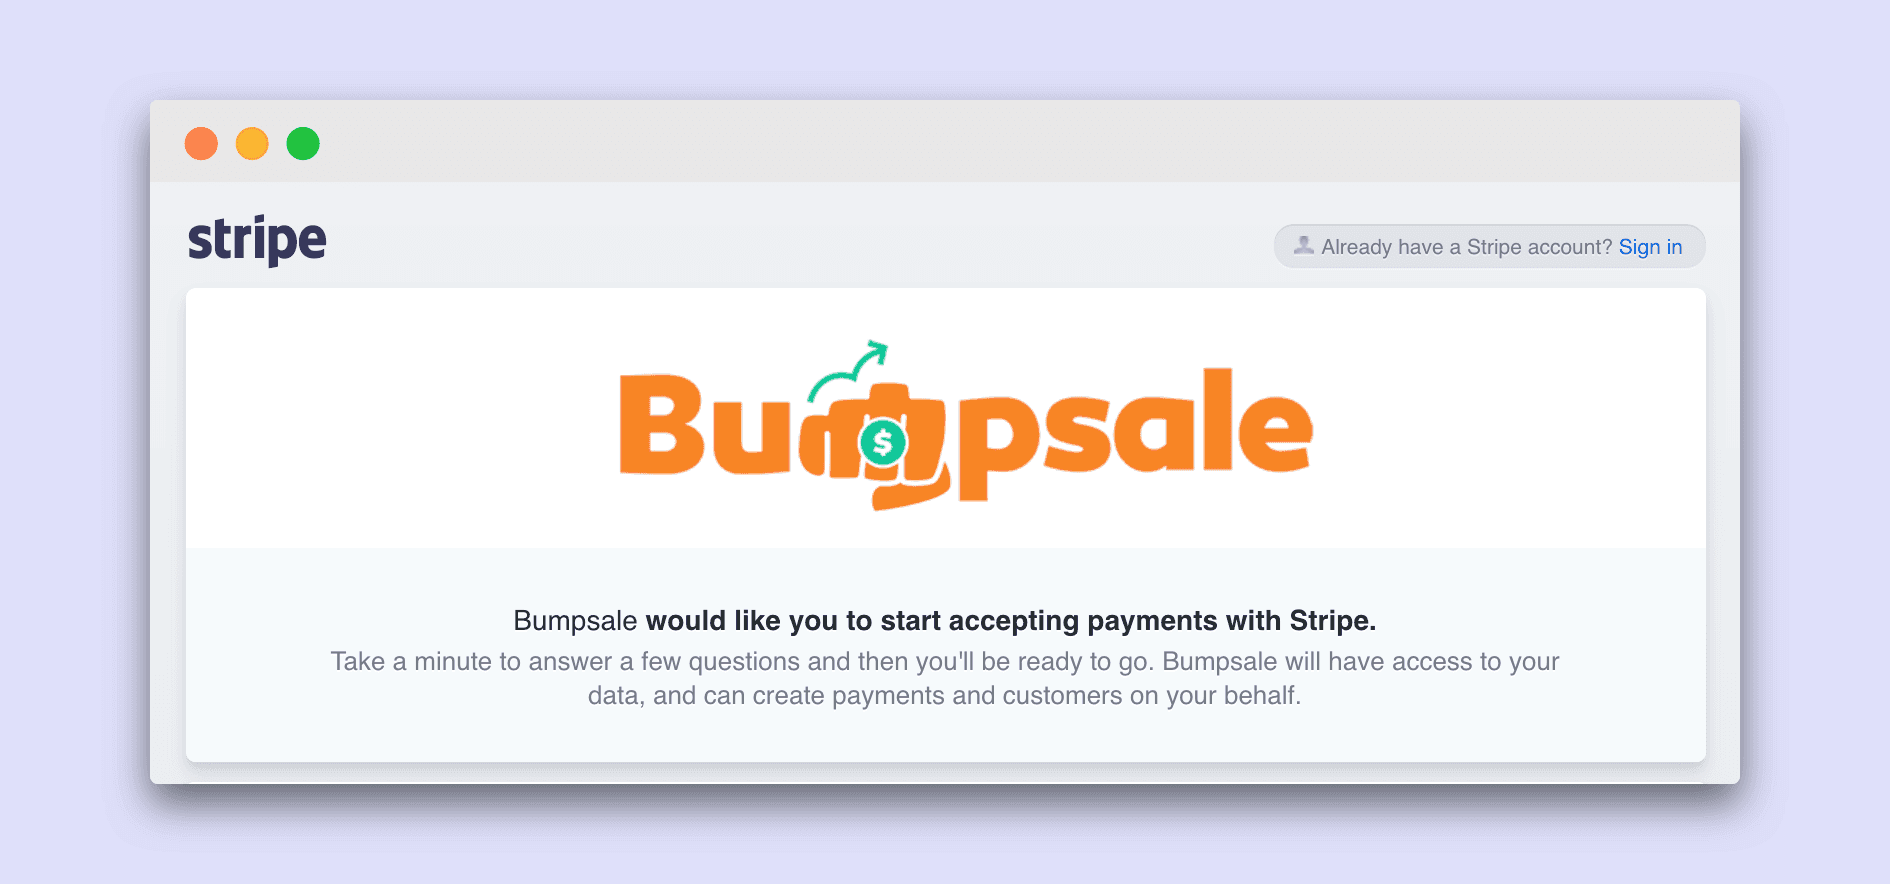
Step 1 to create a Bumpsale: Connect your Stripe account Bumpsale
This is how you create your Bumpsale account. There’s no need for you to make an actual login, password, etc with Bumpsale. We let your existing Stripe account handle that info. If you don’t currently have a Stripe account, it’s completely free to set up and Stripe is the way to process credit cards (your customers won’t know Stripe exists).
NOTE: Stripe will send a receipt after a successful purchase. If you want to customize the way your receipt looks, you’ll do this in your Stripe account settings.
Step 2: Create your first Bumpsale!
You’re rockin’ and rollin’! We told you this was easy. With one click of your mouse, you’re on your way to building your first Bumpsale.
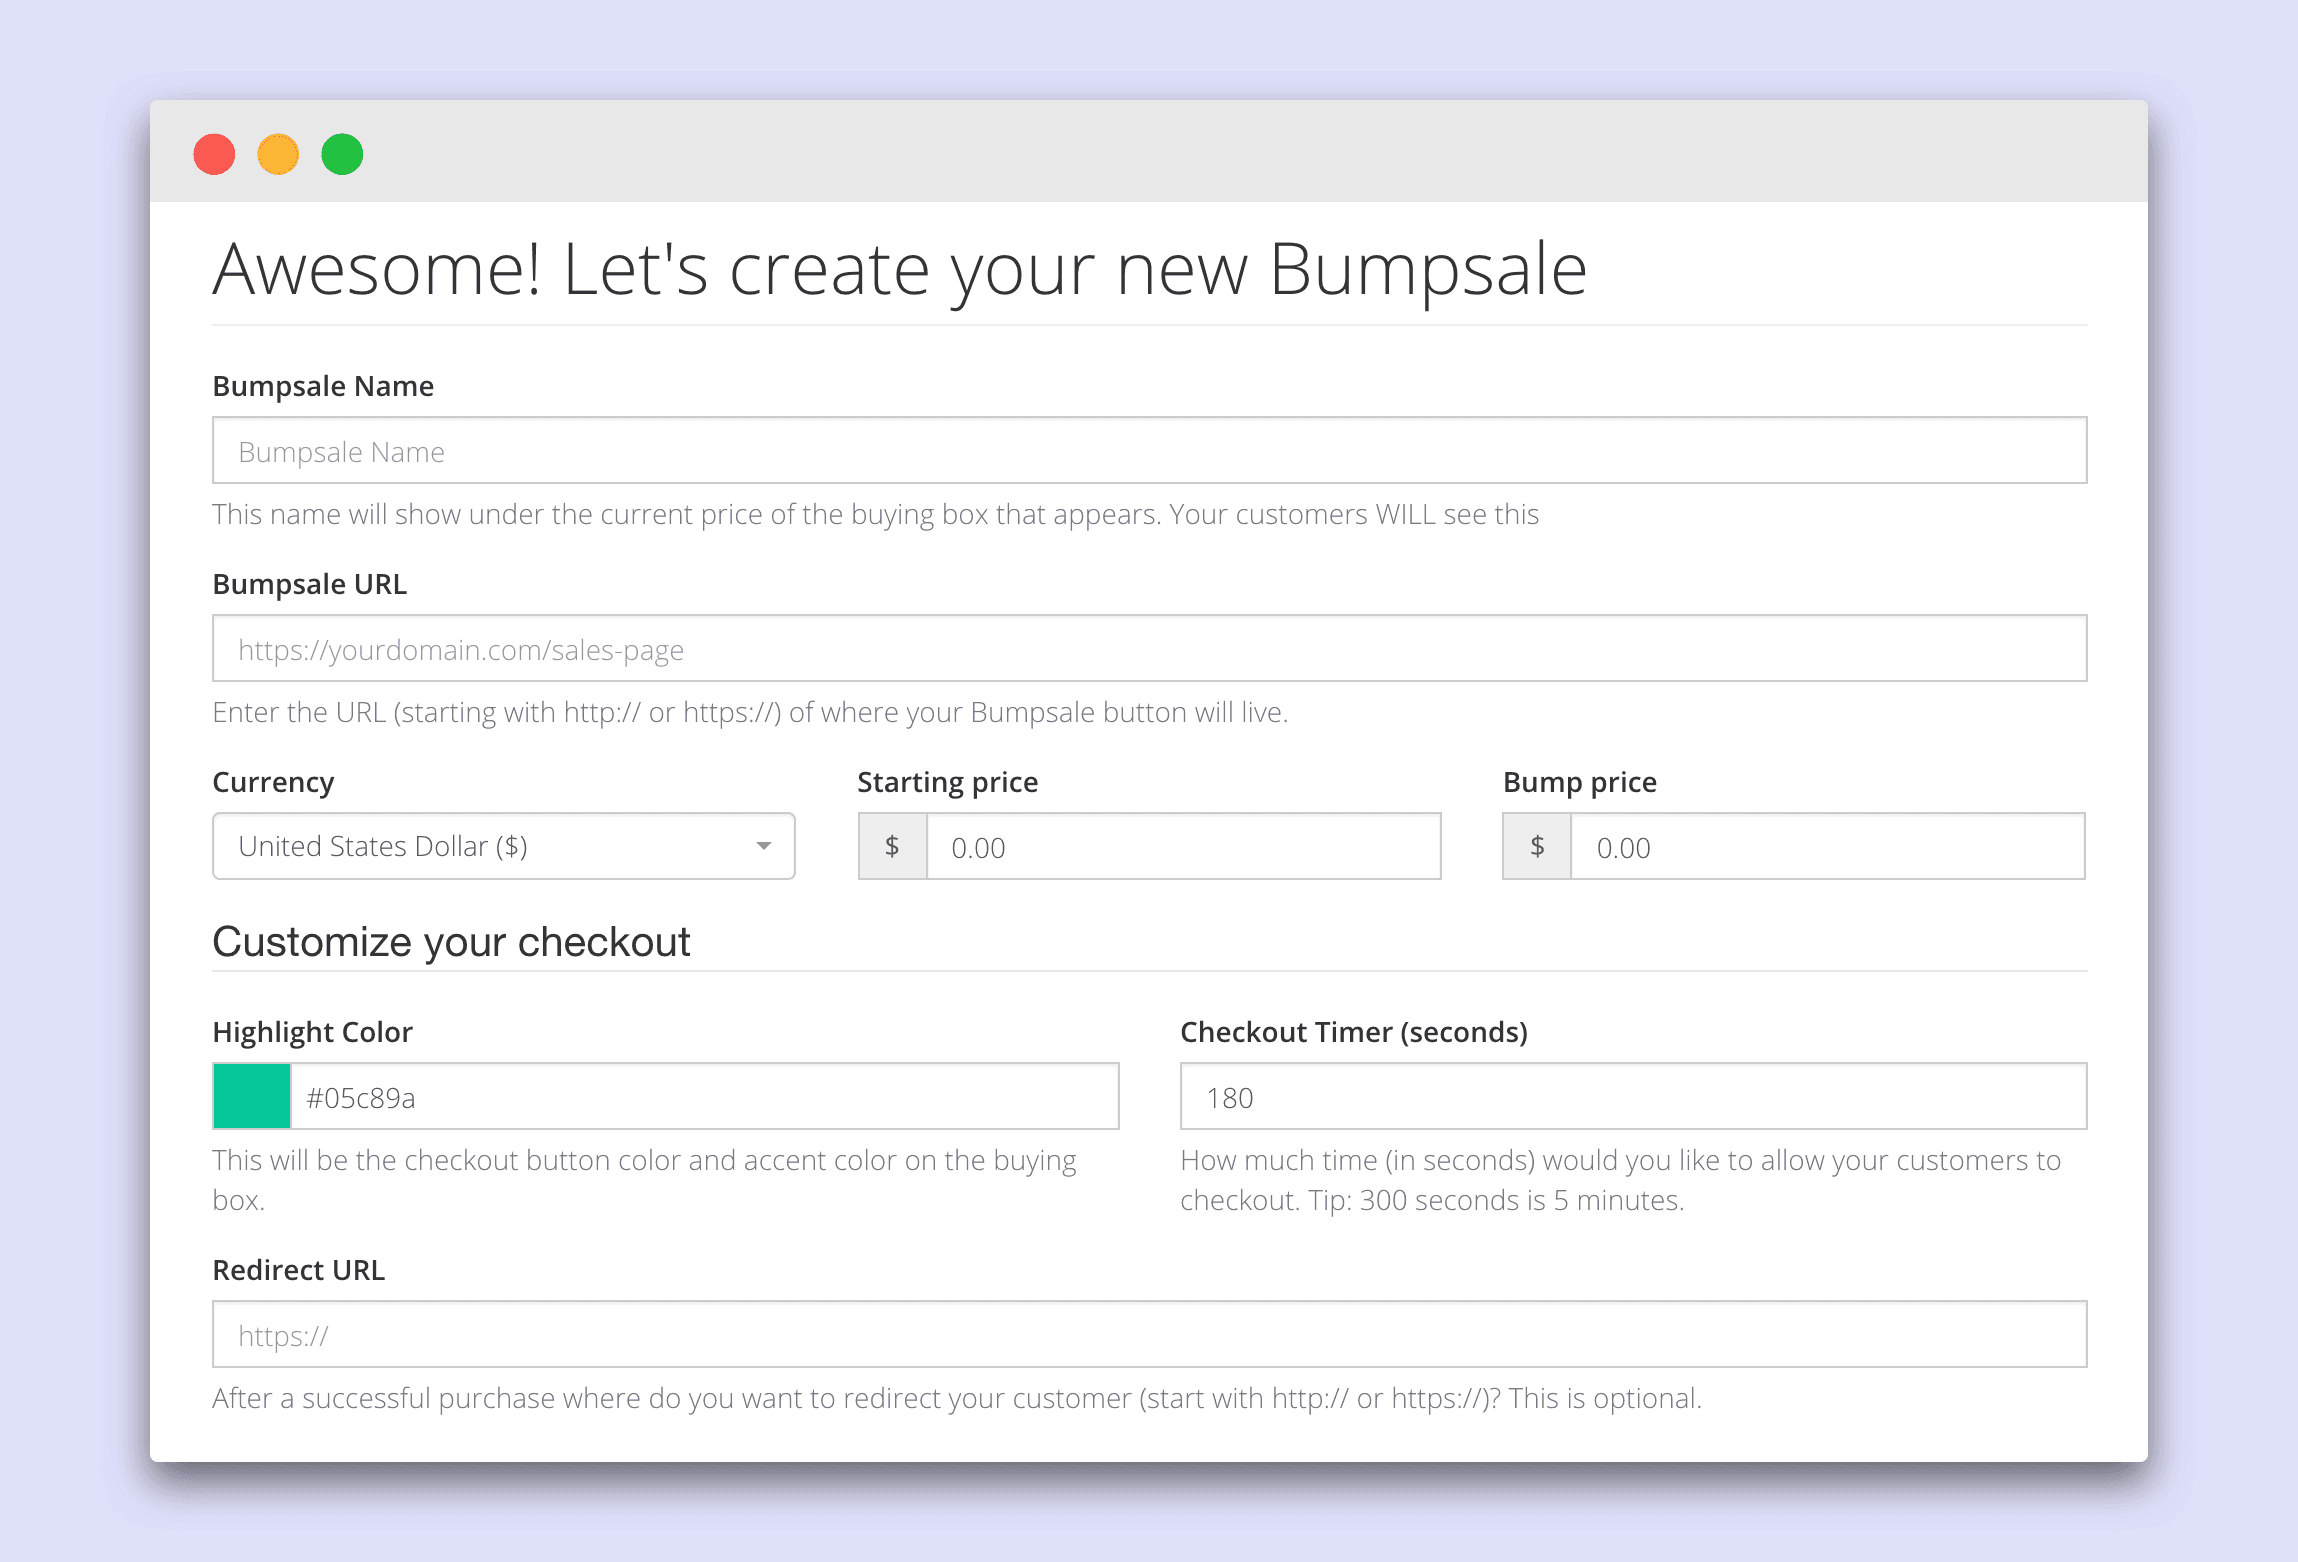
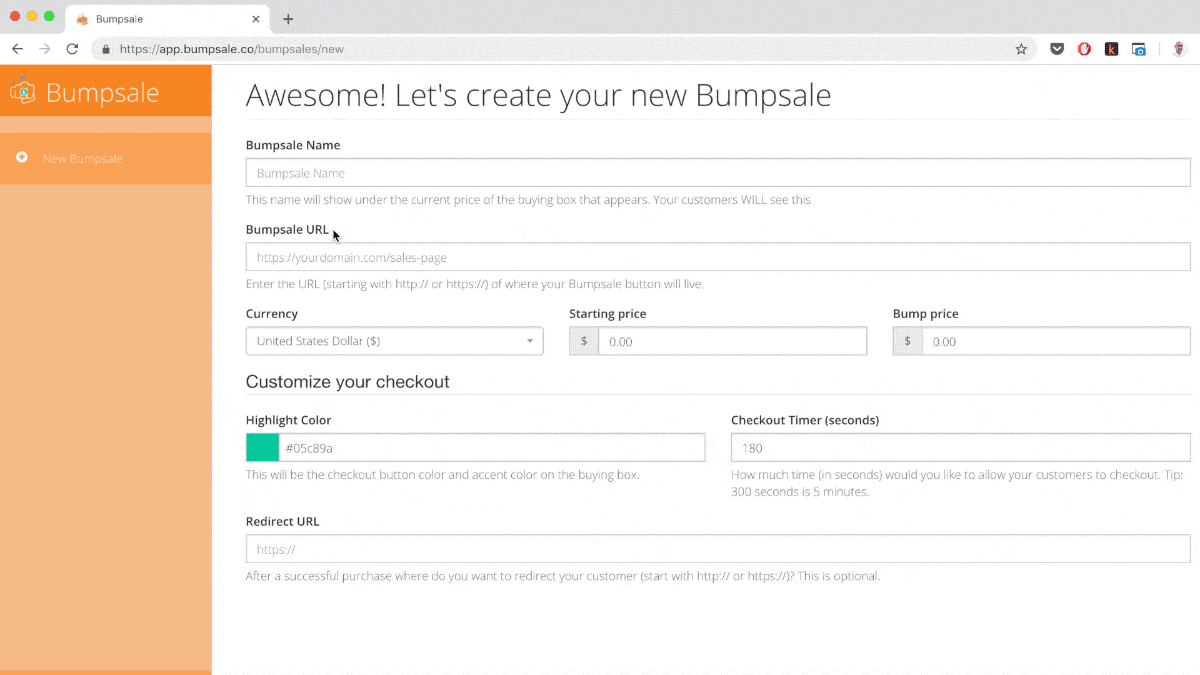
Step 3: Set your Bumpsale settings
Next up, you’re going to fill out a couple simple fields. You can ALWAYS edit this stuff later, even while a Bumpsale is active (so don’t worry about getting it perfect). These are the fields you’ll fill out:
Bumpsale Name (this shows on the purchase box that pops up for your customer)
Bumpsale URL (this is so we can help you later on in case you have any trouble)
Currency (135+ to choose from, the default is USD $)
Starting Price (whatever you want your Bumpsale to begin at)
Bump Price (how much your Bumpsale price should increase after each purchase)
Highlight Color (this is the button color and the purchase box accent color)
Checkout Timer (how long you want someone to lock in their price when they click the button to buy)
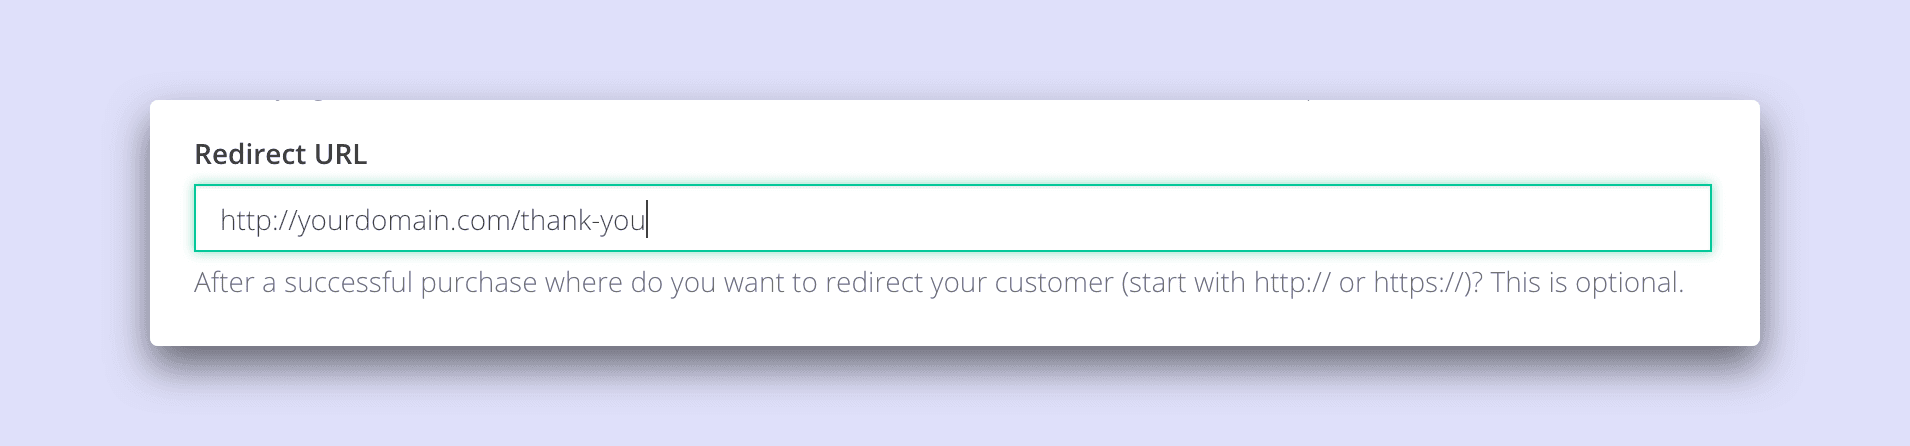
Redirect URL* (where should someone go after they complete their purchase)
*Setting your post-purchase redirect URL
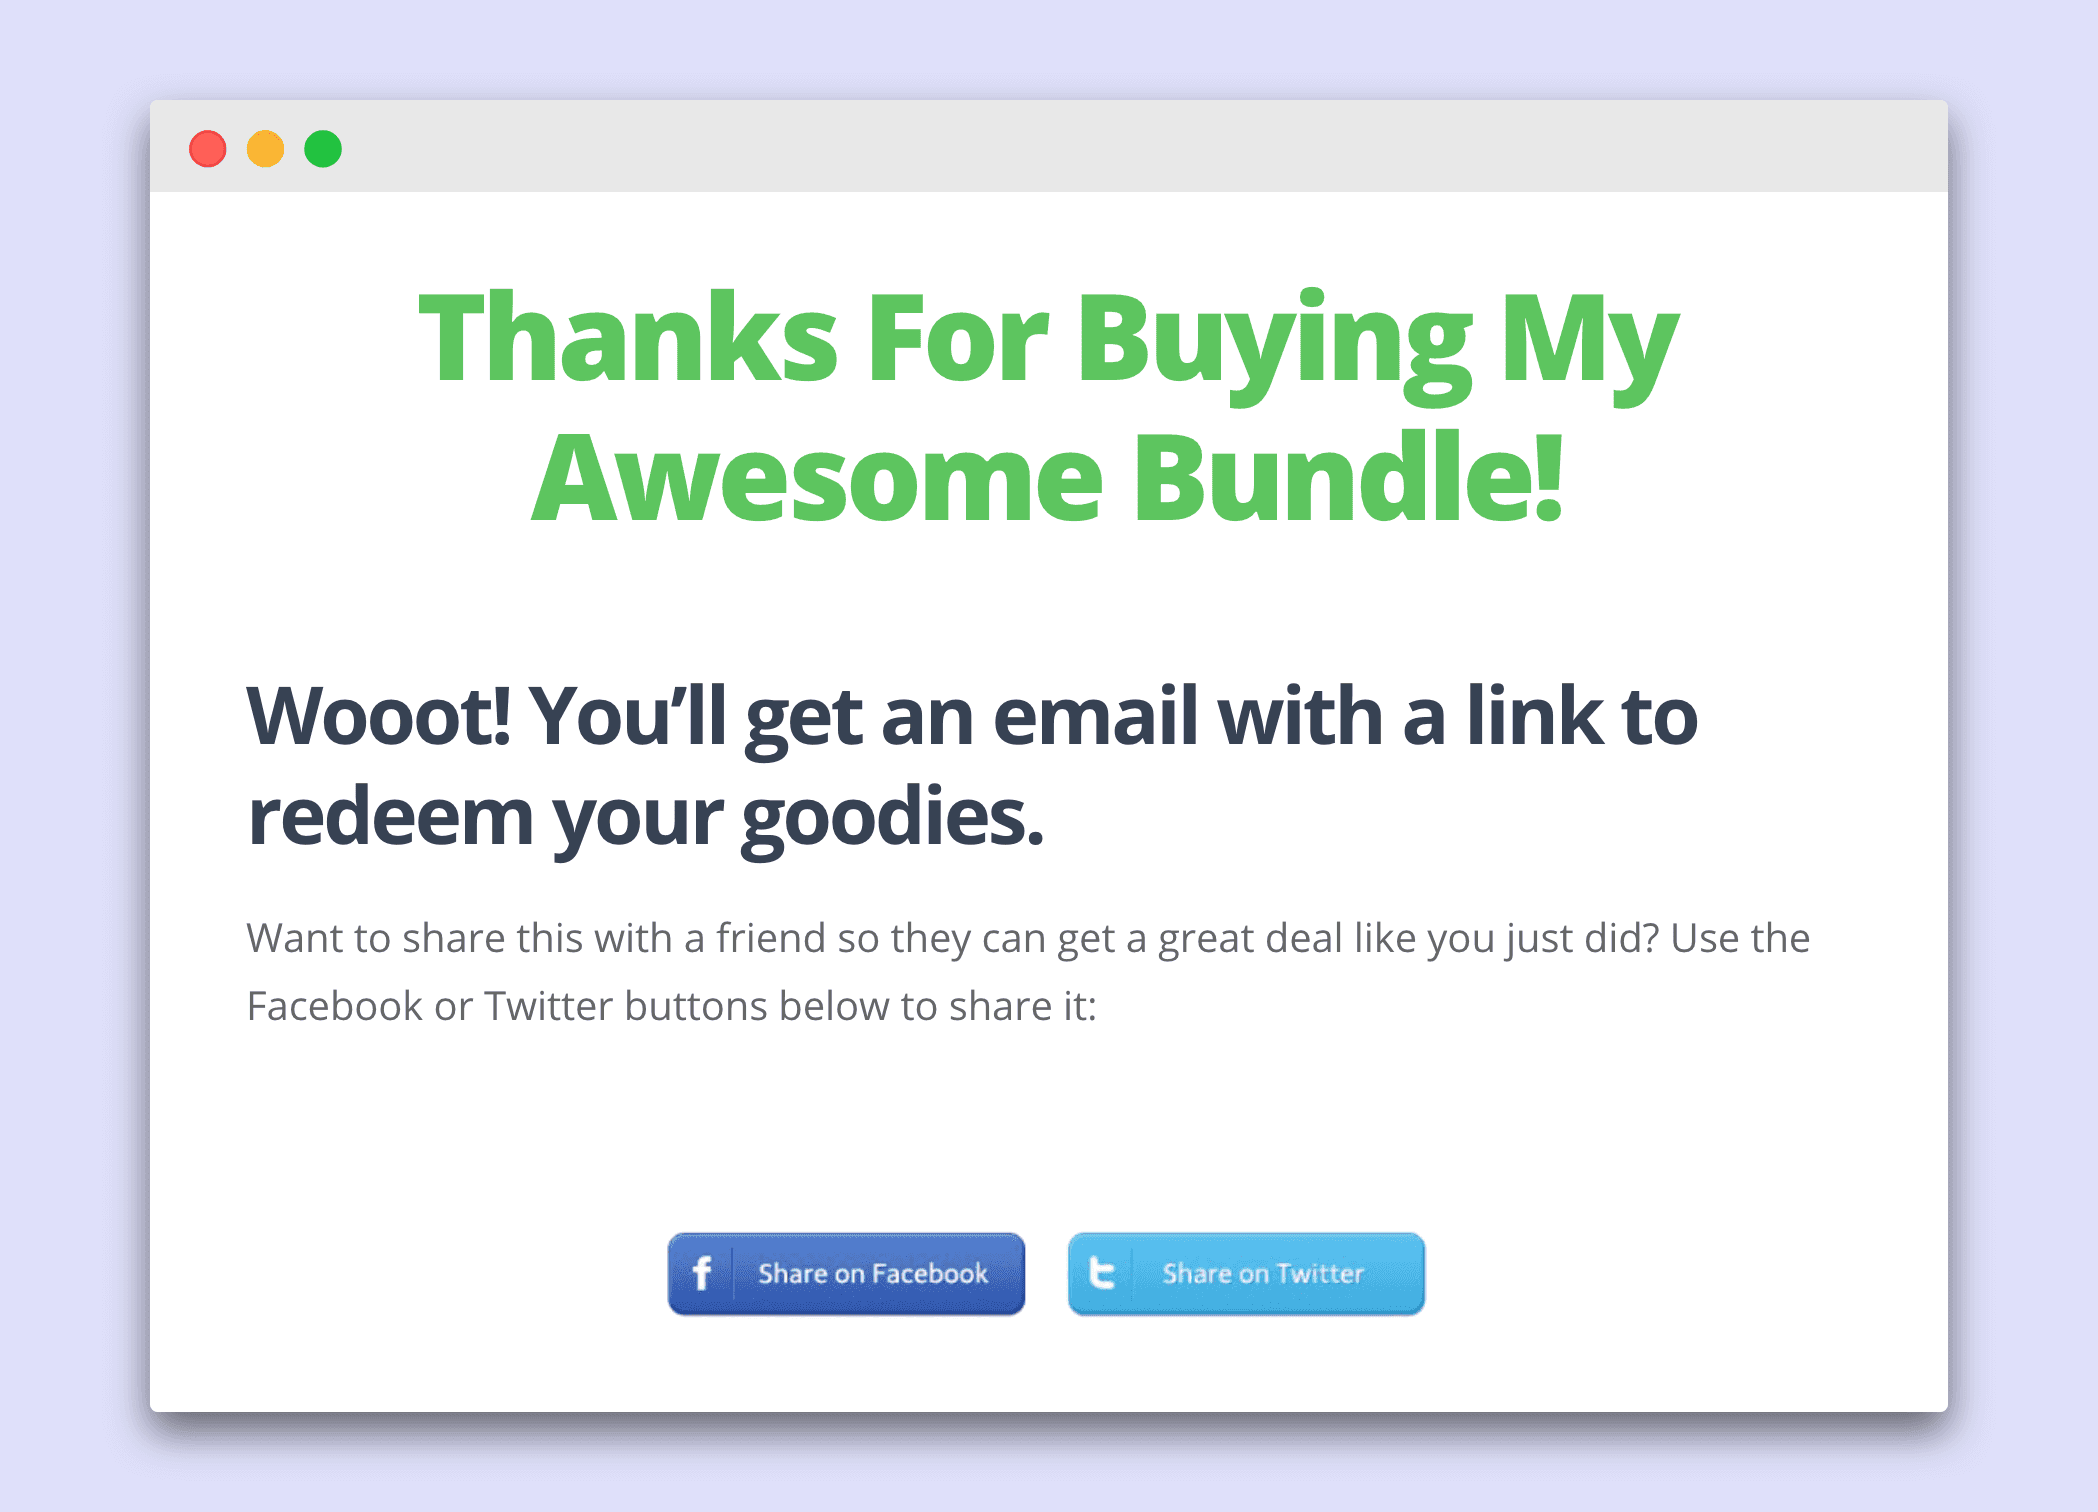
Where do you want your customer to go after they finish their purchase? You don’t want them to just land back on the sales page, that’s confusing. We recommend creating a Thank You page of some sort on your website and redirecting to that page. This gives your customer a great experience AND give you a chance to lead them to the next step in the process (if there is one).
Bonus Tip: Add a way for people to share after purchasing (aka: “social intent”)
Adding social intent on your thank you page is a great way to get someone to share your Bumpsale on Facebook or Twitter. You can use Share Link Generator to make the links, then just add those to friendly share icons on your thank you page.
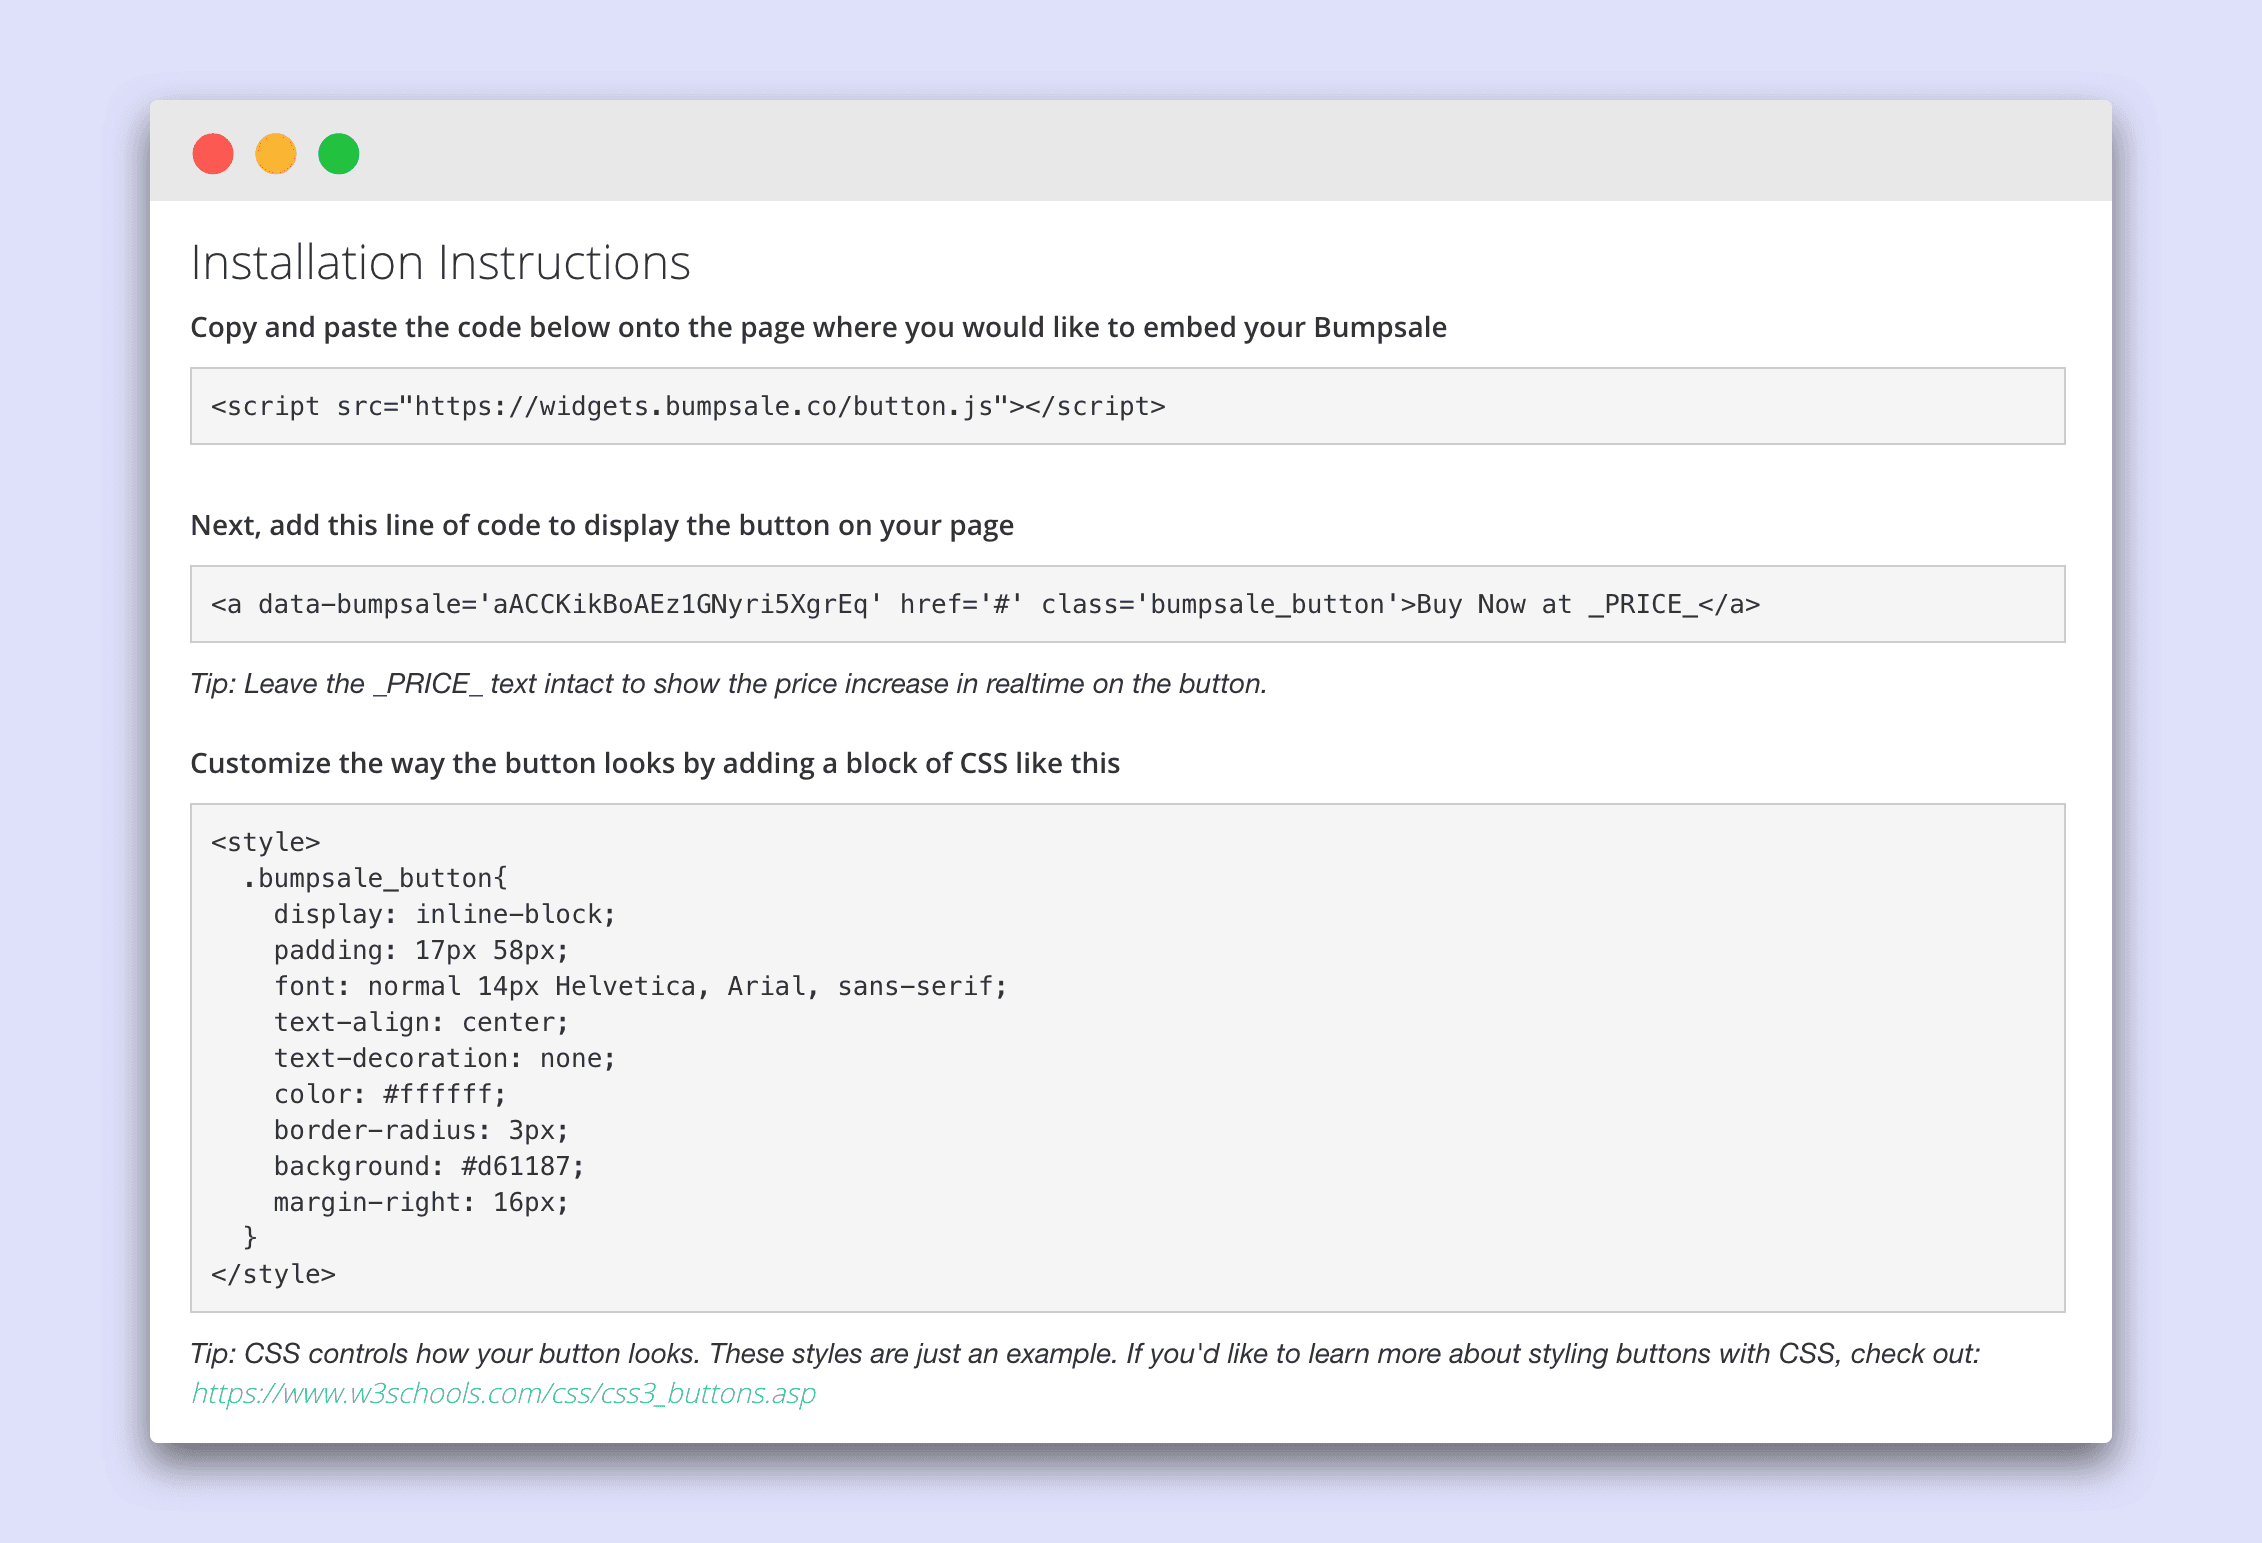
Step 4: Add the Bumpsale javascript and Bumpsale button code to your website
You’re almost done! Grab the little snippet of javascript code and add it wherever you add other custom scripts to your website (in WordPress this is probably in your header.php or footer.php, in Squarespace this is in your “Code Injection” area within Settings). Here’s a little example of adding it to WordPress.
Note on WordPress: You DO have to publish the WordPress page/post to see the Bumpsale code in action – it will NOT work in preview mode.
Step 5: Create any automations that need to happen post-purchase
Bumpsale is going to handle the purchase itself, but it’s on you to give your customer whatever they just bought from you. This could simply be having your redirection URL go to a page on your website with a promo code to use or a secret link to access your product/service.
We highly recommend using Zapier for digital products (redeeming courses, ebooks, etc): You will use your Stripe account as the first step in any Zapier Zaps (more below).
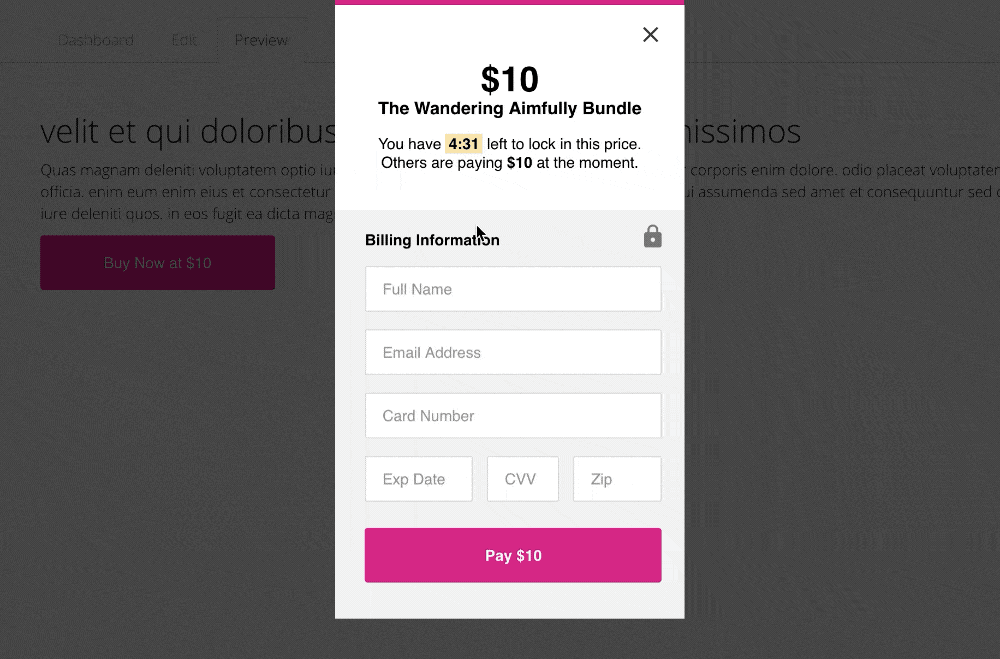
Step 6: Do a test purchase of your Bumpsale!
We cannot recommend this step enough. Use an Incognito Window in Google Chrome, or simply use an entirely new browser. This will give you the complete experience of viewing your sales page and your Bumpsale as a potential customer. Go through the entire buying process yourself and make sure everything works properly.
When you click the Bumpsale button, did it open the buying modal window?
When you filled out the buying form did it work?
When you finished your purchase, did you get redirected to the right URL?
On the page you were redirected to, does everything look correct? Did you add social intent? (You should!)
Check your email inbox, did you get a payment receipt for the purchase? (Reminder: You customize this receipt in your Stripe account settings)
Was any advanced stuff with Zapier supposed to happen? Did that work?
Go back to the sales page, did the price of the button bump up by the Bump Amount you set?
Step 7: Promote your sales page! You’re off to the races!
Huzzzzah! It’s time to get your Bumpsale out into the world and bringing money into your bank account. Feel free to check out our tips below on setting up a sales page and things that help land the sale.

(How you should feel after people buy your Bumpsale.)
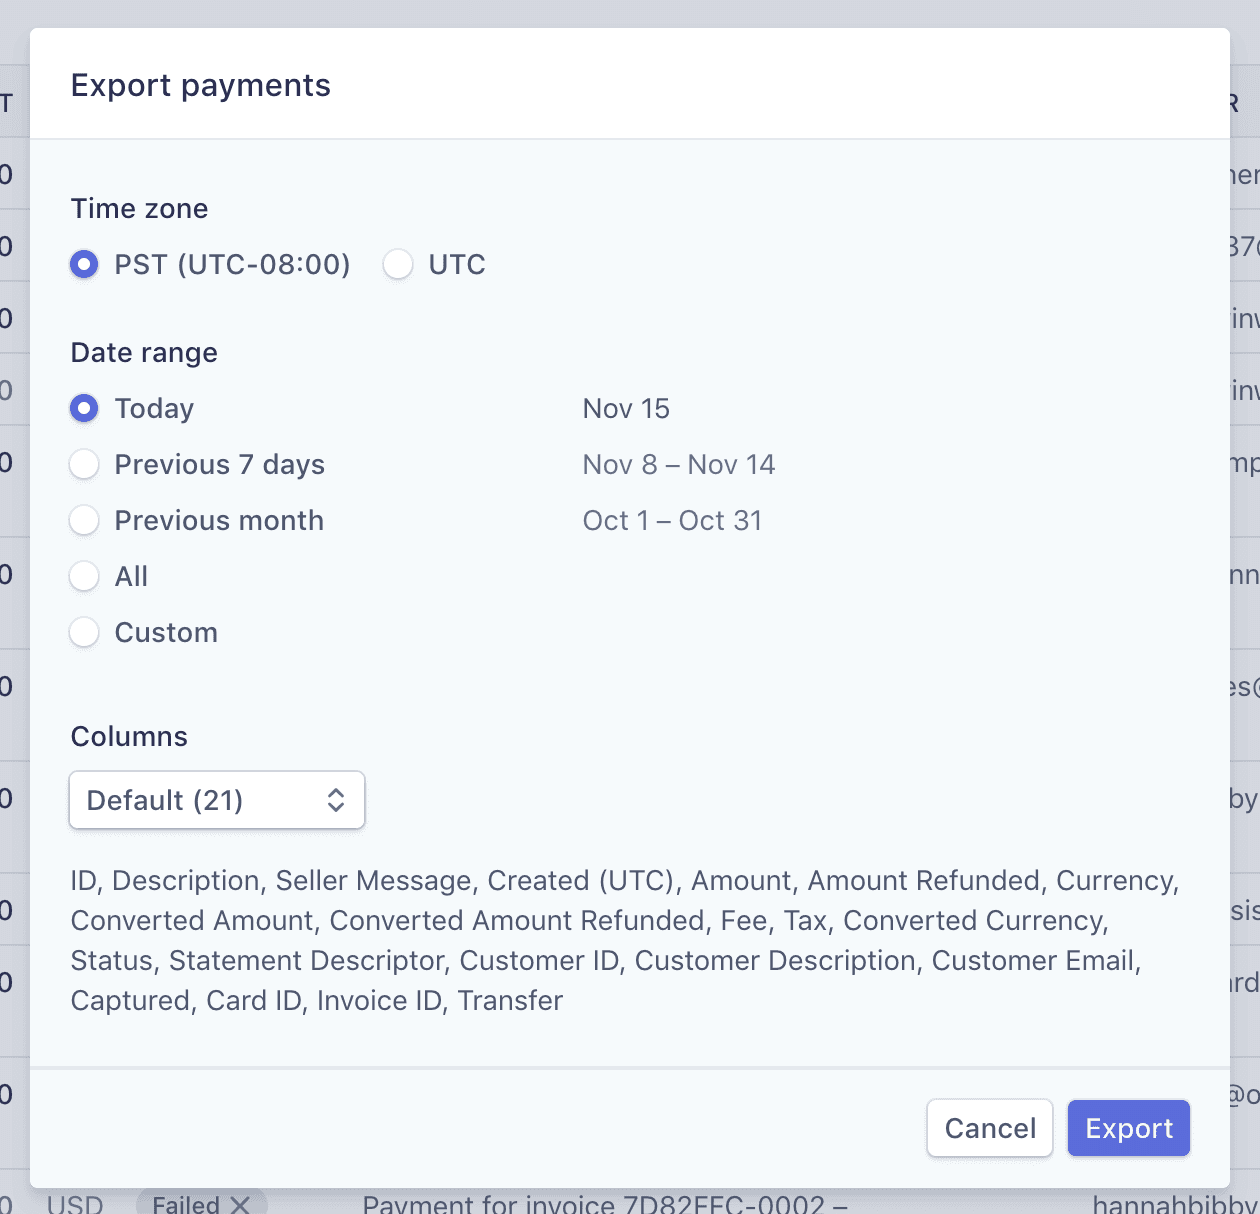
Step 8: How to get your customer email addresses after your Bumpsale is done?
This one is easy! All you need to do is log in to your Stripe account, navigate to the Payments area, and click the Export button. You’ll want to select the “Default” option and you’ll find all your customer emails in the resulting CSV.
Another option is to use Zapier to automatically send your customer emails from Stripe and add them wherever you want (more on this in the Zapier section below).
How To Warm Up Your Audience For Your Bumpsale
Warming up your audience for a Bumpsale is incredibly important. Did we mention that enough yet? It’s likely your audience has no clue what Bumpsale is, how it works, or why you’re even talking to them about it. That’s why you need to warm them up!
Feel free to copy, paste, and customize this text which helps explain how Bumpsale works (use this in emails and on your website near the Bumpsale button so it’s very clear how it works):
Hey there!
On [INSERT DATE] I’m doing something fun that I’ve never done before. I’m going to be offering [INSERT BUMPSALE PRODUCT OFFER] at a super discounted price, but with a twist!
Starting on [INSERT DATE AGAIN] at [INSERT TIME] I’ll be using something called “Bumpsale” to sell [OFFER NAME] starting at just [INSERT BUMPSALE START PRICE] and with every purchase, the price will bump [INSERT BUMP PRICE]. The earlier you purchase, the lower the price you’ll pay.
The total value of [OFFER NAME] is [TOTAL VALUE] so you’ll have the chance at snagging a crazy discount. This “Bumpsale” will only be available for [TIME AVAILABLE] so make sure to get ready as I won’t be doing this again for quite some time.
Keep your eye on your inbox for my next email that will have the link to purchase the [OFFER NAME]!
Here’s an example of how we explained a Bumpsale right on the sales page:
One thing to think about as well is your Bumpsale promotion schedule.
From personal experience running multiple Bumpsales, I’ve found that this schedule works really well:
Email #1: Announce the Bumpsale is coming (using the text above) a few days ahead of time
Email #2: Share the link to buy, with a clear explanation of what’s being offered, how great the discount is, and a reminder of how Bumpsale works
Email #3 (24 hours left): Remind people that the time to purchase is running out and remind them how great of a deal the Bumpsale still is*
Social media promo? If you’re promoting your Bumpsale on social media, feel free to give updates on a similar schedule!
*Recommendation: Take the current price of the Bumpsale and divide by the total value of what you’re selling. For example, if your Bumpsale is at $75 and the total value is $400 your customers are getting an 82% discount on the total price!
Bumpsale + Zapier Tips
This section is for you if you want to have some sort of automated event happen AFTER someone purchases your Bumpsale.
Example Zapier automation events:
You send a nice thank you email (or an email with a password to access resources)
You add their email address to your email provider (Mailchimp, etc)
You get a notification in Slack that someone purchased your Bumpsale
You automatically add their email into an online course and they get access
And so many other things!
If you’ve never used Zapier before, it’s incredibly powerful and really easy to use. There is a free account level, but I would recommend opting for the Professional ($49/month) level DURING a Bumpsale (you can downgrade immediately after your Bumpsale finishes). Using the Zapier Professional Plan, you take advantage of the 5 minute Zap runtime, which will give your customers a good experience. You absolutely do not have to use the $49/month plan, we just find it’s best experience for a customer.
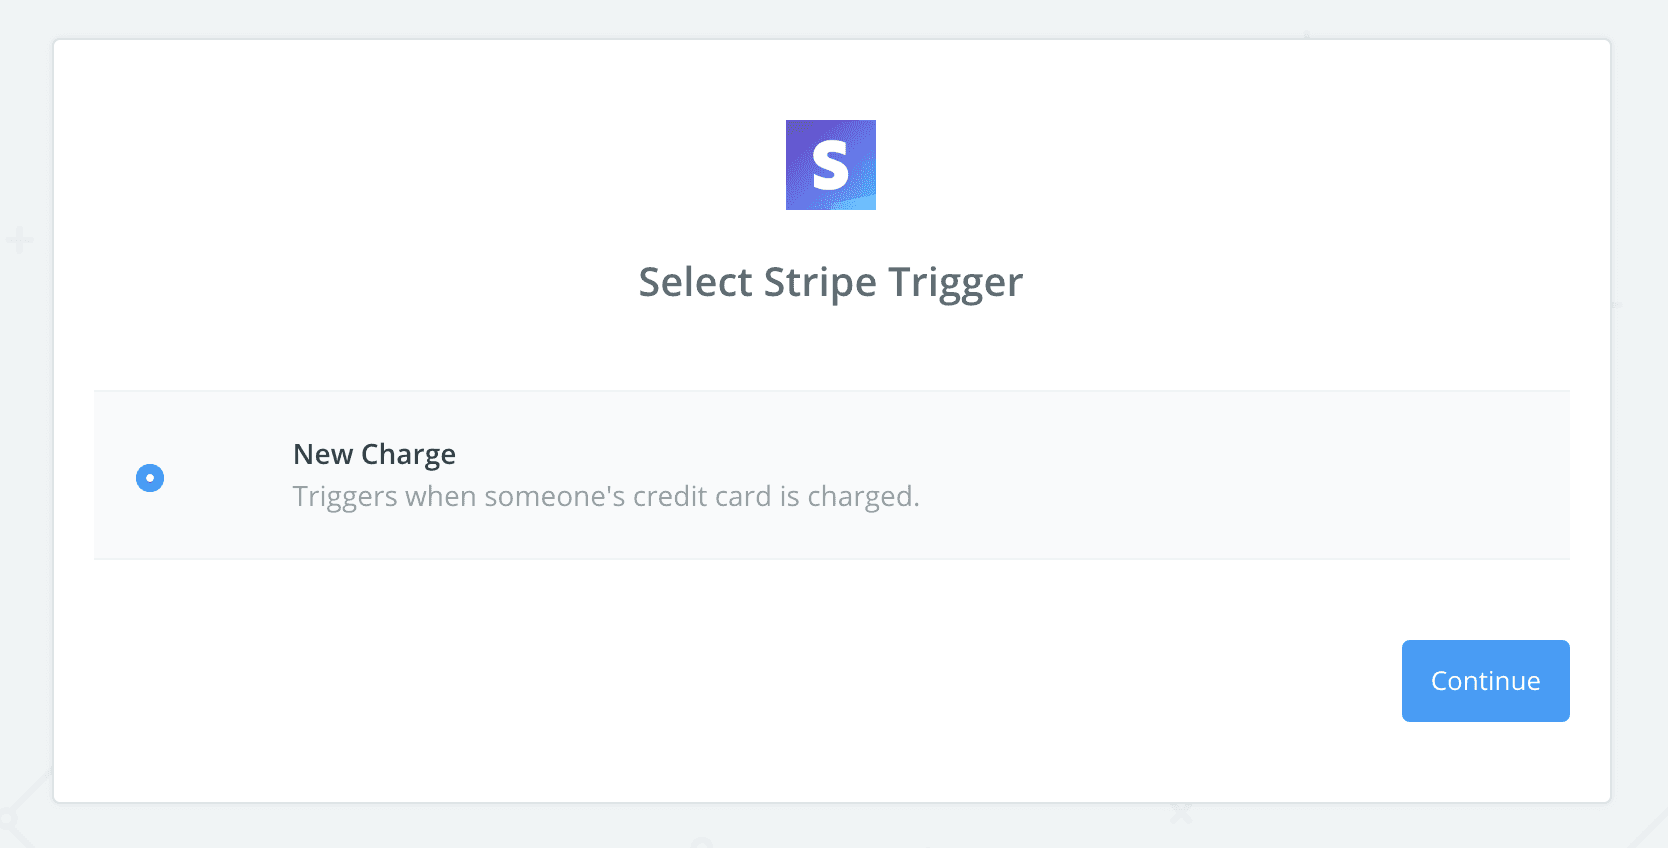
Setting up a Zapier Zap with Bumpsale (Stripe)
Bumpsale is NOT the first step in a Zapier Zap, that will be your Stripe account. After you follow the steps in the Zap creation process to connect your Stripe account to Zapier, you can choose from one of two triggers to use from Stripe:
New Charge (recommended!)
New Event
New Customer
NOTE: If you’re connecting a Stripe account to Bumpsale that has other purchases happening with it, you’ll need to use a Filter step in your Zapier Zap to look for the name of your Bumpsale in the purchase data. More on this in Zapier Tip #3.
Zapier Tip #1: Set your customer’s expectations (if using Zapier to trigger an action)
On the Thank You page, or wherever you redirect someone after a successful purchase of your Bumpsale, make sure you mention that it can take 5-15 minutes to receive whatever you’re triggering via Zapier (an email, etc).
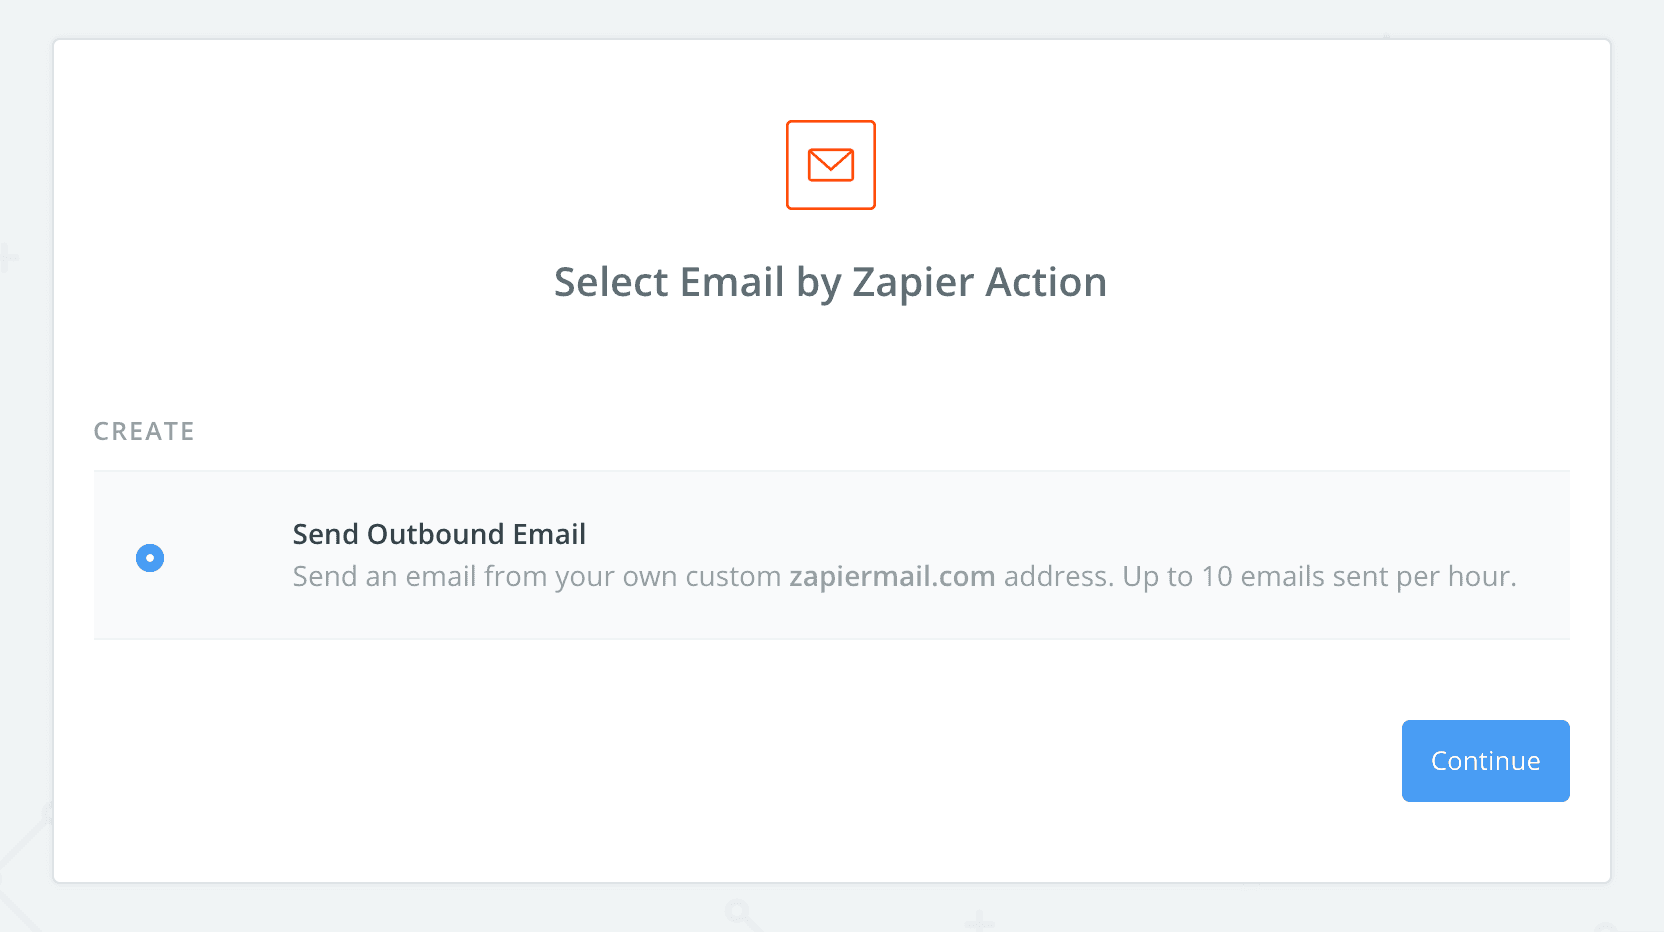
Zapier Tip #2: Send a thank you email via Zapier (using Email By Zapier)
One of the simple triggers after a successful purchase of your Bumpsale is to send an email using the Email By Zapier action. In this email you can add your product redemption itself (maybe a link to a page or a password), or you can simply say thank you and let the customer know what to expect next now that they’ve purchased.
Reminder: Stripe will send a receipt after purchase, so you do NOT need Zapier to send a receipt of any kind via email.
Heads-up: The “Email by Zapier” can only send 10 emails per hour (yep, 10). If you know you’ll have more than 10 sales per hour, you’ll want to use a different way to send an email. Maybe it’s a 1-email sequence people get added to in your Zap?
Zapier Tip #3: Use a filter if your Stripe account has other purchase activity going on
If you currently use your Stripe account to sell any other products at the same time you’ll be running your Bumpsale, you’ll need to use a Zapier Filter to make sure your Zaps only run when the Bumpsale is purchased (and not all products associated with your Stripe account).
After your Stripe account is connected, the Zapier Filter step will give you an option of Only continue if…
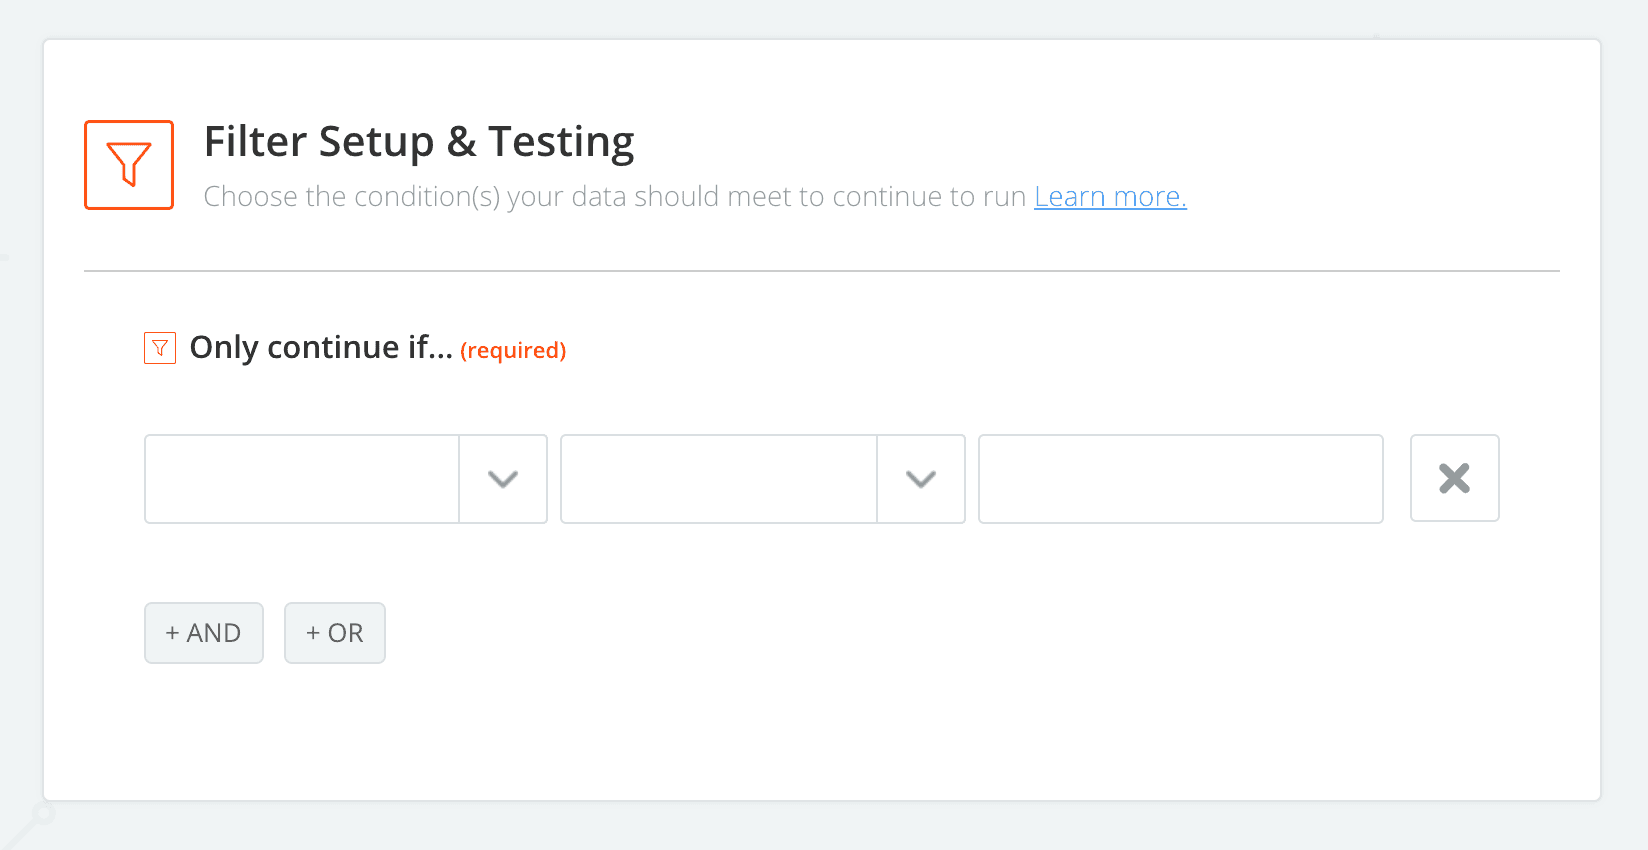
In the first input field, look for the entry that has the name of your Bumpsale.
In the second input field, select (Text) Exactly Matches.
In the final input field, type your Bumpsale name exactly as it’s named in Bumpsale.
This will ensure that every Stripe purchase Zapier sees associated with your Stripe account, the Zap will ONLY run if it meets the Filter requirement.
Important: If you’re only using your Stripe account for your Bumpsale you DO NOT need a Zapier Filter.
Zapier Tip #4: Add whatever steps you like to make your automated tasks happen!
The additional steps in your Zapier Zap will be up to your choosing. Again, you could add your Bumpsale customer to your email list, or immediately add them to your online course, etc.
You do NOT need to make multiple Zaps if you want multiple actions to happen after a Bumpsale purchase. In one single Zap, you can:
Send the Email by Zapier
Add your customer’s email address to your email list (ex: Mailchimp)
Add your customer to your online course
Send yourself a Slack notification of a new purchase (this is just fun!)
All of those would be Actions within the one Zap you create. Yay, you!
Final Zapier Tip: Make sure your Zaps are turned ON!
You’ll want to double-check that your completed Zaps are turned on and ready to go. You can triple-check this by completing a real purchase of your Bumpsale and seeing if the Zap fires in your Zap History. Remember, it can take 5-15 minutes depending on whatever Zapier pricing plan you chose.
Last But Not Least, Frequently Asked Bumpsale Questions (FABQ)
👉 How come multiple people can pay the same price if it’s increasing after each purchase?
If you have a large audience, odds are you will get a handful of people who pay the exact same price for your Bumpsale. I’ve had this happen multiple times and it’s simply a byproduct of having a larger, engaged audience (that’s a great problem to have!)
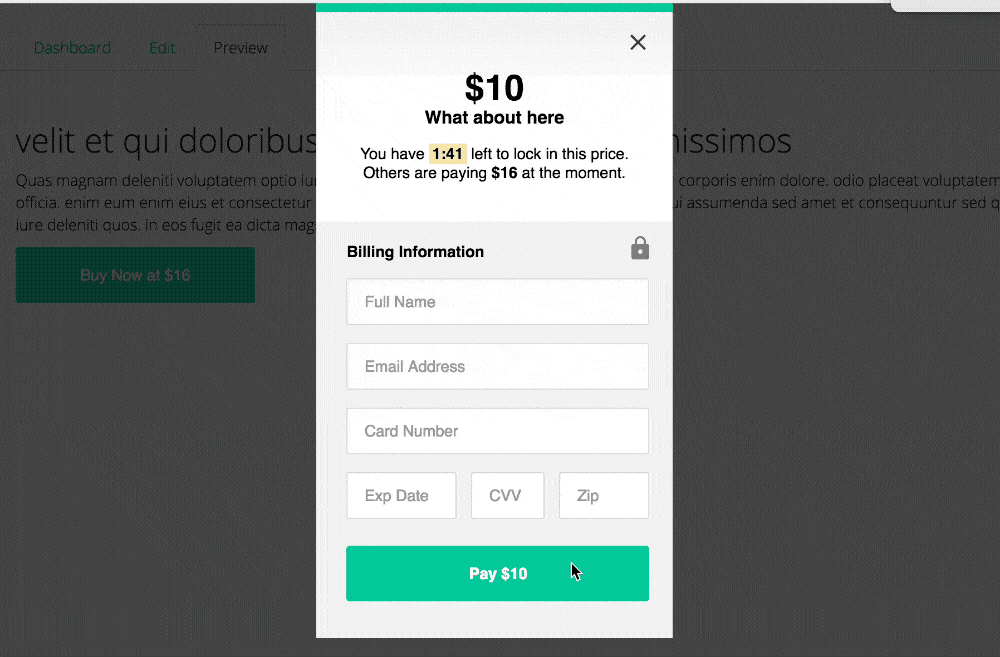
Your Bumpsale button will automatically bump the price as insanely fast as possible after a purchase happens. But… if someone clicked the Bumpsale button and they’re looking at the purchase pop up window, that customer’s price is locked in until the Bumpsale timer expires.
Even if you have multiple customers pay the same price, Bumpsale will keep track and update the button with EACH purchase (regardless if the same price was paid or not). Example: If your Bumpsale button is at $20 and 5 people click it at the exact same time before another purchase happens, each time one of those 5 customers completes their purchase the Bumpsale button on your sales page will increase based on your bump price setting.
We do NOT recommend setting the Bumpsale timer to anything less than 180 seconds. It can take a minute or two for people to fill out their payment information. You’d rather have happy paying customers, than angry customers who had a buying window close on them and they missed out on the price they were looking at.
👉 Does Bumpsale create my sales page for me?
Nope. Bumpsale is just the button and the purchasing mechanism. You’ll need to create your own sales page and add the Bumpsale javascript and Bumpsale button code to your own website.
👉 I’m not a CSS expert, do I have to use the CSS provided in the Bumpsale installation instructions?
We would highly recommend at the very least copying + pasting our Bumpsale CSS and adding it to your website. Otherwise, your Bumpsale button is going to look pretty crappy. Odds are you know someone who knows CSS and they’d be willing to help you for the price of a beer or cup of coffee.
👉 Does Bumpsale bring customers to my sales page?
We wish! You bring the customers to your Bumpsale. I’ve personally seen amazing results using the social intent on a thank you page after a Bumpsale purchase. Don’t be shy in asking someone who just bought from you to share that they purchased (because hey, how the heck often do you run a Bumpsale??)
👉 Can a Bumpsale button expire after a certain number of purchases or certain amount of time?
It cannot. While Bumpsale is smart, you’ll have to be the one to turn it off. And by turn it off, we simply recommend removing the button itself from your sales page. There is nothing that needs to be done in Bumpsale itself to “end” a Bumpsale.
👉 Why only Stripe? Why not PayPal?
Guh, PayPal just sucks. It’s an awful experience. For years we’ve tried to get PayPal added and it’s a huge thorn in our side. Eventually, we’ll support PayPal, but Stripe makes everything sooooo smooth and simple.
👉 How long should I run my Bumpsale for?
Again, we recommend a shorter time period for your Bumpsale. Anything over one week is pretty long and the urgency built into using Bumpsale kind of wears off. We recommend running a Bumpsale for a minimum of 24 hours and a maximum of 5 days. But hey, if you want to use it for longer than that, it’s completely up to you!

Join 12,000+ intentional business owners and get our Growing Steady newsletter every Monday where we share transparently about the latest projects we’re working on. You'll also get our Calm Creator Canva Whiteboard as a free download!