


If you want a sure way to feel less overwhelmed and more focused in your work life, it’s time to declutter your digital life.
Whether we realize it or not, digital clutter takes just as much of a mental toll on us (if not more given how immersed we are in it day in and day out) than physical clutter. And while I may love a good messy desk, creative chaos abounding, I’ve learned that I do NOT have the mental energy to withstand rogue files on my desktop, mountains of email subscriptions that go un-opened, and useless apps clogging up my hard drive. My anxiety simply can’t handle it.
That’s why I’ve compiled a list of 12 ways to declutter, streamline, and clear out the various digital pipes of my business below. If you’re an online business owner (or, heck, really anyone that uses a computer!), I hope this list will prove helpful for you in creating a clean slate to start off the year right come January.
Doing this type of regular check-up on your digital life will hopefully contribute to less overwhelm in general and a more restful state in general.
And hey, if it’s a little too daunting to take all of these on at once, well as of today you’ve still got 20 days left until January 1st. Try tackling just one of these a day for the next 12 days and you’ll be all spick and span before 2016 hits!
1. Organize Your Files
This one shouldn’t come as a surprise, but if you spend hours a day on your laptop like I do, it’s crucial to your sanity that you’re able to find what you’re looking for fast AND that you don’t have file pile-ups clogging up your machine’s memory. (Believe me, I’ve been working on a project at the 11th hour and suddenly I have ZERO disk space and everything starts crashing. It’s not a fun game to play!) To avoid all that, here are a couple tips for cleaning up and organizing your files.
Create a naming convention for your most-used files and folders.
I recently learned this trick from my roommate Julia Roy, but did you know that you can use special characters to sequentially organize your folders? (This is on Mac, not sure about PC!)
Yep, you can include special characters like _, -, <, (, [, and / at the beginning of your folder names to control which rise to the top of your finder window (when sorted by “name”) and which fall below. Finder will prioritize them based on the order I listed above. I use this to my advantage by placing the name of my current project folders in parentheses, placing my secondary folders (things I use often but not every day) in brackets, and then my lesser used “archive” folders with a / in front.
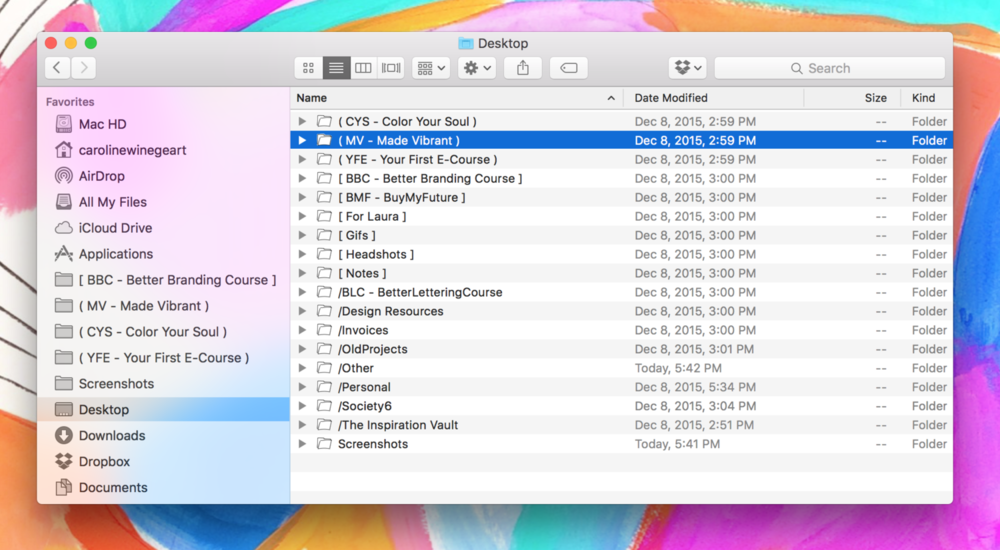
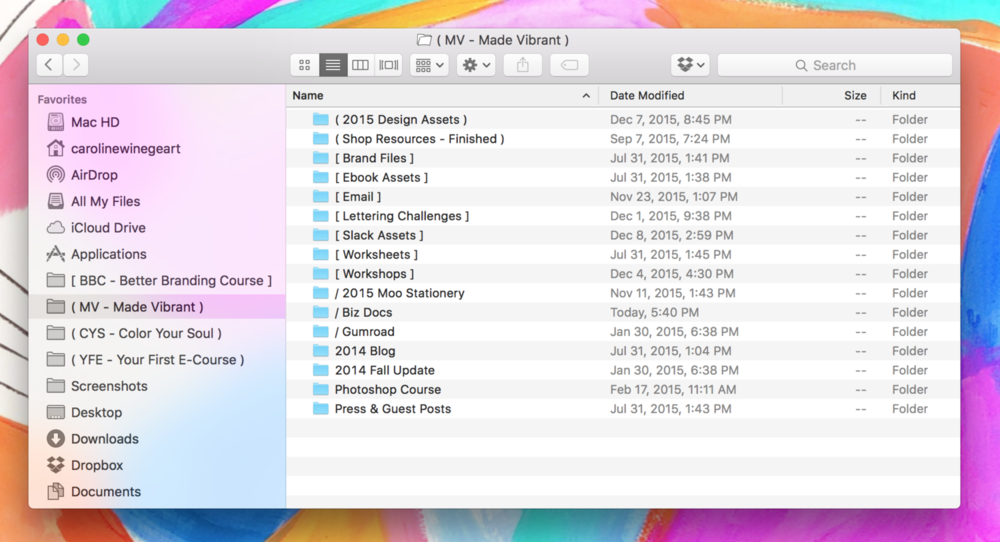
I not only use this to organize my Desktop but I do the same thing within each folder.
And don’t forget you can drag and drop your most used folders to your Favorites in the sidebar of your Finder window! That comes in handy for me quite a bit!
Regardless of whether you take advantage of the special characters or not, the important part is just that you come up with a system so that when you do create new files, you know where to put them and when you go to look for files, you can navigate to them without frustration.
As you go through your files, I recommend creating one “Master Archive” folder of things that you want to keep on an external hard drive but that you don’t need in your day-to-day business operations.
Which leads me to the next step…
Back up your computer and archive outdated files!
Once your files are organized and you know which ones you don’t need daily moving forward into 2016, I recommend backing up your hard drive onto an external hard drive (if you’re not familiar, think basically a USB drive on steroids!)
I recently invested in a more slim and portable drive via Amazon. My old one weighed several pounds and had to be plugged into the wall! How antiquated! 😉 I’ve been really happy with it so far because I can actually keep it in my tote and keep it on me if needed. If you’re in the market for one, the one I have is the Seagate Backup Plus Slim 2TB Portable External Hard Drive (aff link).
Once you backup to your drive using Time Machine, you can trash the Master Archive folder from your active Desktop because you’ll always be able to access the files within it on your external hard drive if you need to.
If you’re feeling EXTRA zesty and really want to boost the performance of your computer, you can do what I did and you can restore your Mac to its factory settings — after you back up, of course.
I followed the steps in this article, which basically wipes your hard drive, allows you to reinstall OSX and then you can pull over your necessary files from your backup that you intend to use daily.
**Warning: Be careful though! If you choose to do this you’ll have to reinstall any paid applications from the Mac app store and you’ll lose all of your custom preferences/settings. You’ll also have to re-login in to any of your saved accounts like social media, web apps and banking portals. **
Still, for me I was able to free up about 150 GB of available storage by doing this which has definitely sped up the processing speed of things quite a bit. Plus it’s nice to feel like you’re starting the year off with a brand new computer!
Okay, now that you’re hard drive is clean, you want to make sure it stays that way…
Keep your screenshots off your Desktop.
This may not apply to everyone, but I’m an absolute nut when it comes to using my ⌘+SHIFT+4 Mac shortcut to save screenshots, and because the default location for screenshots is the Desktop, inevitably I end up with a Finder window that looks like this:
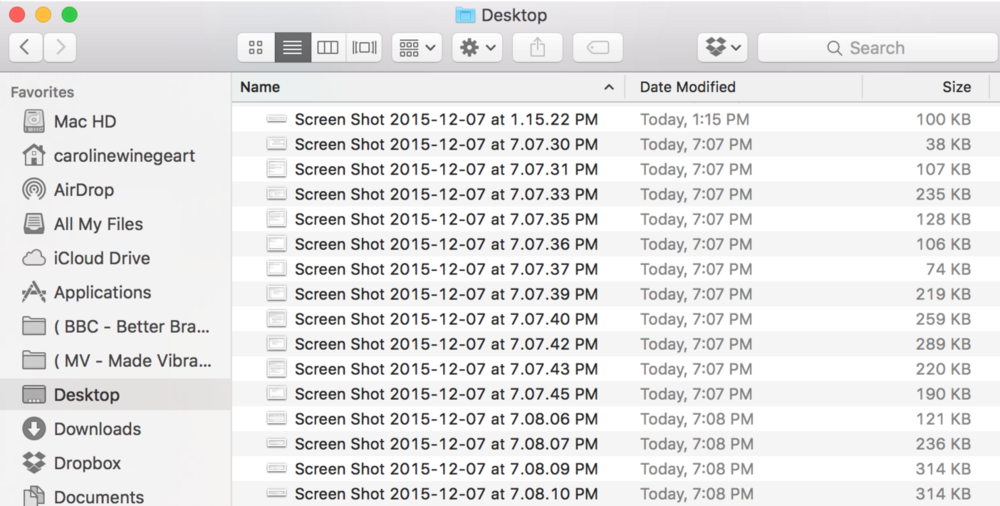
As Jimmy Fallon would say, “EW!!” Not exactly the easiest way to find anything!
A while back I was fed up with all of this gibberish staring at me from my finder window so I searched for a way to send them straight to a folder on my Desktop instead. (At least that way I could sort through them regularly and they wouldn’t clog up my pretty desktop wallpaper!)
That’s when I found this article, How to Change the Screenshot Save Folder on Your Mac, and it worked perfectly! It’s a little scary at first because you have to open the program “Terminal” on your Mac that looks veeerrry technical, but I promise if you just follow the simple instructions you’ll be fine.
And now my laptop background looks like this, with all my screenshots being saved to one “Screenshots” folder:
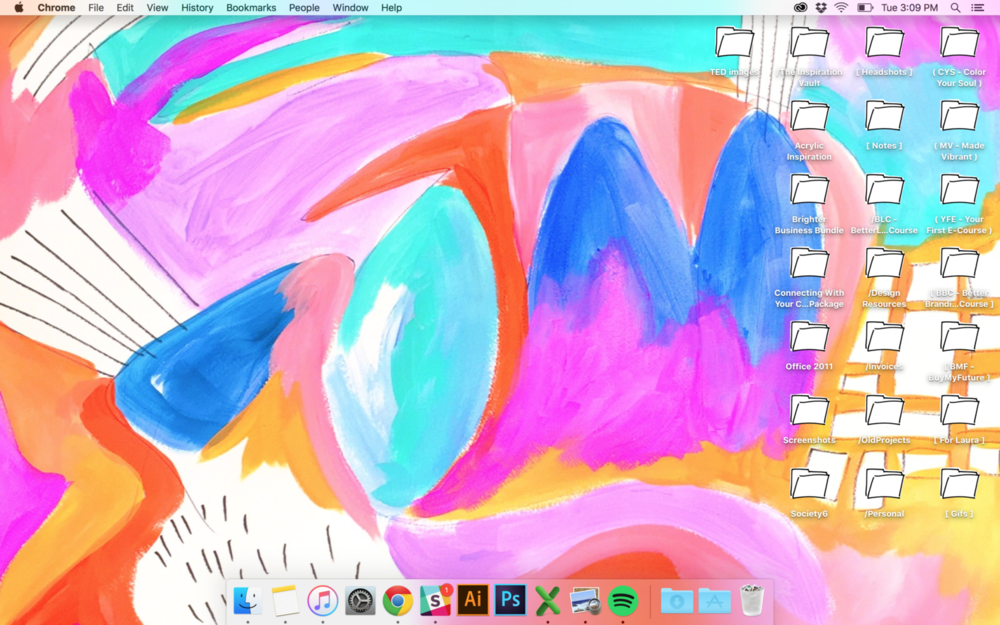
Ahh yes, that’s much better.
Now that the place is all tidied, you can also put a few easy processes in place to make sure it stays that way!
Create recurring reminders on your calendar to keep the place cleaned up.
To make sure that your digital home stays this organized all year round, use your calendar or project management software to leave you regular reminders.
Once a week I… clean up my desktop and empty my trash can.
Every two weeks I… empty my downloads folder.
Every month I… reassess my folder prioritization and backup my hard drive.
I use recurring tasks through Asana (or you can use Google Cal) and it only takes me a few seconds but it keeps me sane!
2. Update Your Browser Configuration
Now that your file structure is streamlined and your machine is hopefully moving at the speed of light, let’s talk about your browser (where I’m guessing you spend most of your time when you’re on your computer). Here are a few items to help you bring your browser into the new year.
Make sure your browser is up to date.
I use Chrome because I’m a Google nerd and I love using Chrome extensions, but regardless of what browser you choose, take a few moments to make sure you’re using the latest version of the browser. This will ensure you have the latest design features, functionality and security updates. Chrome updates automatically for me so if that isn’t a default setting for you, now would be a good time to make that change so you don’t have to worry about staying up to date in the future.
Clean up your bookmarks and bookmarks bar.
Am I the only one that has wildly outdated bookmarks? I mean, I hadn’t updated those puppies for YEARS before just recently. I guess before Evernote or Pocket I pretty much used my bookmarks as a “save for later” app and things apparently got out of hand.
If you’re like me, I recommend going through them, tossing the ones you haven’t had a second thought about since you saved them, and then keeping just your most-visited work-related sites to your bookmarks bar. Right now for me that’s basically just Made Vibrant, Asana and Mailchimp. It’s nice not to have 14 different links staring at me from the top of my browser (especially since I’m a recovering tab-aholic and it’s usually crowded enough up there!)
One thing I want to note: If you do end up restoring your computer to its factory settings like I mentioned above, you can carry over your newly-overhauled Chrome bookmarks by exporting them and re-importing them once your machine is restored to brand new.
To Export, simply click the Chrome menu , select Bookmarks > Bookmark Manager, click the “Organize” menu in the manager, and select Export bookmarks. That will save your bookmarks as an HTML file that you’ll just make sure you carry over with your files to your new Desktop.
To Import the HTML file and restore your bookmarks once you’ve restored your computer, click the Chrome menu , select Bookmarks > Import Bookmarks and Settings. Select the HTML file that contains the bookmarks you’d like to import, click Import and click Done. Then you’re all set!
Pro-tip: try leaving social media sites OUT of your bookmarks bar. The less easy it is to get to them, the less time you risk wasting during the day while trying to be productive.
Take a look at your browser extensions/apps/add-ons.
There are a few Chrome extensions that I love and use (WhatFont?, Eye Dropper) but over the course of a year I tend to accumulate some that are completely worthless and just taking up wasted space. If that’s the case, now’s the time to kick those puppies to the curb! Visit your browser settings and disable or delete those that you aren’t using.
Make your default web page a useful one.
For a few months now, my default home page used to be Panda which was a pretty cool service that would deliver articles and Dribbble shots specifically for designers. It was awesome for a while because it was a constant source of inspiration every time I opened a new web page BUT I found it more distracting than inspiring.
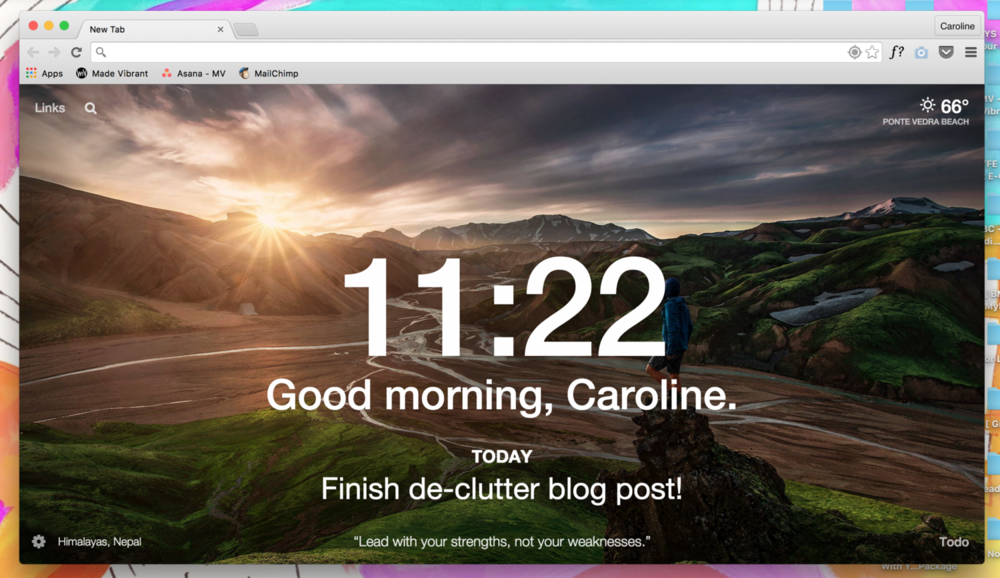
Recently I switched over to a Chrome Extension called Momentum (another great recommendation from my roommates Julia and Clay) which basically sets your home page as a clock, a beautiful photo and one intention that you can set for the day. That way your most important to-do is front and center reminding you to stay on task! Just click the link above to sign up and it will update your settings for you.
That’s it for your browser! While we’re on the subject of web-based de-cluttering, let’s tackle some of those cloud-based files!
3. Clean Up Your Cloud Storage
If you’re running an online business, especially one where you’re collaborating with other people, my bet is that you are using one or more cloud-based storage solution like Dropbox or Google Drive. If that’s the case, you’ll want to make sure those file structures are getting some attention just like your desktop files.
Organize Dropbox and assess your Selective Sync.
One feature of Dropbox that I find especially useful is the ability to drag and drop files using their integration with my finder window. However, did you know that if you sync your Dropbox folder to your desktop that essentially you’re creating copies of those files and storing them on your machine (which pretty much defeats the purpose of housing files on Dropbox anyway!)
To avoid this, there is a way to sync your Dropbox to your machine and then edit your Selective Sync settings so that only certain folders are available to you through finder.
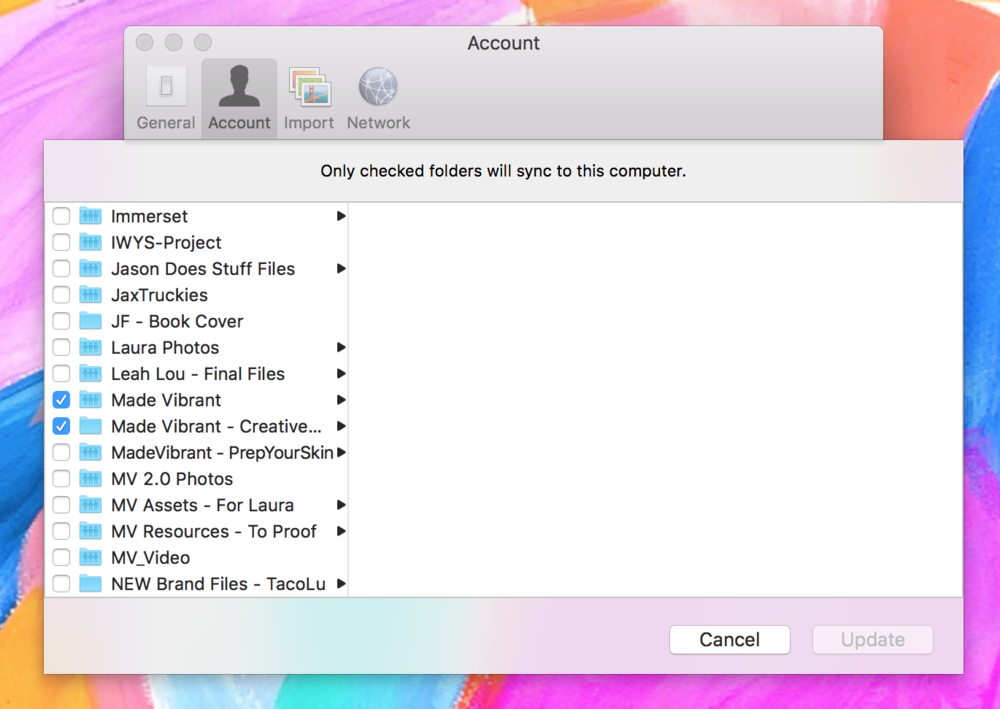
To do this, simply visit your Dropbox settings from the application in your toolbar, click on Account, and select Change Settings… next to Selective Sync (see below).

This will pull up a list of your Dropbox folders and you can simply uncheck the folders you DON’T want to sync to your desktop. This comes in handy if you want to host things like large video files or even design files that you want access to but don’t want them hogging up space on your hard drive.
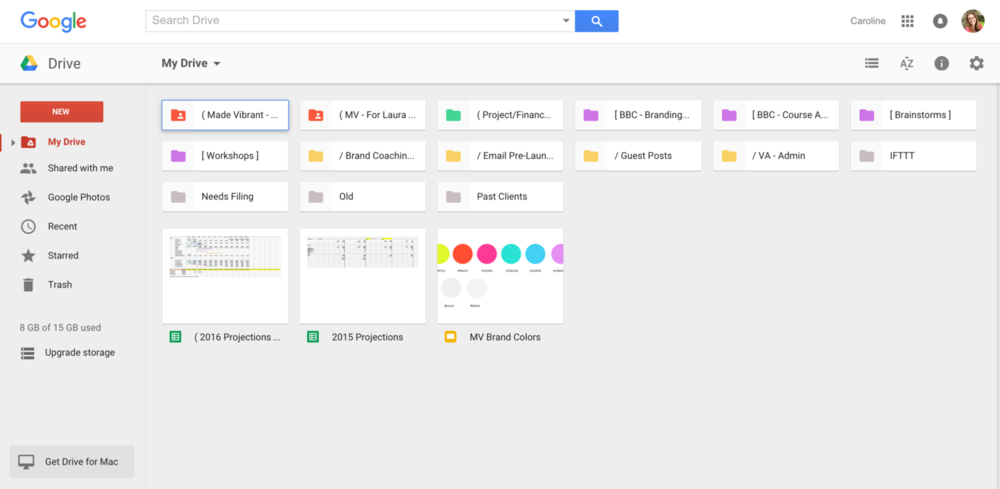
Delete unused Google Drive documents and file the rest.
I use Google Drive a TON, not just for collaborative documents with my assistant, Laura, but for brainstorming and project planning as well. Over the course of the year there are blog post drafts that never get completed, spreadsheets that go unused and random shared documents that pile up.
That’s why I go through and consolidate relevant documents into folders, deleting any documents that got started but are no longer useful. I also use the same special character filing system I use for my desktop files to order the files for easy navigation. And of course, utilizing fun bright colors to codify my primary, secondary and tertiary folders is a must!
4. Perform A Website Audit
As online business owners, our websites are arguably our most valuable brand asset, so making sure they are up-to-date and reflect the latest, greatest version of whatever’s going on in your business is key!
If you’re like me and you’re creating new products or writing blog posts often, you want to make sure the back-end of your site isn’t causing you all sorts of mental anguish.
Delete incomplete and abandoned pages.

Do you have pages of your website you’ve created but never fully finished? Maybe it’s a landing page for a product you never released or a portfolio project you wanted to update but never did?
Well, I’m notorious for this. I have about 35 pages in the back-end of my site and about ⅔ of those are hidden/incomplete/abandoned. (I mean, just take a peek to the right — all the light gray pages are ones that aren’t live.)
So many of them are for ideas that I never brought to life and then I just let them sit there in my Squarespace dashboard collecting dust and cluttering up my brain every time I do update a live page. But not anymore!
Before the beginning of the year, I’ve set aside one day where I plan to go through each one, deleting those that will never see the light of day and fully finishing those I want to push live but I abandoned for lack of time or focus.
Go through each live page of your site and update any images or text.
I know for a fact there are pages on my site that link to old products or say “new to the shop” for products I released months ago. When it’s just you or a small team, it’s hard to find time to make all those tiny updates along the way. (And, to be honest, you’re looking at your website every single day and you kind of become blind to those glaring out-dated items.)

Umm…. I guess four months after the launch, the Resource Shop is no longer the “NEW” resource shop anymore, right? 🙂 This image is going to get updated STAT!
However, I really want to enter next year with a site that’s completely up to date and that promotes my latest, greatest projects. By going through each page and swapping out more up-to-date images/copy, you can make sure your website feels current and relevant for readers that have been around for years and new ones that arrive to your site each day.
So, for each page of your site ask yourself: Is this easy to navigate? Does it lead someone through the information I want them to know? Are there any calls to action or images that need to be updated?
And then refresh accordingly!
5. Tidy Up Your Inbox And Email Settings
Yes, we’ve arrived at the dreaded inbox! I’ll be honest with you guys, emails can be the bane of my existence. Not because I don’t love getting email — I do! Especially from readers and community members because that’s where I really get to know you guys and connect in a meaningful way.
My biggest problem with email is that, until recently, I had never developed a solid system for managing incoming messages and trying to respond to them. Without any sort of protocol, it’s all too easy to let messages slip right through the cracks and then suddenly they’re piling up on you and you find yourself avoiding your inbox at all costs like you would the dark and crowded attic.
Develop a system for organizing incoming messages.
Before we clear out the cobwebs, I’ll give you the basic rundown of how I organize my inbox and mark incoming messages. Everyone’s email tendencies will probably vary, so I recommend structuring your inbox according to what your bad email habits are. Here’s what I mean by that:

My worst email habit used to be opening a message, realizing I didn’t have the time or focus to respond right then, but not doing anything to mark that message for later. Since the message was now “read,” it would just get buried among everything else, never to see the light of day again. Not good.
But now, with my email flagging system, if there’s something I need to respond to but don’t have the time at that moment, I can simply assign a colored flag to it which let’s me know it needs a response and what level of priority it is. Messages that require a timely response OR that contain revenue-dependent opportunities (ie. the chance to make the biz money) get responded to first. Then, every week I have a set time that I try to solely focus on responding to the remaining flagged emails from that week. It’s not a perfect system, but it definitely keeps me sane and I no longer dread opening up my inbox.
To set up your own flag system in Gmail, visit your General Settings and drag which flags you want to use to the “In use” section. Here’s how I set up my flags. Blue is top priority (because the worst feeling is finding a message months old that could have made your business money!); purple is secondary and tells me the response has some sort of time component or time limit on it; and orange is still important, reminding me to respond, but doesn’t necessarily have a time component to it. This system helps me prioritize my time and when I do make time to respond to emails I know exactly what to tackle first.
I also have my inbox customized into sections to keep things sorted. Here’s what that looks like:
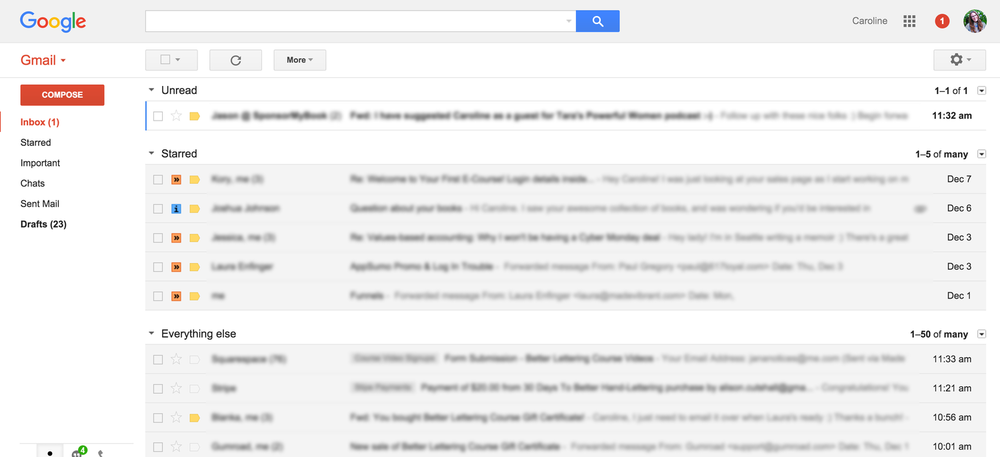
Messages obviously start out in the “unread” section and once I’ve seen them they get three treatments: (1) Archive immediately; (2) Flag for response; (3) Read with no need to respond.
Flagged emails get moved to the “Starred” section which is grouped and visible, keeping it top of mind that I need to respond.
All of this doesn’t guarantee I respond to every message (though I try!) but it does keep my brain from exploding, something that’s super helpful.
Delete abandoned drafts.
Similar to the abandoned pages, you don’t want messages you started but never sent clogging up your sidebar or lingering out there. Even if you consider them “out of sight, out of mind,” I guarantee you’ll feel better knowing you don’t have any of those outstanding. It’ll feel good to start the year off with no task left undone!
You can see above I have 23 lingering drafts which I intend to go through, making sure there aren’t any messages I meant to send that never got out, and then trashing the rest.
6. Trim Down Your Content Subscriptions
While we’re on the subject of email, this seems like a great time to mention one of the most gratifying de-cluttering practices: paring down your email and blog feed subscriptions!
Unsubscribe from newsletters you no longer find valuable.
There’s nothing worse than waking up to an inbox that’s already clogged up in the morning, not from eager customers or collaborators or your BFF, Oprah, asking you to be a guest on Super Soul Sunday.
Nope, instead it’s just pointless sales emails from that one place you downloaded something from that ONE TIME and you continue to archive their messages week after week instead of simply just unsubscribing. No more, my friend!
Instead, use a service like Unroll.me, which connects to your email and allows you to easily bulk unsubscribe to those you no longer wish to receive and “roll up” the rest into one handy newsletter email instead of a bajillion individual ones.

My Unroll.me “rollup” where I can see my retail subscriptions at a glance.
*Note: I use this tool for retail subscriptions only. Weekly newsletters from my favorite peeps like BrainPickings.org, Jamie from Spruce Rd., Paul Jarvis, and that handsome fella, Jason Zook, I keep happily in my inbox so I know I won’t miss them.
I would also encourage you to take this time to evaluate which newsletters you open week after week but that actually might be negatively impacting your business.
I went through a phase earlier this year where I wanted to keep an eye on what everyone else was doing with their creative businesses. Without realizing it, all this led me to do was question my own decisions, compare myself to others, and spin my wheels with self-doubt. The best decision I made was to unsubscribe from almost every one of them — not because I didn’t enjoy what they were doing or because I didn’t support them — just because I needed less noise in order to hear my intuition more clearly when it came to running my business. I encourage you to take a hard look at your newsletter subscriptions and do the same!
Speaking of playing the comparison game, that also goes for blog feed subscriptions like Feedly and Bloglovin…
Clean up your blog subscriptions.
I actually don’t use Feedly or Bloglovin’ anymore for the exact reasons I outlined above. They put me into consumption mode vs. creation mode and I’ve learned that’s not always conducive to my ability to stay true to my voice.
Still, I don’t think there’s anything wrong with following blogs that you love (Hellerrrr, that’s hopefully why you’re here!), I just believe in doing it more intentionally. So maybe instead of those 50 biz blogs you follow, you could pare it down to your top 5 instead and that will allow you to start off the year without drowning in a sea of other people’s content.
Feeling overwhelmed with where to start? Don’t forget there’s a handy dandy checklist you can download at the end of this post to tackle each item one by one!
7. Streamline Your Mailing Lists
Now that you’ve cleaned up your inbox, you want to make sure you’re not dirtying up anyone else’s!
Hopefully you already know how important having an email list is to the growth of your online business (if not, start here!), but if you’re a little bit further along in the life of your business, you may be at the point where you’re juggling multiple lists or list segments.
Consider segmenting your lists based on behavior/topic interests.
People who signed up for this live workshop or that pre-launch list or downloaded that product, etc. It’s enough to make a person go CRAZY at times. Still, I believe that the engagement of your community relies on how relevant and valuable the information you send them is, so it might be a good time to evaluate who’s on your list, how they go there, and find out what information they’re interested in. Admittedly, this is something I’m still very much working on learning more about. If you have any great resources, please link to them in the comments!
Purge your list of dormant subscribers.
When I see blog posts touting the importance of email lists, more often than not it’s about how to grow the size of your email list. And while I realize that’s important (you want to bring new people into your community, of course), what’s not being talked about enough is how to ensure that your list stays lean and full of high-quality subscribers. After all, if you have over a certain number of subscribers, you’re likely paying a service like Mailchimp or ConvertKit and that means that the person who stays on your list but doesn’t open your emails week after week is actually costing your business money.
That’s why now might be a good time to delete “dormant” subscribers. I recently removed about 400 people from my own list and boosted my average open rate by nearly 5%, which tells me that the people I’m paying for are those actively engaged people that open my emails week after week.
To purge dormant subscribers in Mailchimp, I simply created a segment of subscribers who signed up in 2014 (so, almost over a year old) and haven’t opened the past 20 newsletters. That likely pertains to people who found Made Vibrant early on but have moved on and no longer are engaged. (From your Dashboard, select Lists > choose your list > Manage subscribers > Segments > Create New Segment.)
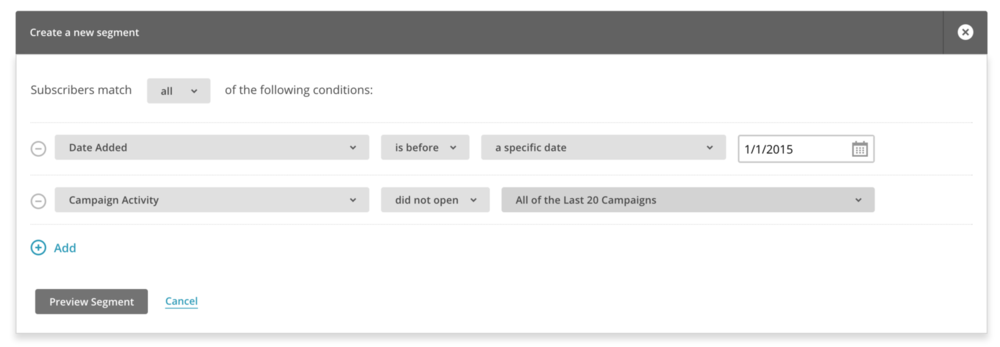
I sent that segment this email asking them to click on a link (which would indicate to me that they’re still interested). Anyone who did not click (or did not open after one week) I deleted from my list. That way I can ensure that everyone who’s signed up for Self-Made Society truly wants to be getting my emails.
8. Evaluate Your Monthly Subscription Costs
Just as it’s easy to forget you’re paying for dormant email subscribers, sometimes it’s easy to forget about all those smaller monthly subscriptions you’ve paid for to run your business.
I’ve just recently put on my big girl pants and hired a bookkeeper to help keep an eye on the business finances, but if it’s just you trying to keep costs down for your online business, taking a look at these recurring payments is a must!
Cancel subscriptions you no longer need or change your pricing tier accordingly.
Maybe you don’t need that analytics software you tried out for $9.99/month and can finally cancel. OR maybe you’ve realized that you love using Squarespace and now you can pay for the next year in advance (instead of monthly) to take advantage of the cost savings. Either way, set aside time to make some of these financial decisions so you know you’re operating your business with as little monthly expenditures as possible.
9. Delete Unused Apps
I won’t lie to you, the home screen of my iPhone is typically a HOT MESS. I download new apps to try them out but then forget to delete the ones that don’t make the cut. Once they’re all jumbled up, I just get used to the habit of searching for things and I forget to organize them!
Arrange your home screen and remove unwanted apps.
There are a million different ways to organize your home screen and I think everyone’s different (similar to email preferences), but the point is just that you take time to intentionally organize your apps, and remove those that no longer serve you.
I also took the opportunity to finally go into my notification settings and remove badge notifications from all my apps so I no longer get those pesky red numbers staring me in the face. Here’s an article on Mashable with some clever ways to organize your apps on your phone if you’re looking for some suggestions.
Here’s the before and after of my own tidy up! Now I can actually see my wallpaper and I don’t have a heart attack when I open up my phone. Hooray for that!

This also goes for any apps on your computer that you no longer use! Hopefully you’ve already taken care of that with your file clean up earlier in this post!
10. Consolidate Your Notes & Saved Articles
You never know when inspiration will strike! That’s why I’ve got pages of haphazard notes started on my phone, random text documents saved on my desktop and rogue articles I stumbled across months ago hiding in the catacombs of my Pocket. If any of those “brilliant” ideas have a hope of turning into something, now’s as good a time as any to sort through them.
Organize your saved content/visual bookmarking.
There are a dizzying number of visual bookmarking tools like Evernote, Pocket, and Stache, just to name a few. The key I think is to pick one you enjoy and to stick with it.
I love Pocket personally and I use the Chrome extension a ton, but I’m TERRIBLE with utilizing tags to keep things organized. I mean, just look, you’ve got Amy Schumer and a Photoshop tutorial in the same breath:

To fully utilize this awesome tool, I’ll be doing a refresh on my tags so I can keep things well organized, and so that when I’m working on a project and need to look for that article or video I saw forever ago, that I’ll know where to look!
Clear out your Notes & Voice Memos.
It could be a random idea for a blog post or a particular turn of phrase that pops into my head but I’m always writing down “Notes” in my phone. Usually I’m terrified that the idea is going to leave me so I don’t waste time searching for the right place to put it, I just start a new note. The result is a list of things that looks like this ->
What does it all mean?!
I figure it can’t hurt to go through and see if there’s anything worth salvaging here. The rest has got to go!
11. Curate Your Social Feeds
Trim down who you’re following to get better content.
Similar to what we talked about in the email subscription section, I think it’s important to regularly assess not just who you’re following but how they make you feel.
Are the people in your feeds Negative Nancy’s or are they positive people that share inspiring content? Are you following too many people that share a similar craft and does it lead you to compare yourself to them? Or are you simply following too many people and you can’t get value from those connections because your feeds are so noisy.
Whatever the case may be, try going through each platform you use and think about how your experience might be improved by further curating down the people you follow.
12. Update Your Project Management System
I have to admit, for the first year and a half of owning my business, my idea of “project management” was pretty much a hacked together system of Google Docs and calendar alerts.
It wasn’t until I brought on the amazing, incredible, gift-of-a-human-being, Laura, as my creative assistant back in September that I realized we might need an actual software solution to manage our projects and collaborate on the twelve thousand things going on at once here at Made Vibrant.
After a few months of experimenting with different apps/systems, Laura introduced me to Asana which has been an absolute game-changer for me when it comes to feeling organized.
We now have every piece of Made Vibrant separated into “Projects” within Asana and each project has tasks/subtasks that we can communicate on and work together on accordingly:

Archive old projects and prioritize current projects.
Whether you use Asana, seen above, or you use something like Trello or Basecamp, it’s a good idea to go through and retire projects that are complete. Also, you can look to the future and start prioritizing projects for the upcoming year. I always find it really helpful to start a spreadsheet with anticipated projects, general time periods of when I plan to work on them and revenue projections. It helps me feel organized and prepared as I enter the new business year.

Things always shift and move around but I find it immensely helpful to have this “year-at-a-glance” to refer back to. Jason and I share this sheet so we can see any opportunities to collaborate and our general household cashflow for the year.
Once that’s taken care of, you should hopefully be feeling refreshed and digitally organized! I truly believe that with how much time we spend around technology — especially as online business owners — these things have a tangible impact on our anxiety levels and overall happiness. When you know your digital life is intentionally organized, you can focus on creating or traveling or doing whatever makes you feel like the brightest version of yourself.